User Manual
Startup Panels
1. Authorization Panel
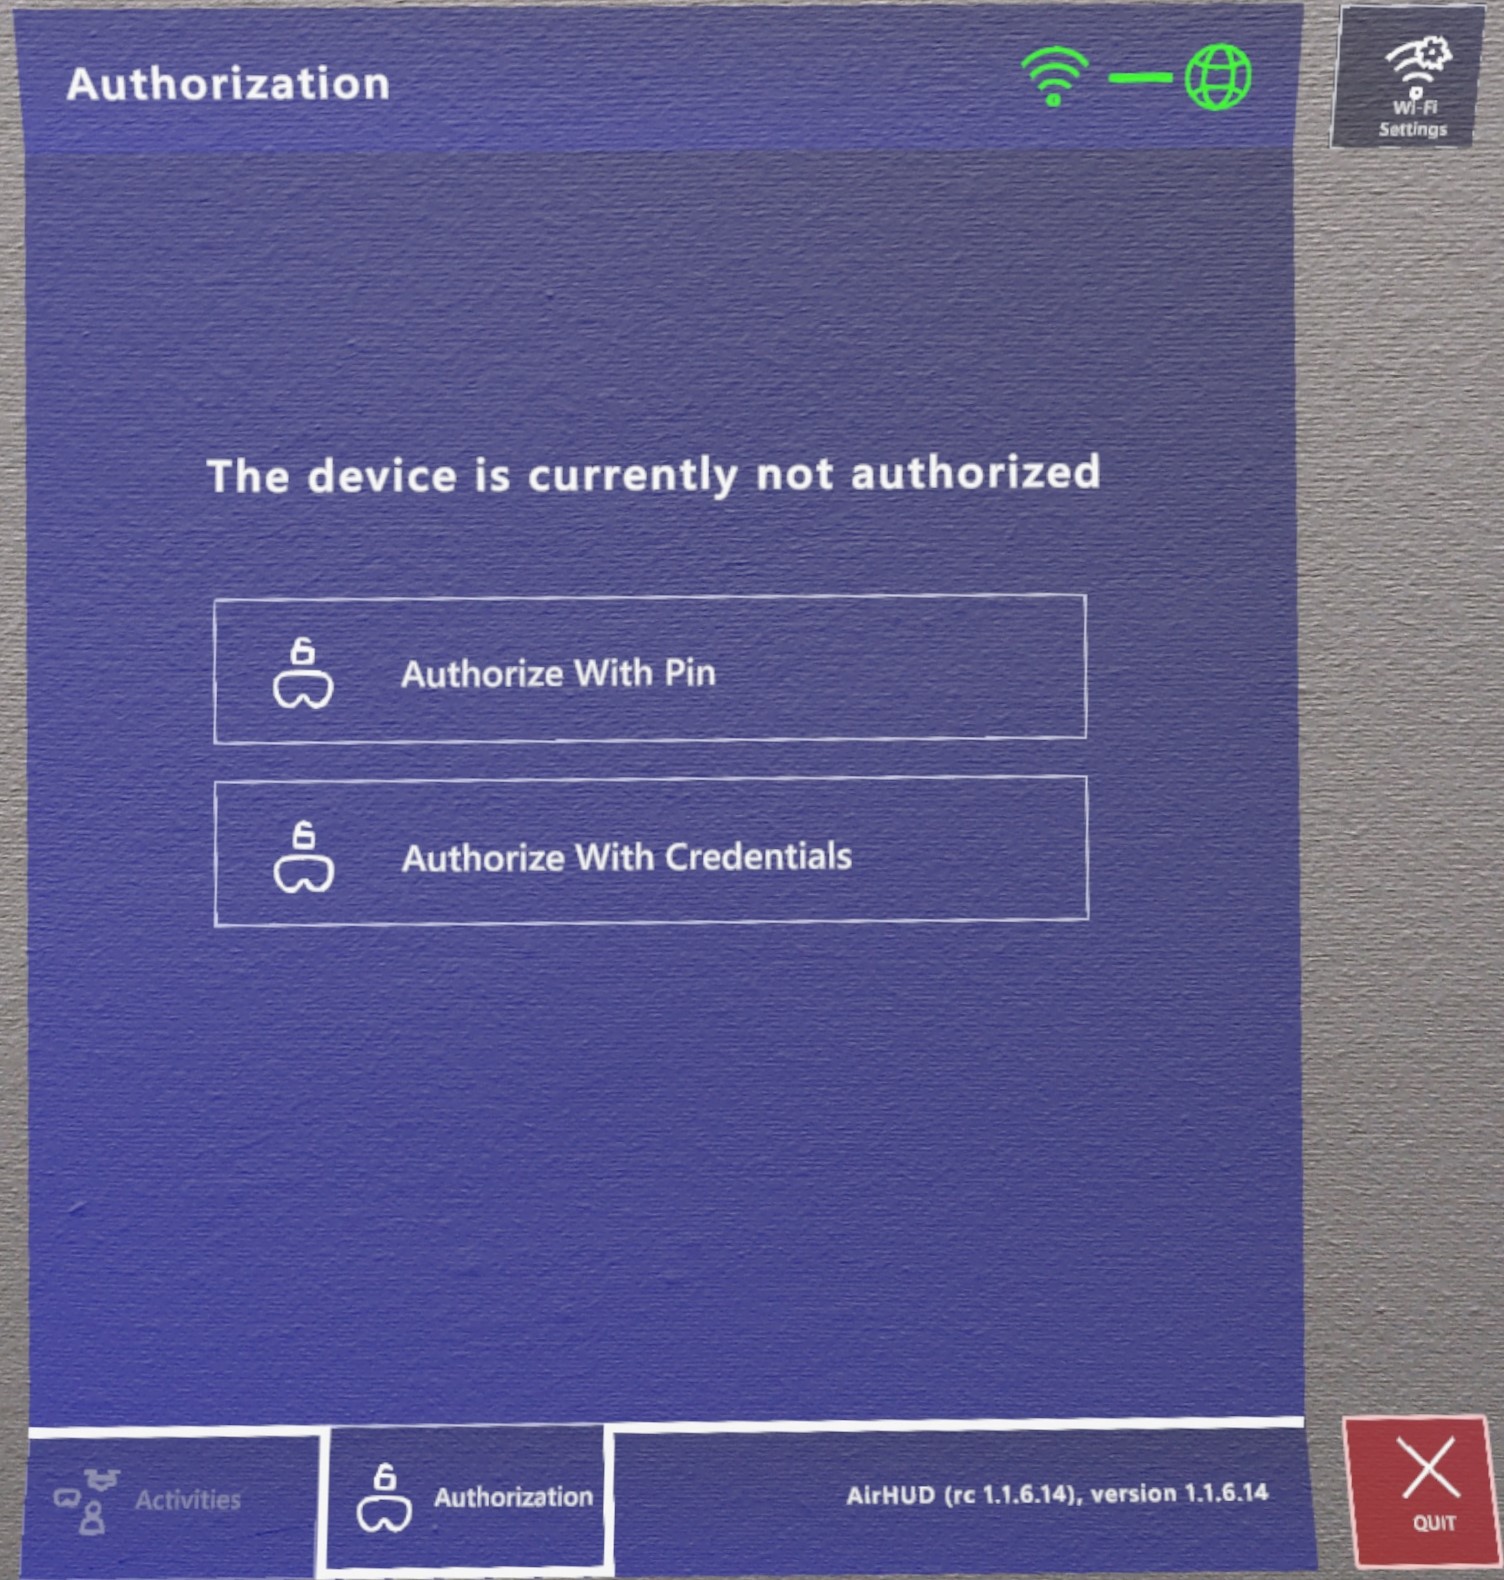
To be able to use AirHUD™, you need to authorize your AR headset with your account that you have received from Anarky Labs. Therefore, when you open AirHUD™ for the first time after installing it on your headset, you will be greeted with an Authorization Panel. Here, you will encounter two methods to authorize the headset: 'Authorize With Credentials' and 'Authorize With PIN'. By using one of these methods, you can follow the steps below to log in to your account:
A. Authorize with Credentials:
Click on the Authorize With Credentials button.
Fill in the username and password fields provided to you through the keyboard that appears.
B. Authorize with PIN:
Go to web.airhud.io from your computer.
Login with the username and password provided to you.
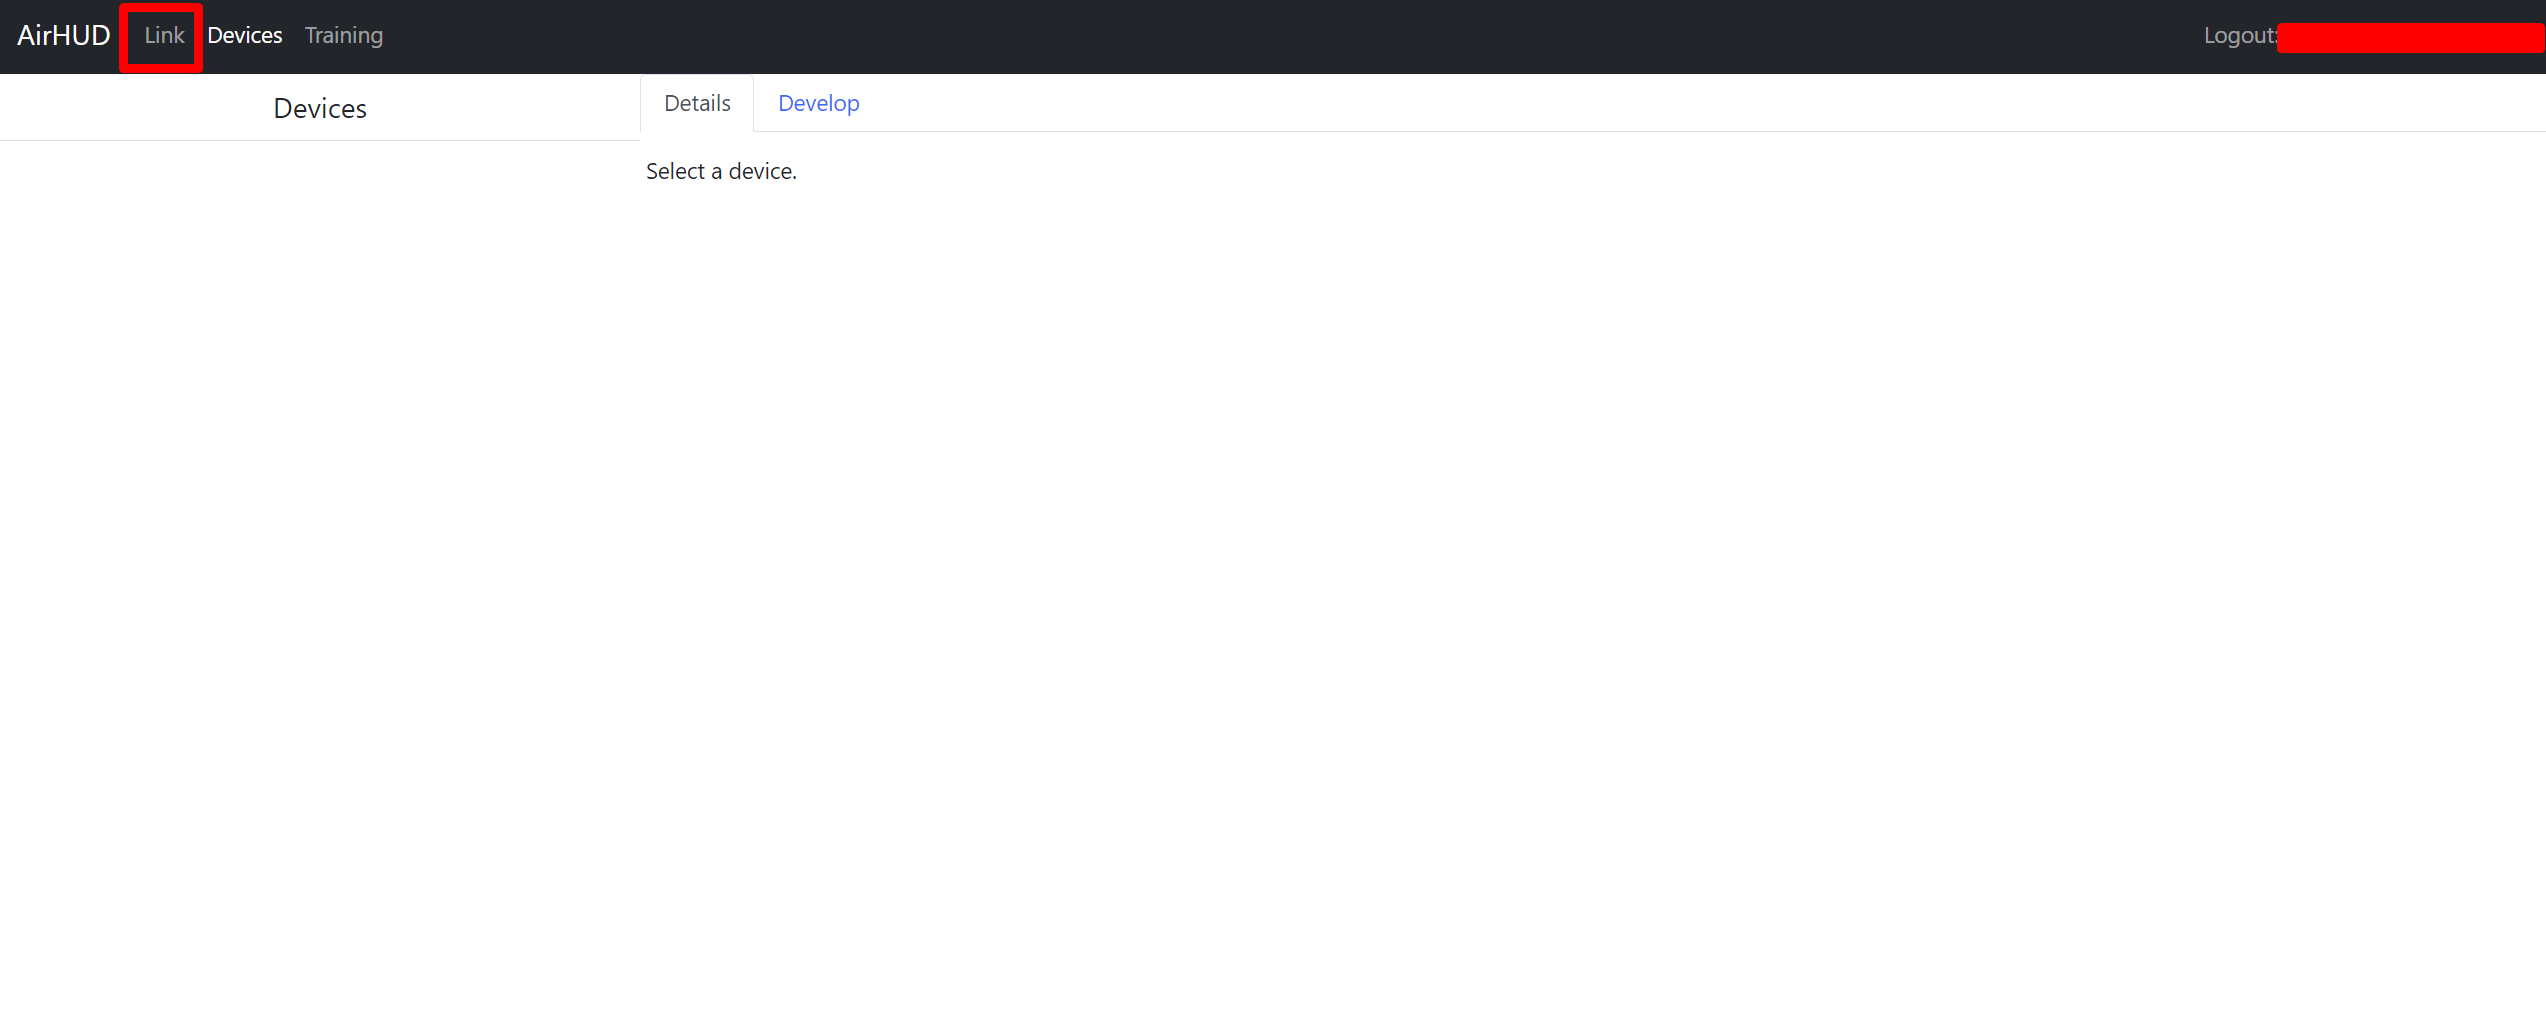
Click on the Link tab.
- Click on the Authorize With PIN button on the headset.
- Look at the PIN code displayed on the headset.
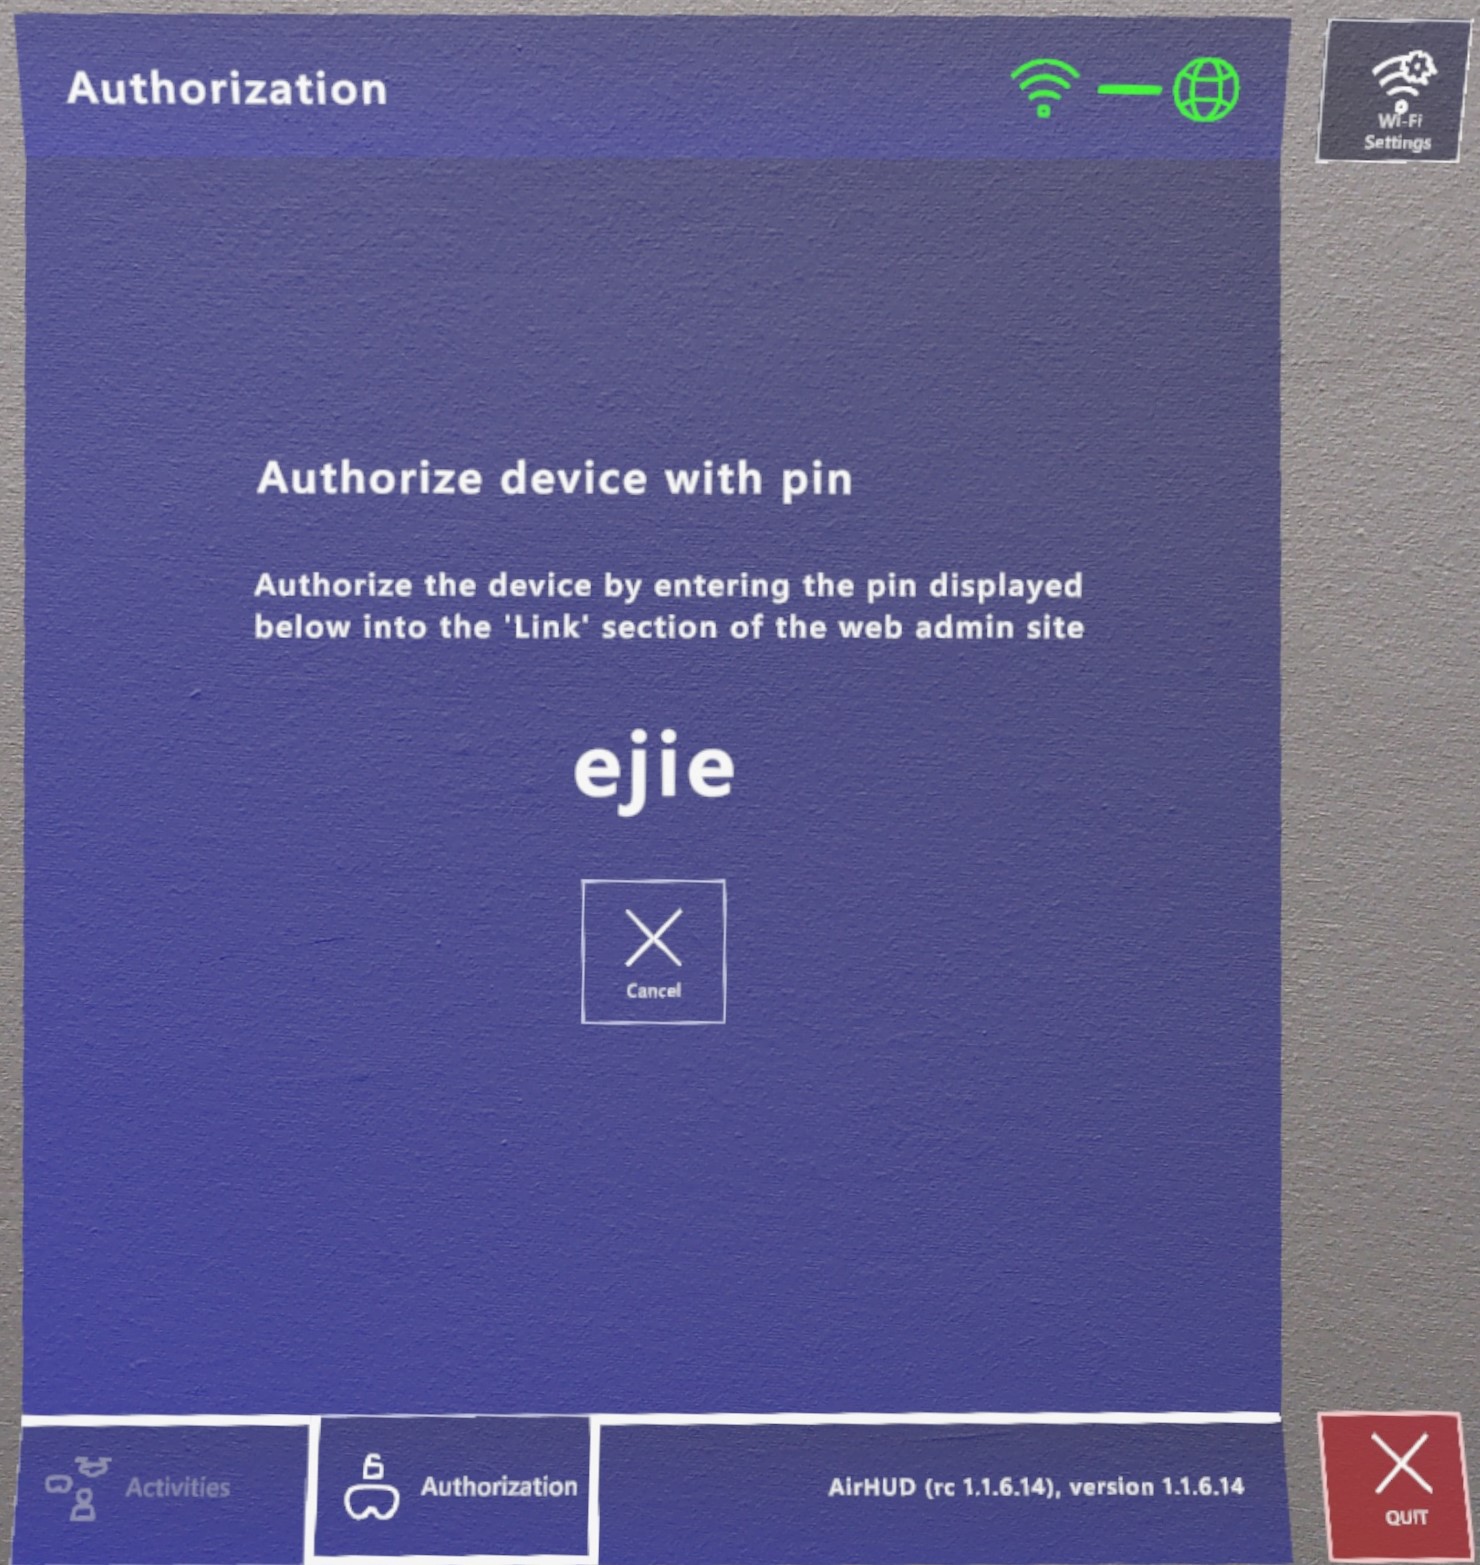
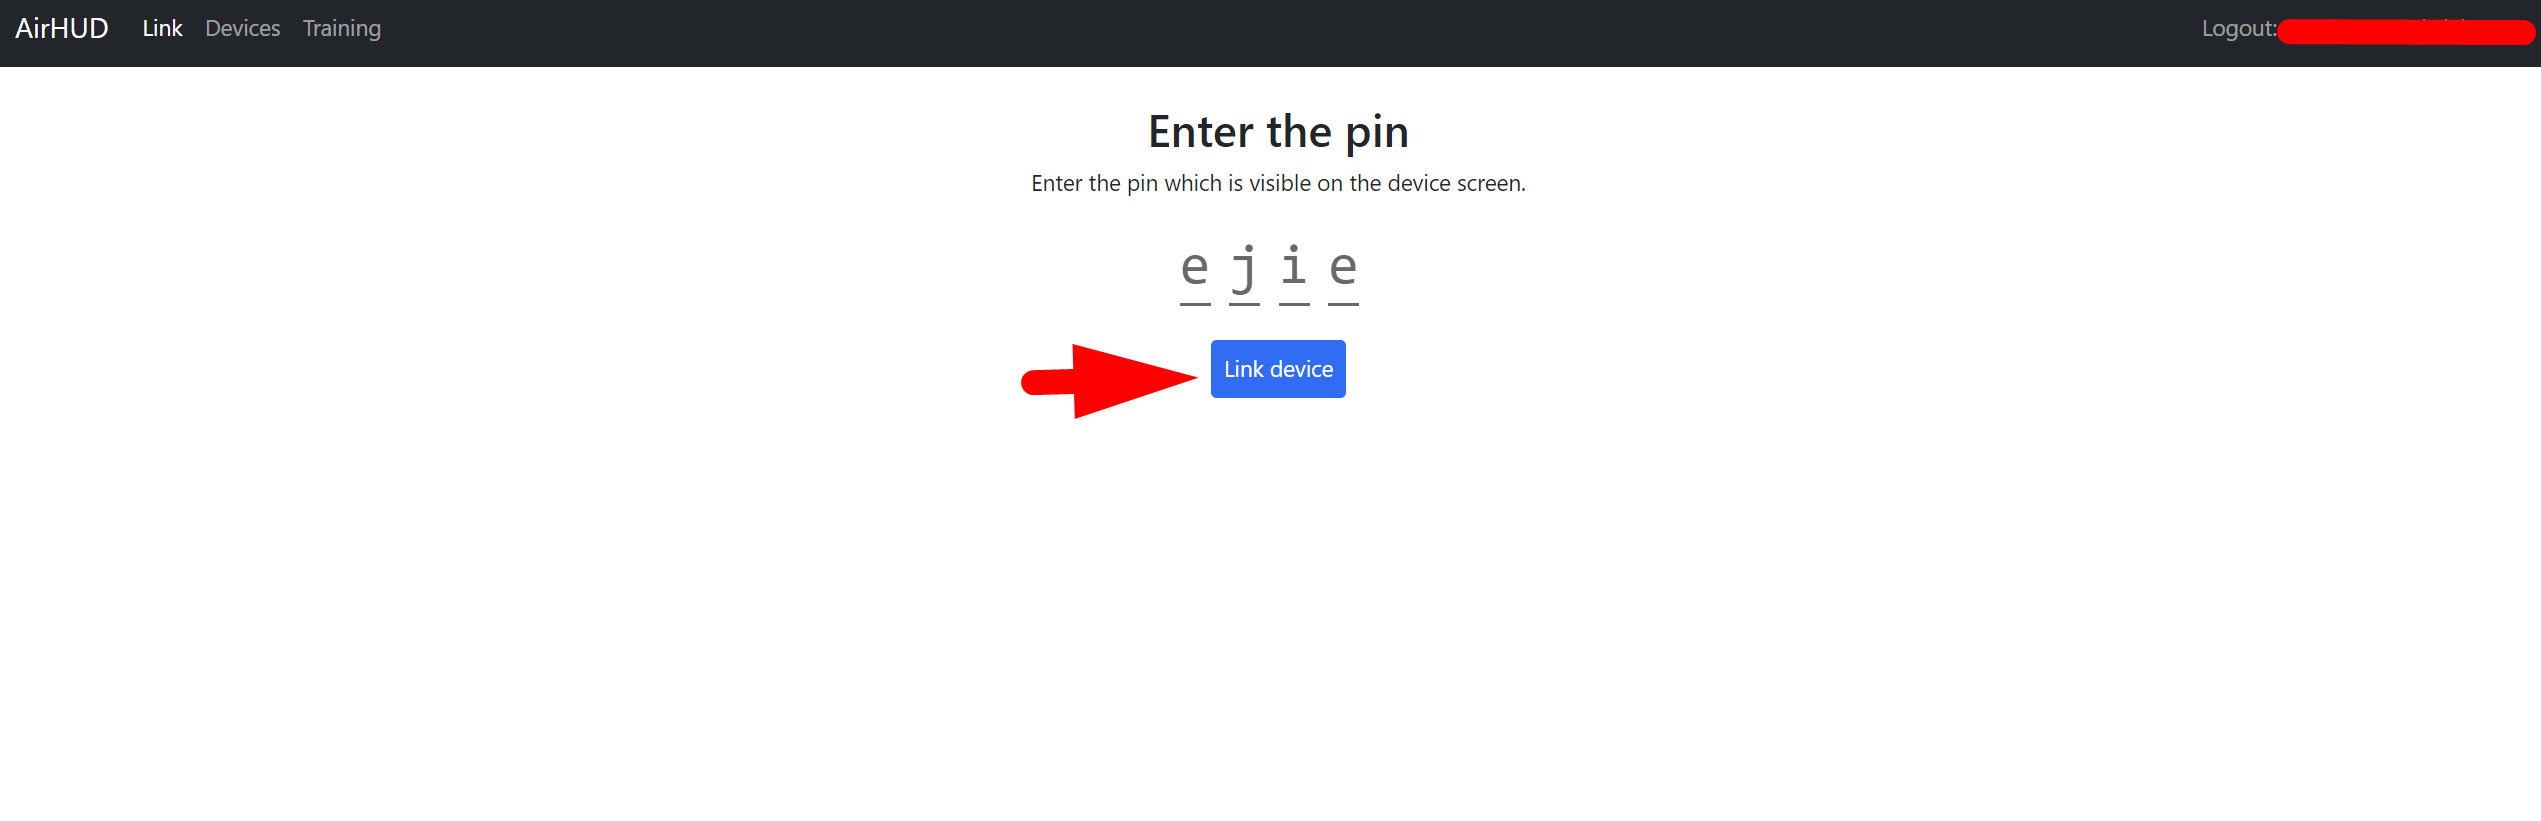
- Enter the PIN code from the headset into the "Enter the pin" section on web.airhud.io.

- Click on "Link device" on web.airhud.io.
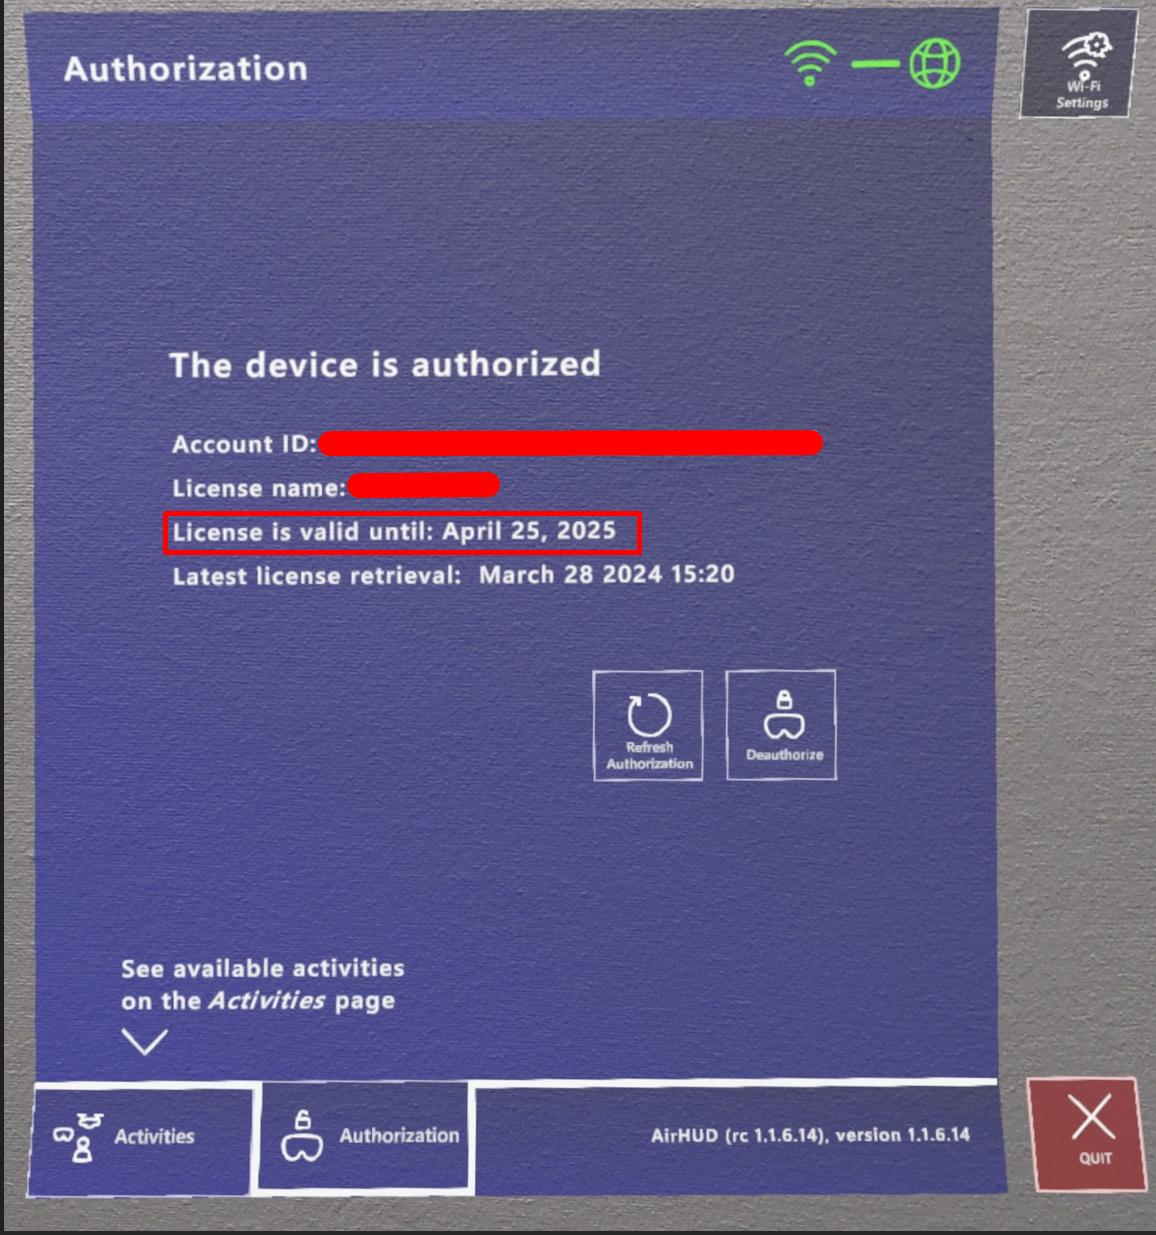
After completing the steps, your device will become authorized, and you will see the authorization information on the panel.
PLEASE NOTE THAT to use AirHUD™, you need to have an authorized headset and a valid license. Your device will be authorized using the username and password provided by us, and you will be able to use AirHUD™ based on your license. However, authorization of the headset and the license are separate concepts. After authorization, your headset will be authorized via your account, also the license is tied to your account but has a specific duration, providing access to AirHUD™. Therefore, even if your headset is authorized, you won't be able to access AirHUD™ once your license expires. Hence, please frequently check the License Expiry Date provided on the Authorization Panel.
After completing the authorization process, you can view the information related to your account and license on the panel.
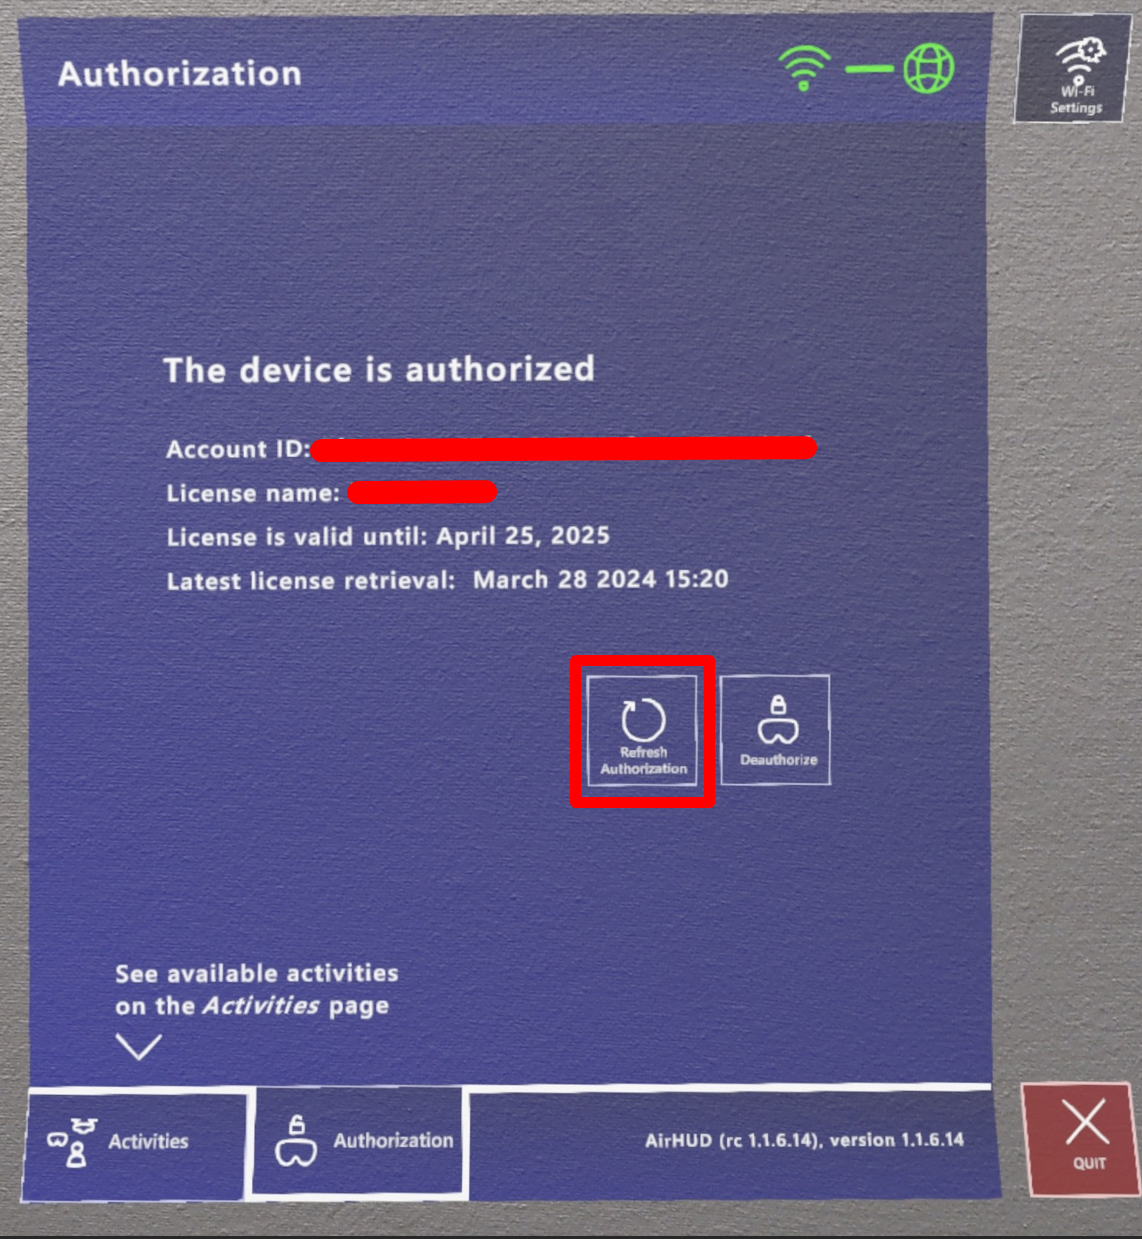
If there is still time left before your license expires and you encounter any issues with license access, you can renew your license by clicking the 'Refresh Authorization' button.
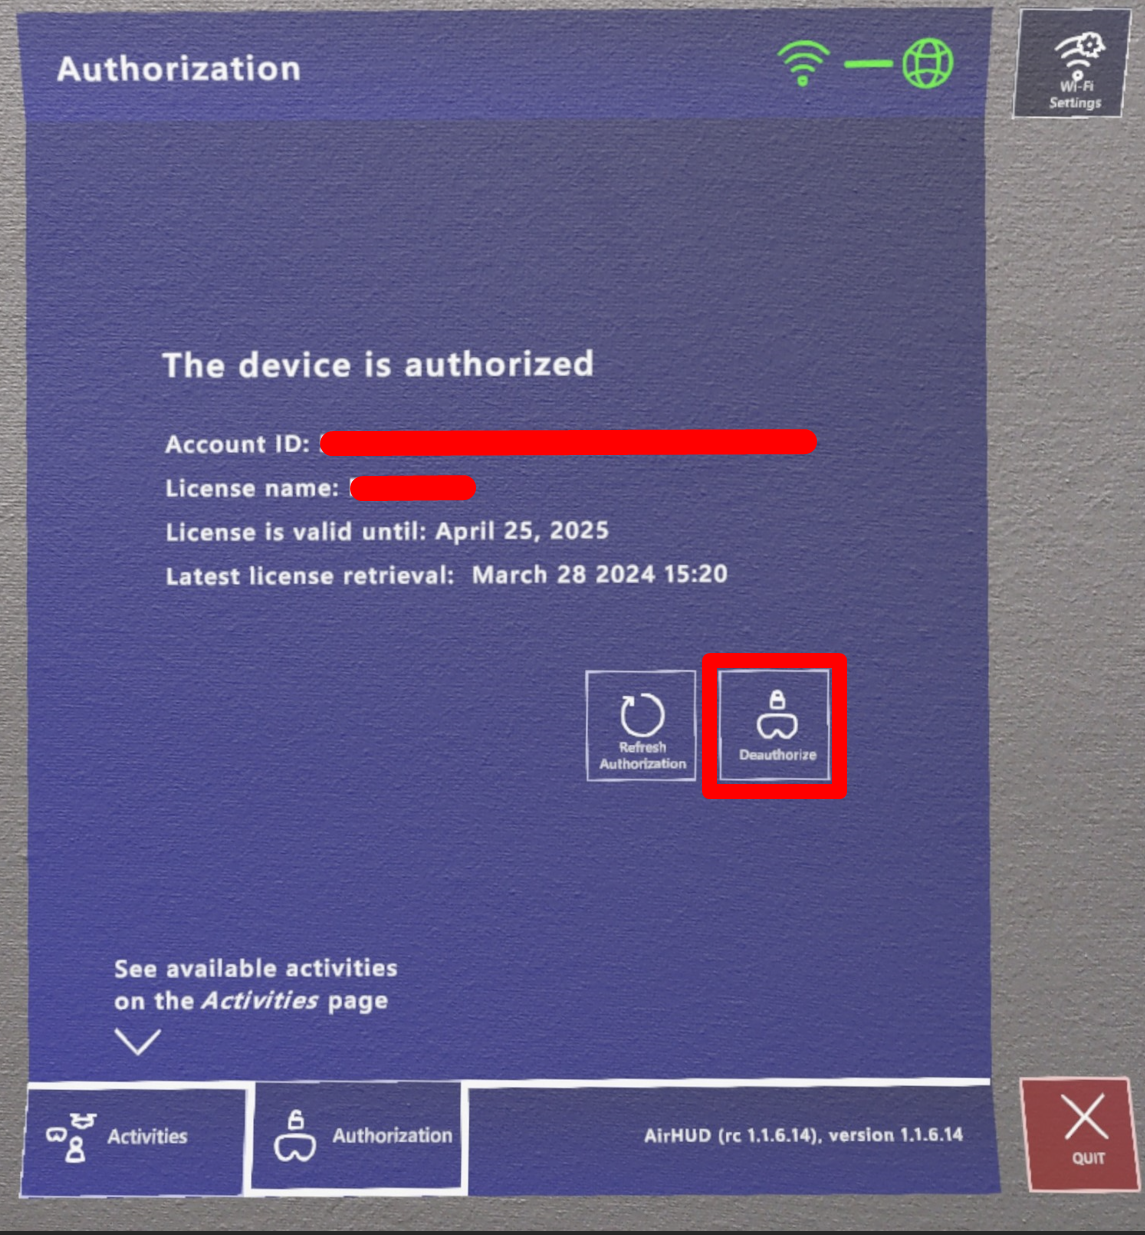
If you wish to deauthorize your headset, you can do so by clicking the 'Deauthorize' button on the panel.
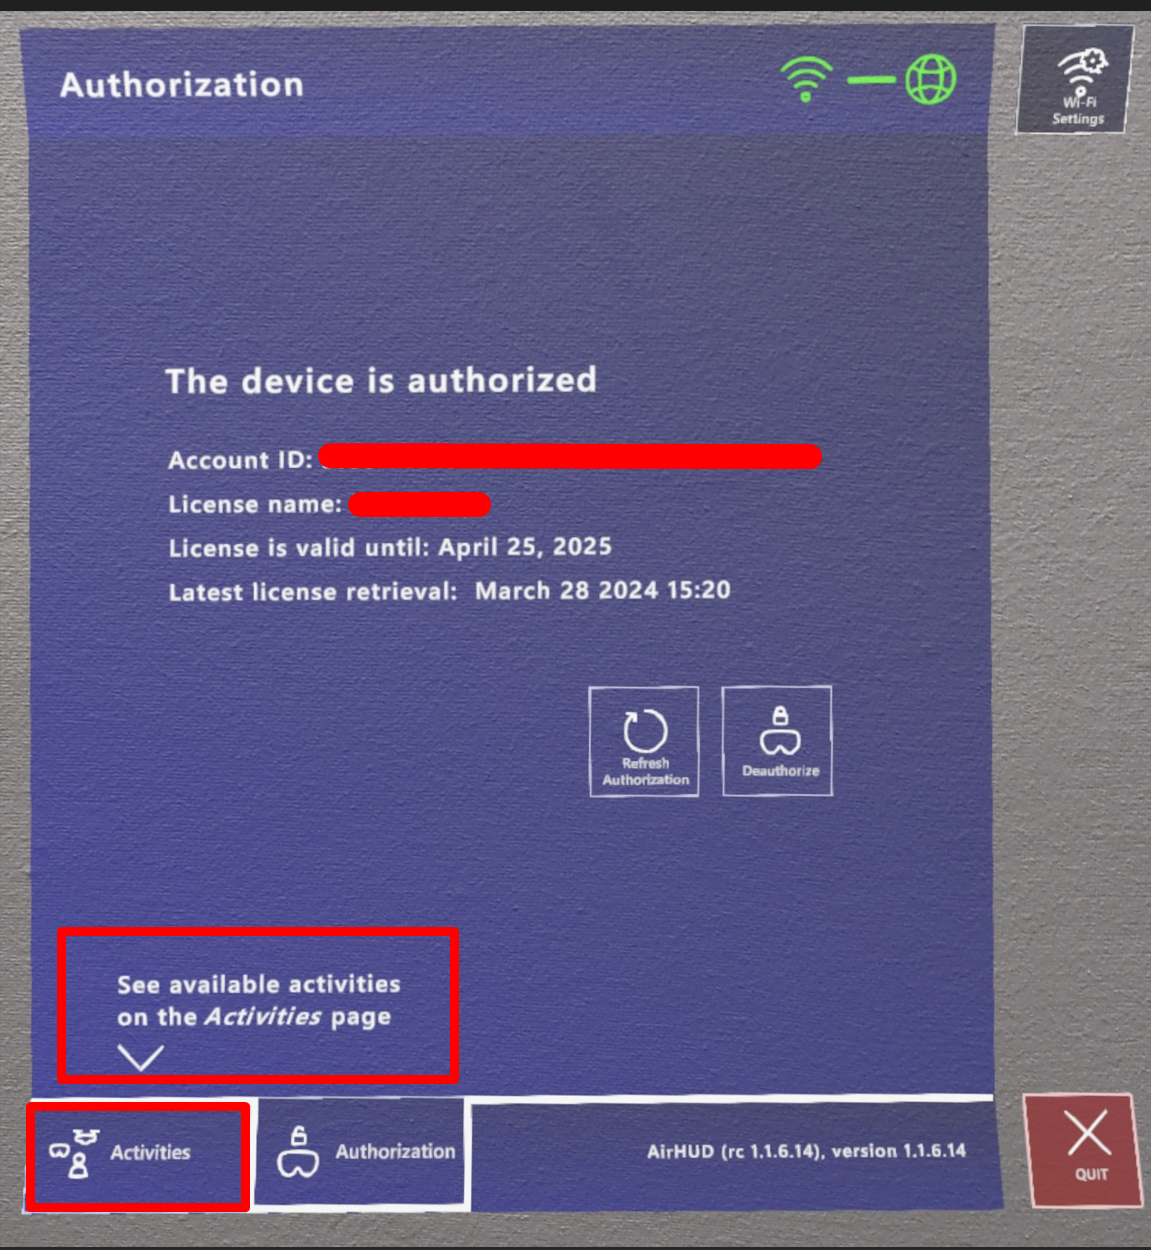
Afterwards, click on the 'Activities' tab to switch to the activity panel which will show you the capabilities of AirHUD™ that your license provides.
NOTE: Once the authorization process is successfully completed, the Activities panel will appear directly when you want to use AirHUD™ again. If you encounter any issues with license access, please navigate back to the 'Authorization' tab located at the bottom of the panel and review the license information.
If the headset doesn’t get access to AirHUD™ license server for a period of 7 days, the license will be invalidated, and you can only access “Demo” mode in Activities panel. Therefore, if this happens and you know your license should be valid, please make sure the headset has proper internet connection and then go to Authorization tab to click “Retry” button to reactivate your license.
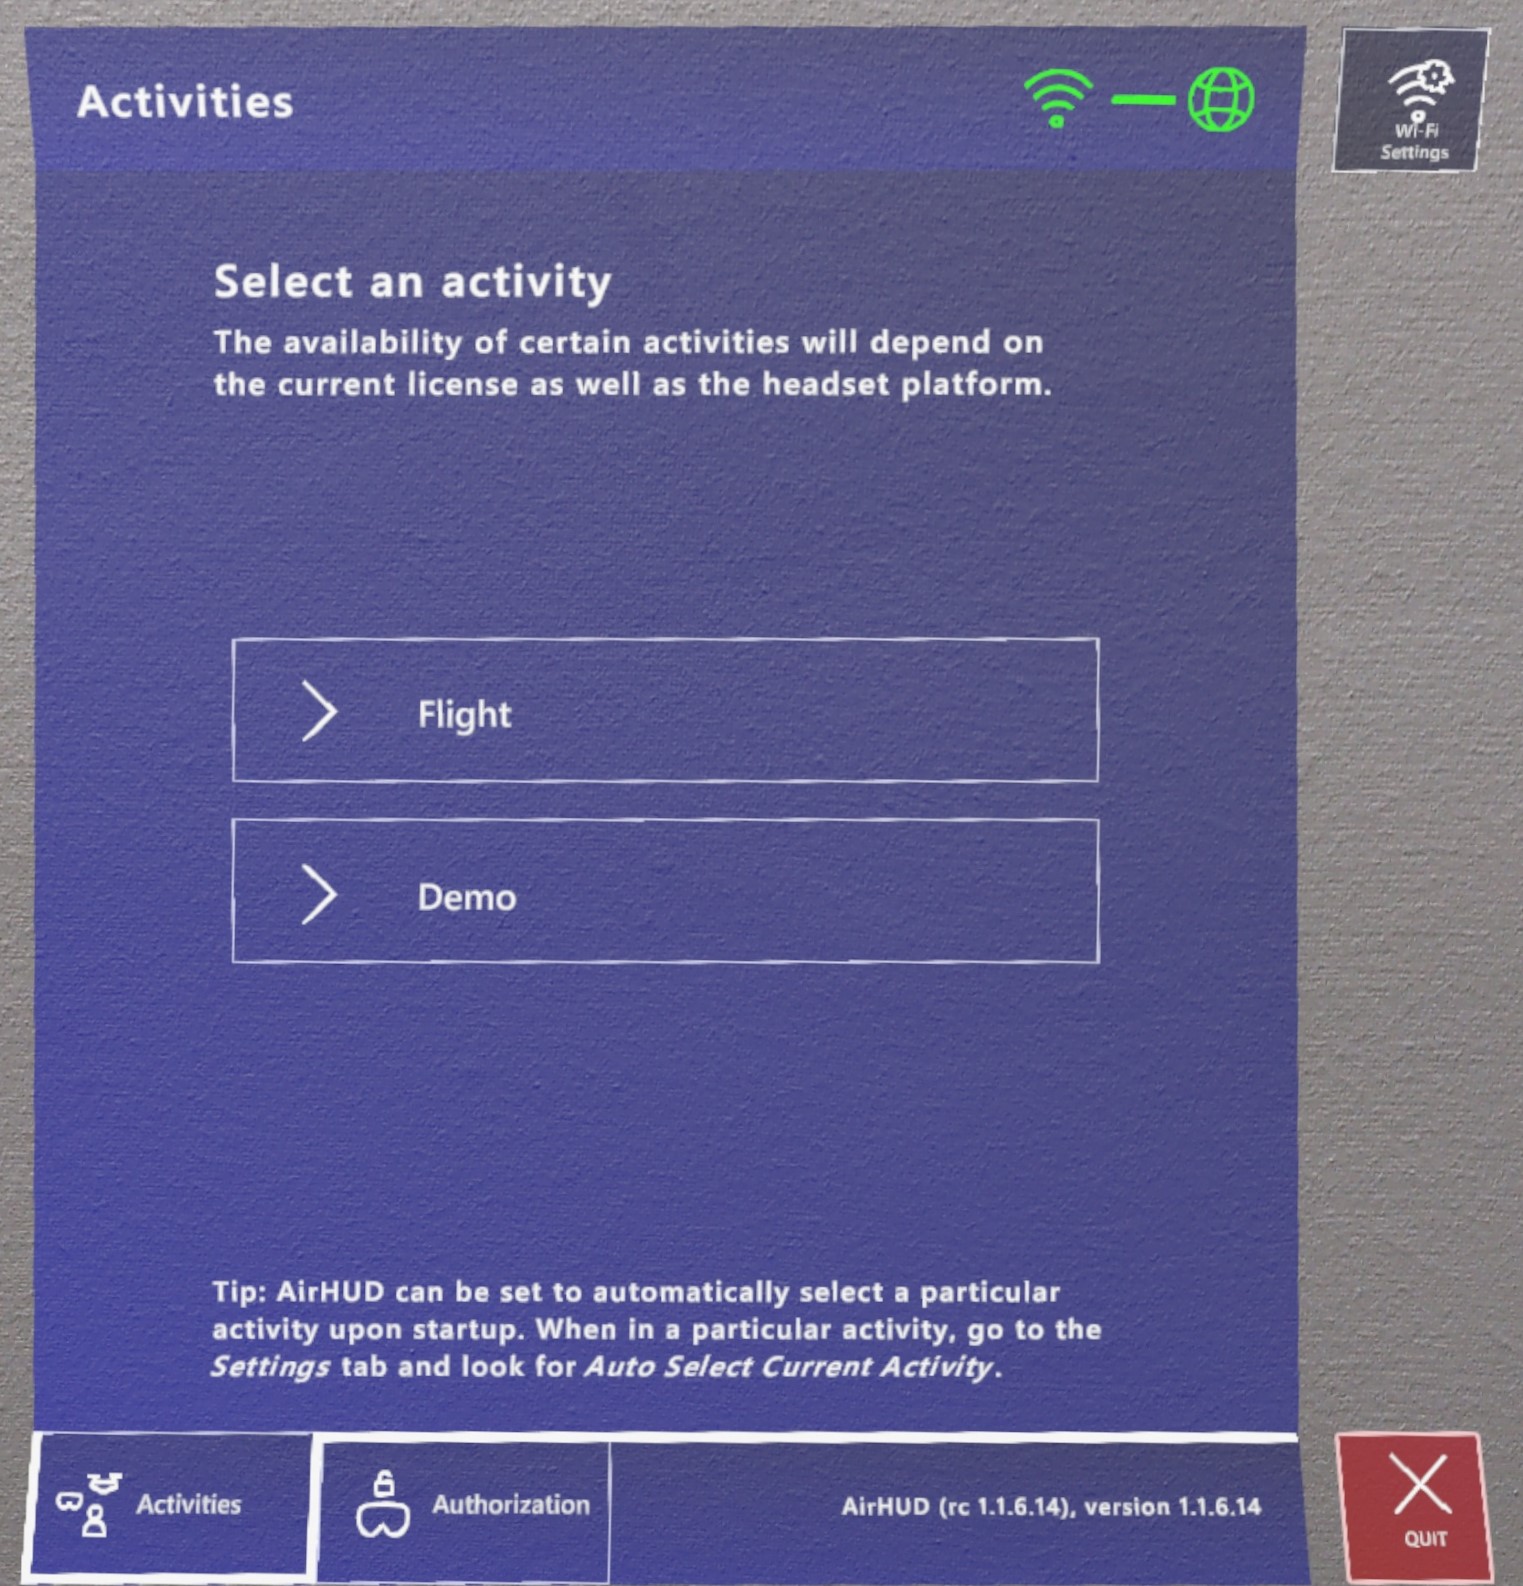
2. Activities Panel
After successfully completing the authorization process, you can navigate to the 'Activities' panel by clicking on the Activities tab at bottom of the panel.
In this panel, you will see the activities available according to your license. Currently, there are two activities you can use: Demo and Flight. You can use the 'Demo' button to access the Demo Mode or click on the 'Flight' button to switch to the real flight mode. (Note: Access to the Training mode in AirHUD™ is provided through the 'Flight' mode as it requires a drone.)
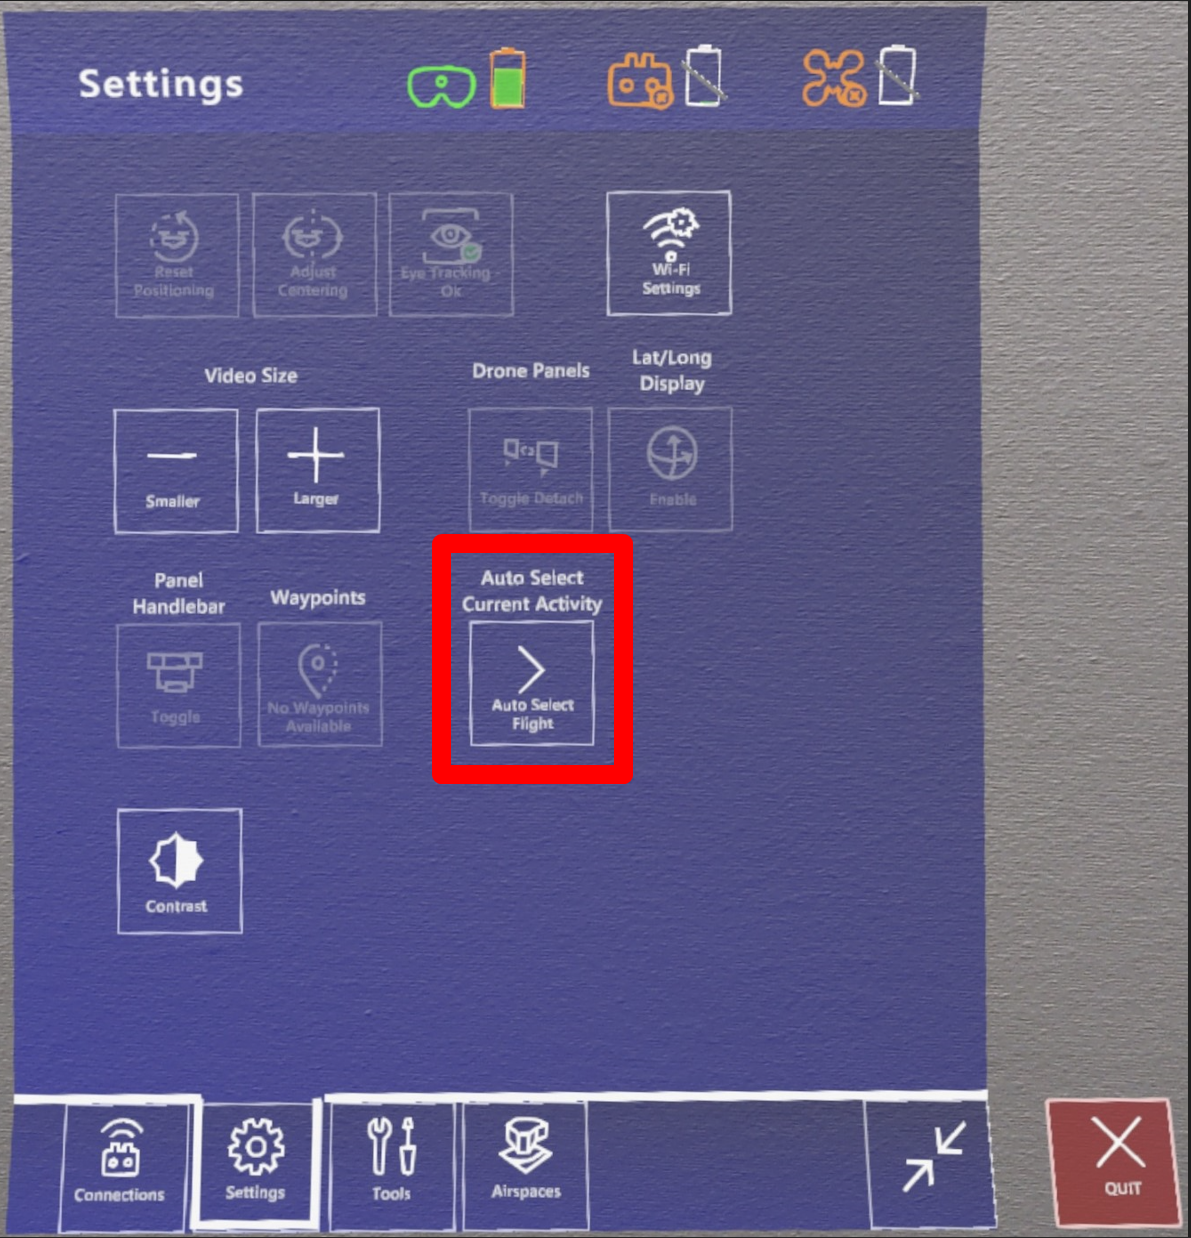
If you want to use only one activity continuously, you can skip the Activities Panel and directly switch to the selected activity always. To do this, go to the activity you want to use continuously on the Activities panel and set the 'Autoselect Current Activity' option in the SETTINGS panel to Enable.
For example:
If you only want to use the Flight mode, select the 'Flight' button on the 'Activities' panel. While in Flight mode, go to the Settings panel and enable the 'Autoselect Current Activity' button. After closing AirHUD™ and opening it next time, you will directly switch to the Flight mode without the Startup Panels displaying.
If you encounter any problems and want to access the Activities or Authorization panels again, go to the SETTINGS panel and set the 'Autoselect Current Activity' option to Disable, then restart the application. This way, you can access the Startup panels again.
- Demo Mode
AirHUD™ offers a Demo Mode allowing you to fully explore its functions without the need for a real drone or controller. This feature can be accessed by clicking on the “Demo” button on the Activities Panel. Once activated, you can begin the animation by pressing the “Play” button from the Tools Panel. The Demo Mode showcases a virtual drone that plays a prerecorded flight pattern, providing you with a simulated experience of AirHUD™'s capabilities. This feature is especially useful for those who want to familiarize themselves with AirHUD™'s interface and features before using it in real-life situations.
NOTE:
If you do not have a valid license, you can only use the Demo Mode.
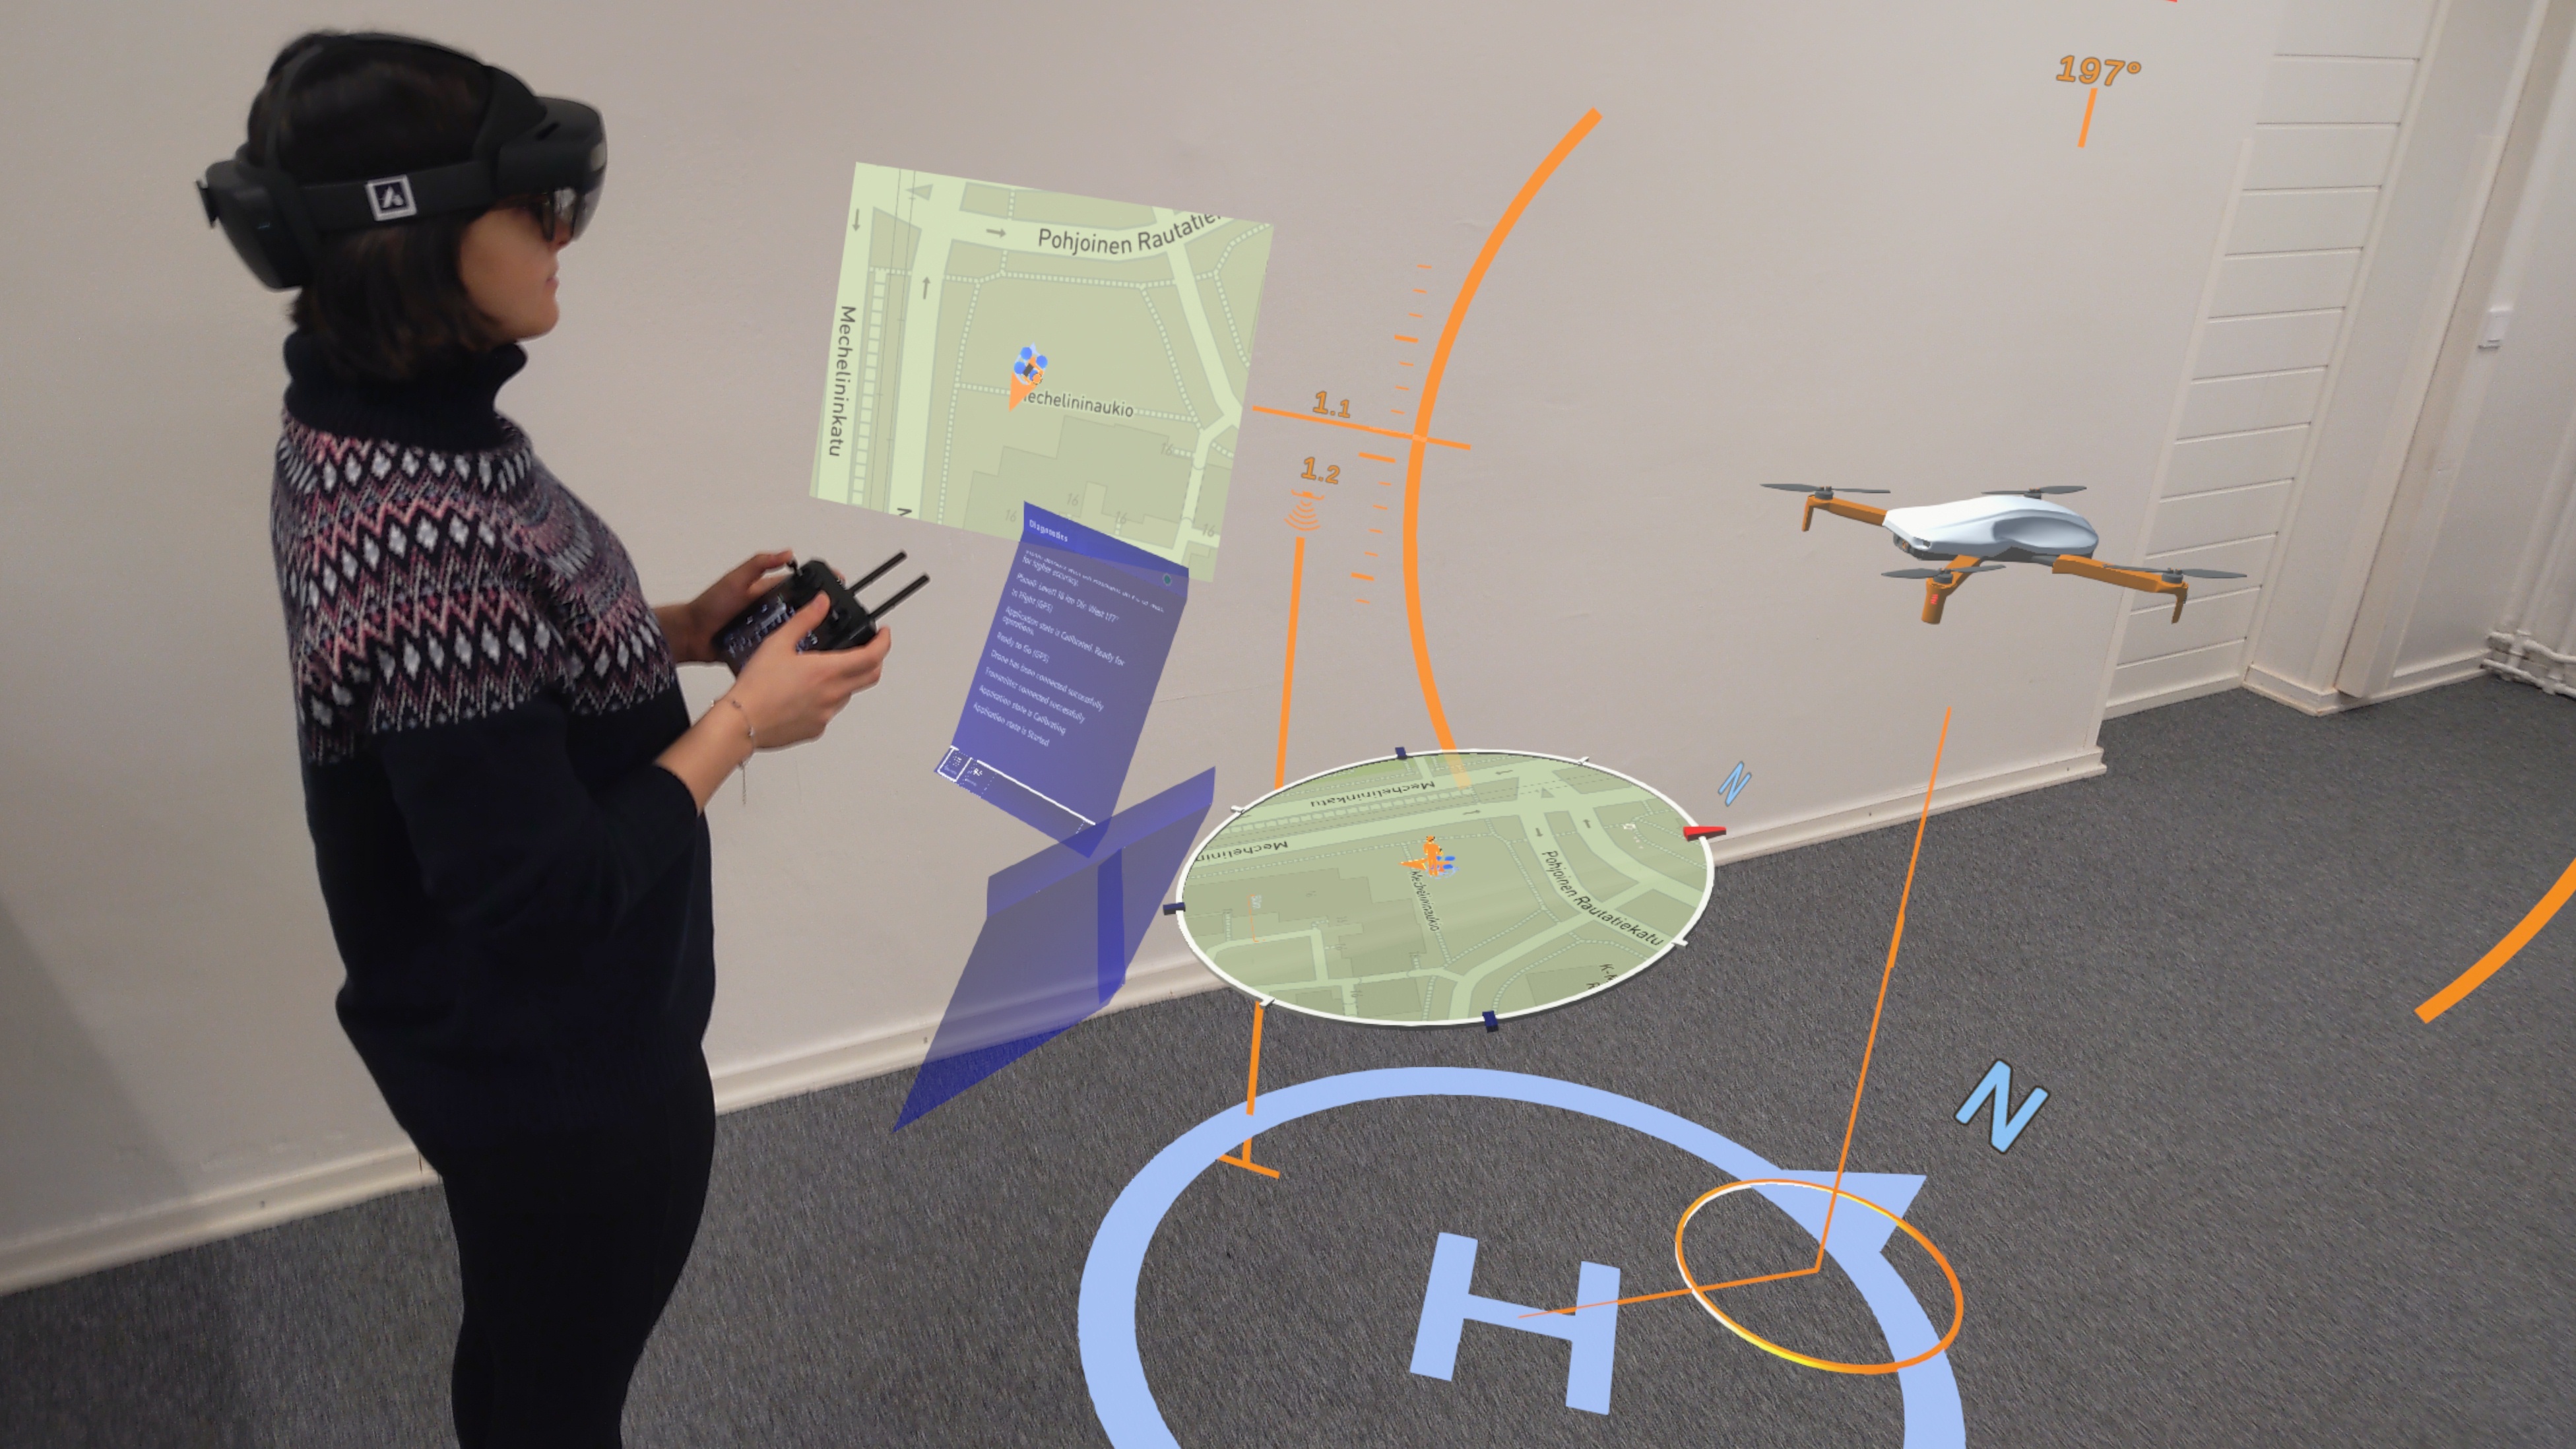
Overview of AirHUD™ User Interface
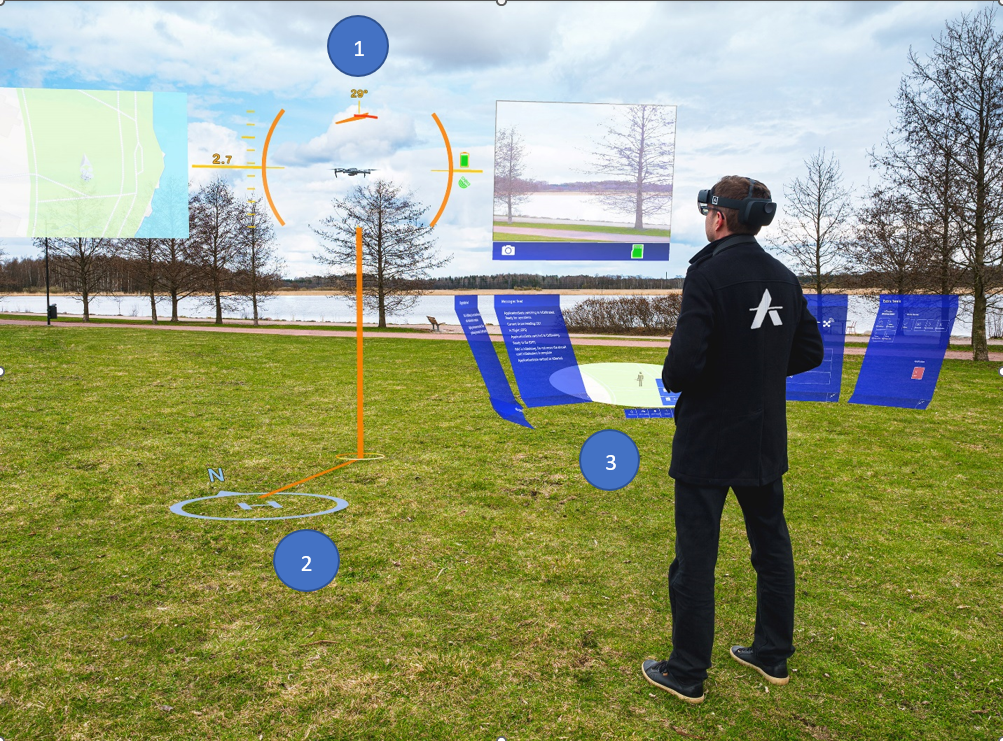
Drone indicator, sky map and camera view
Home position indicator and other world-based indicators
Belt User Interface (Belt UI): panels, map
Map Types
In AirHUD™, there are two basic maps: the one called circular map, the other called big map. These maps have the following features:
Airspace mode
Markers
Zoom In / Out.
Easy navigation: You can navigate maps by pinch-panning the maps
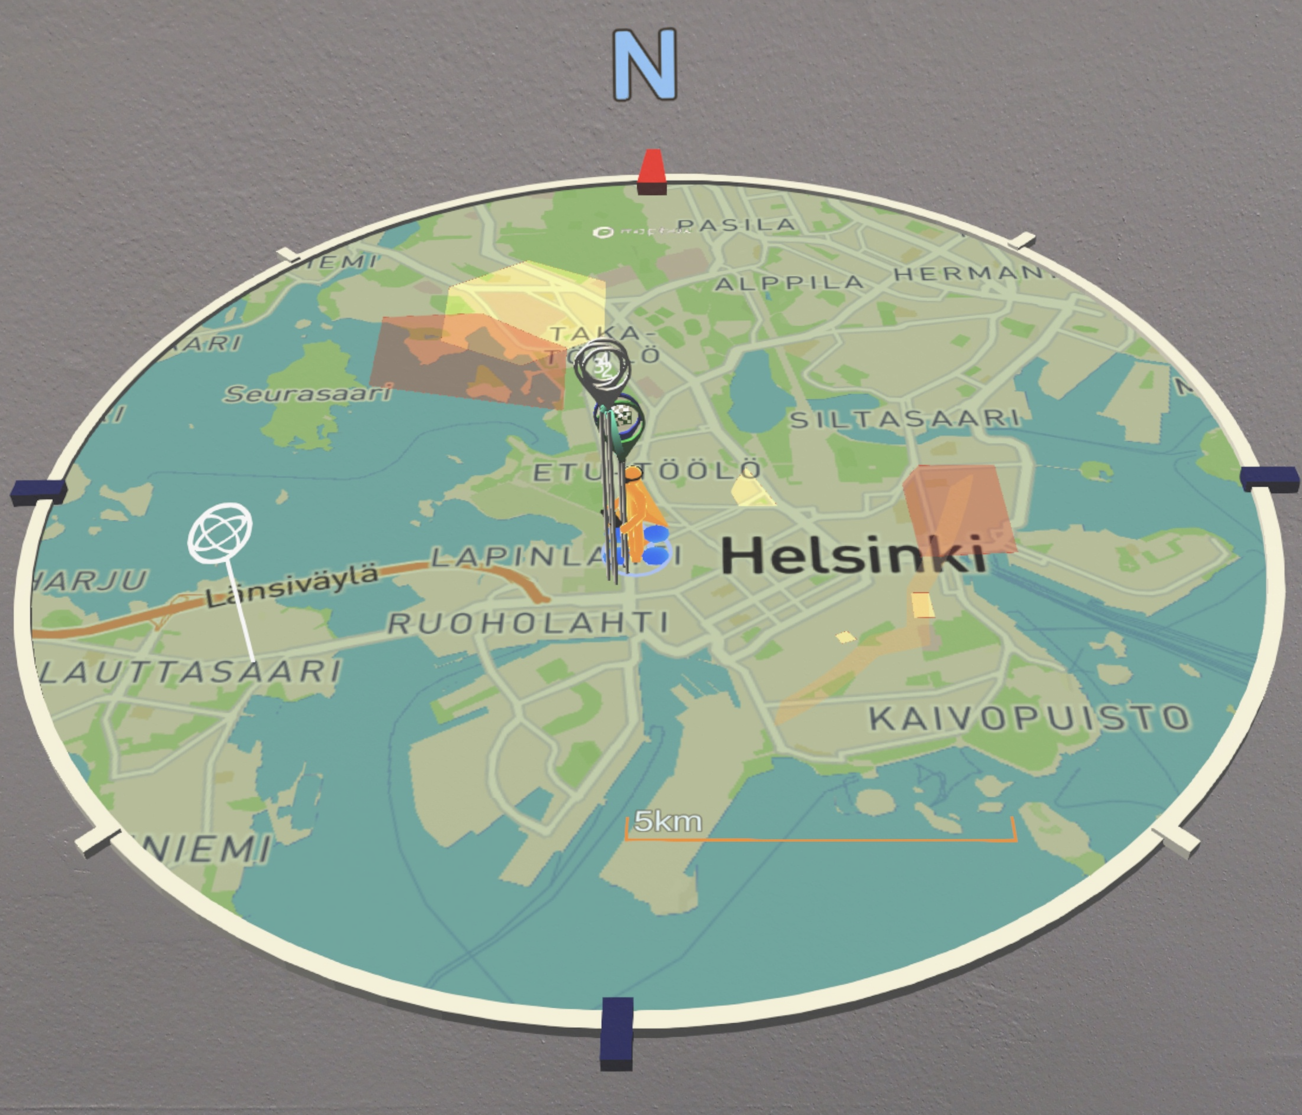
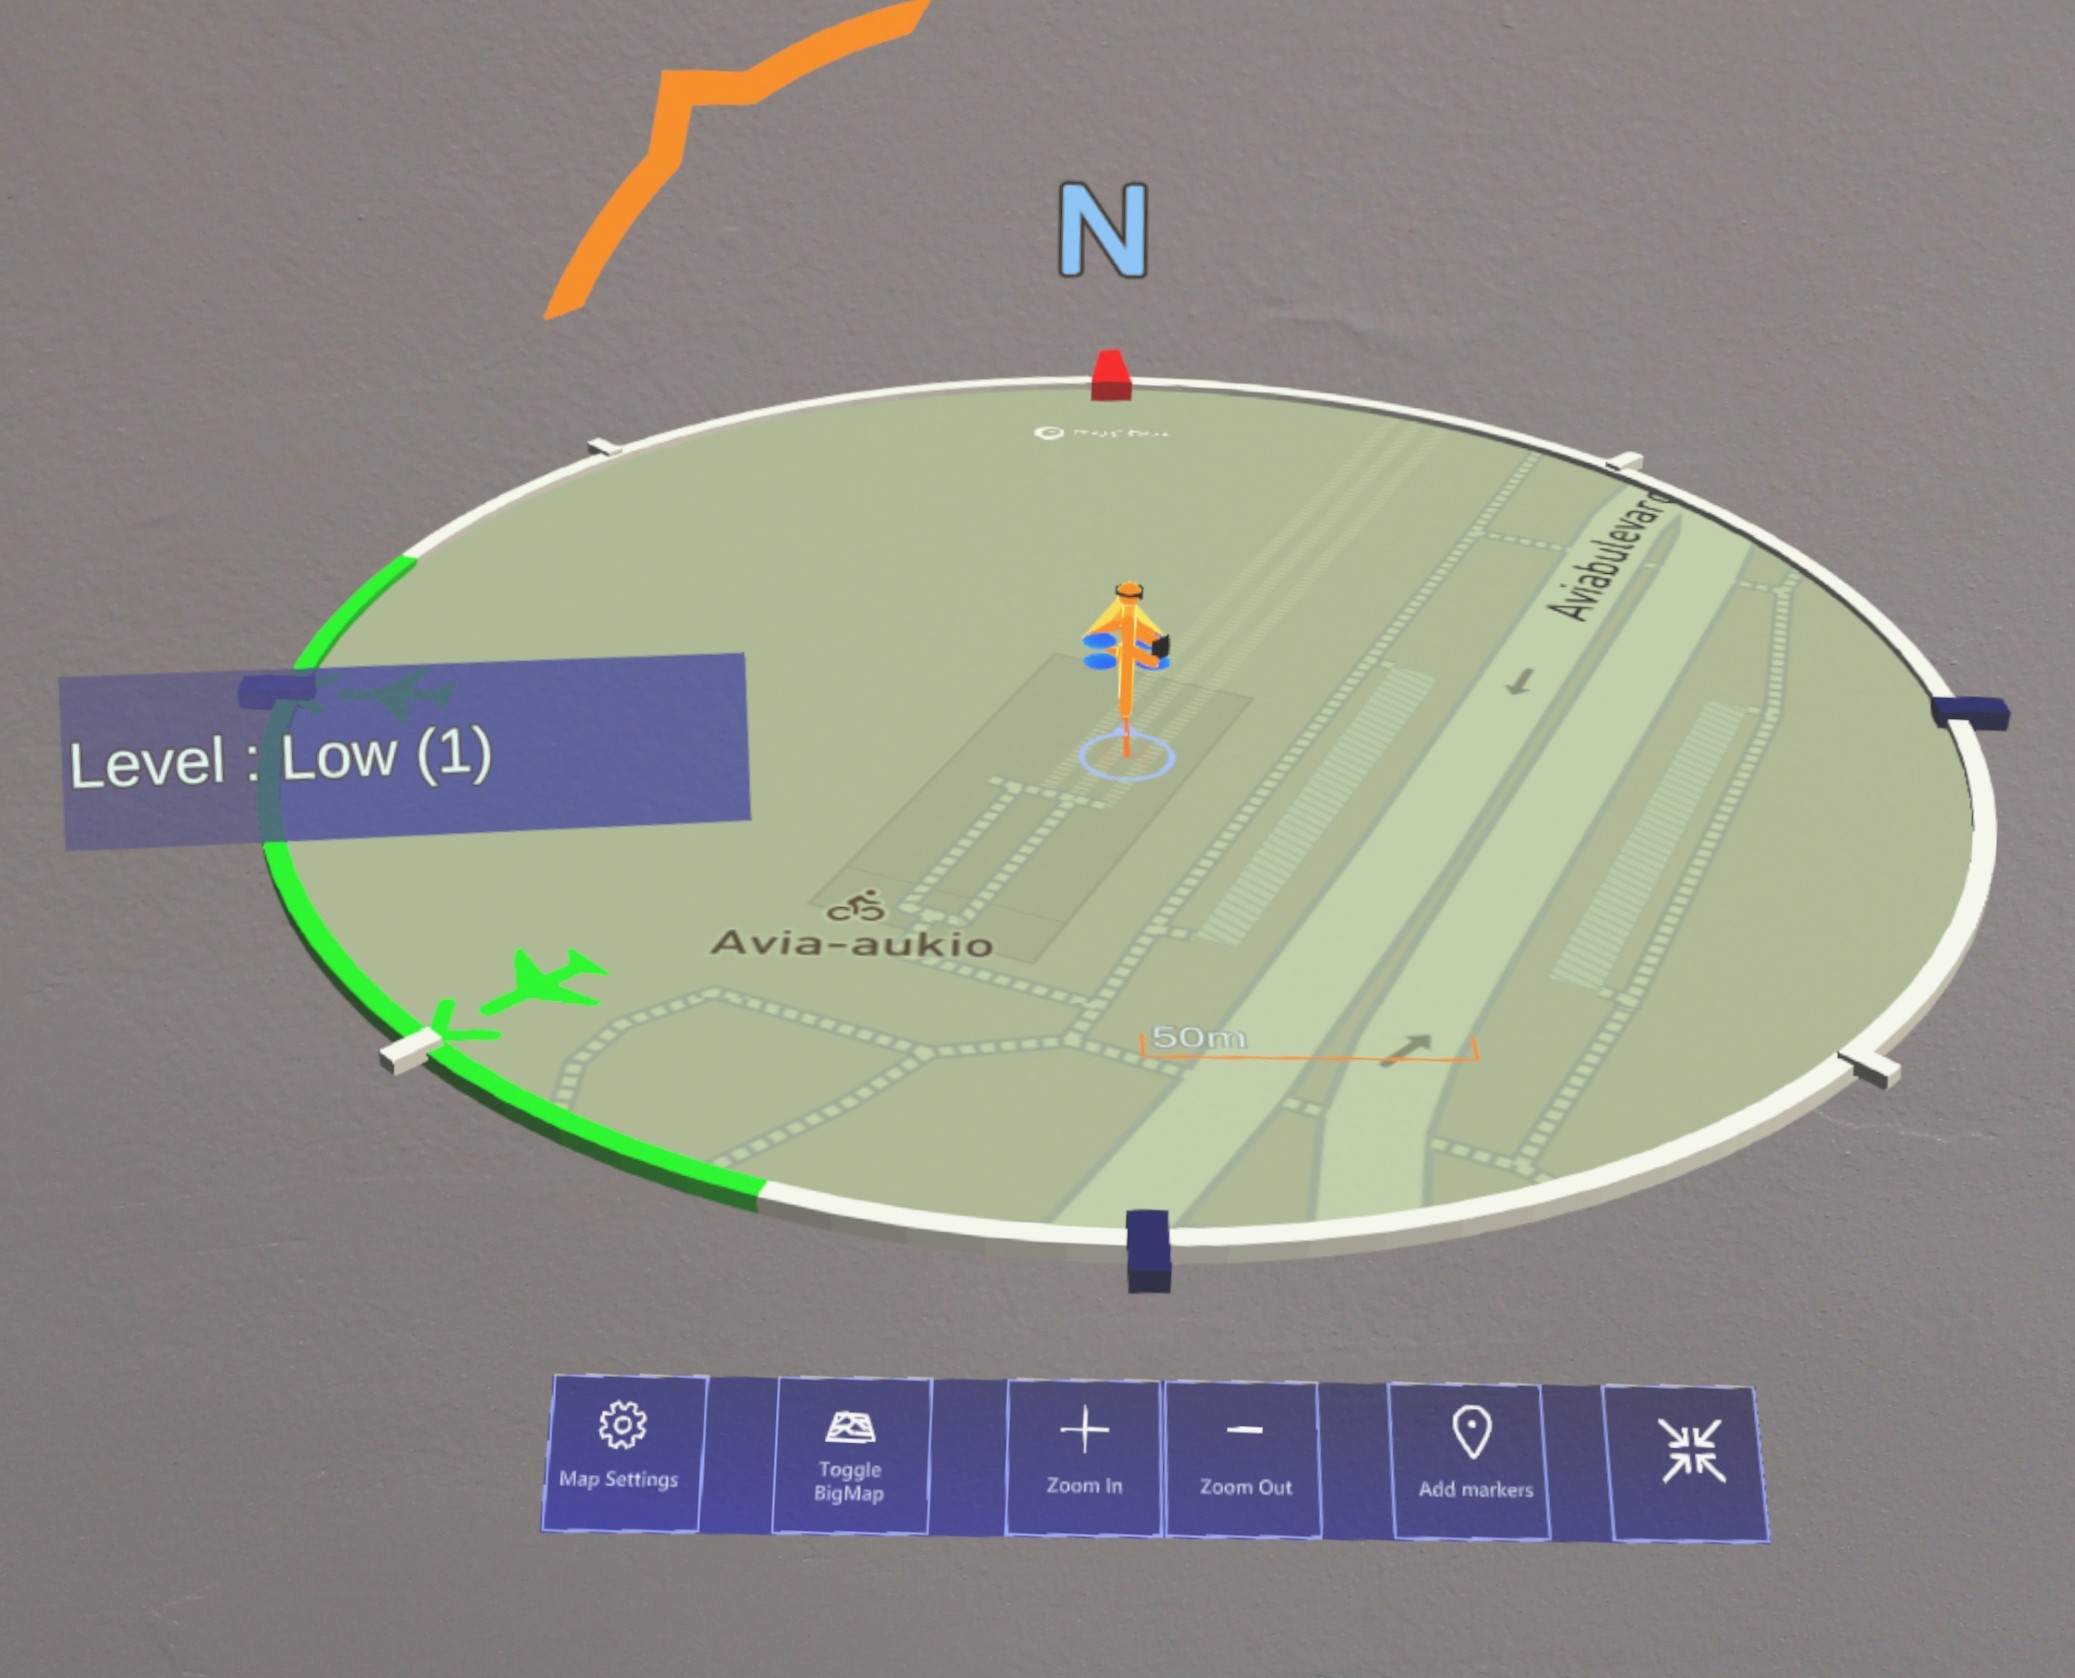
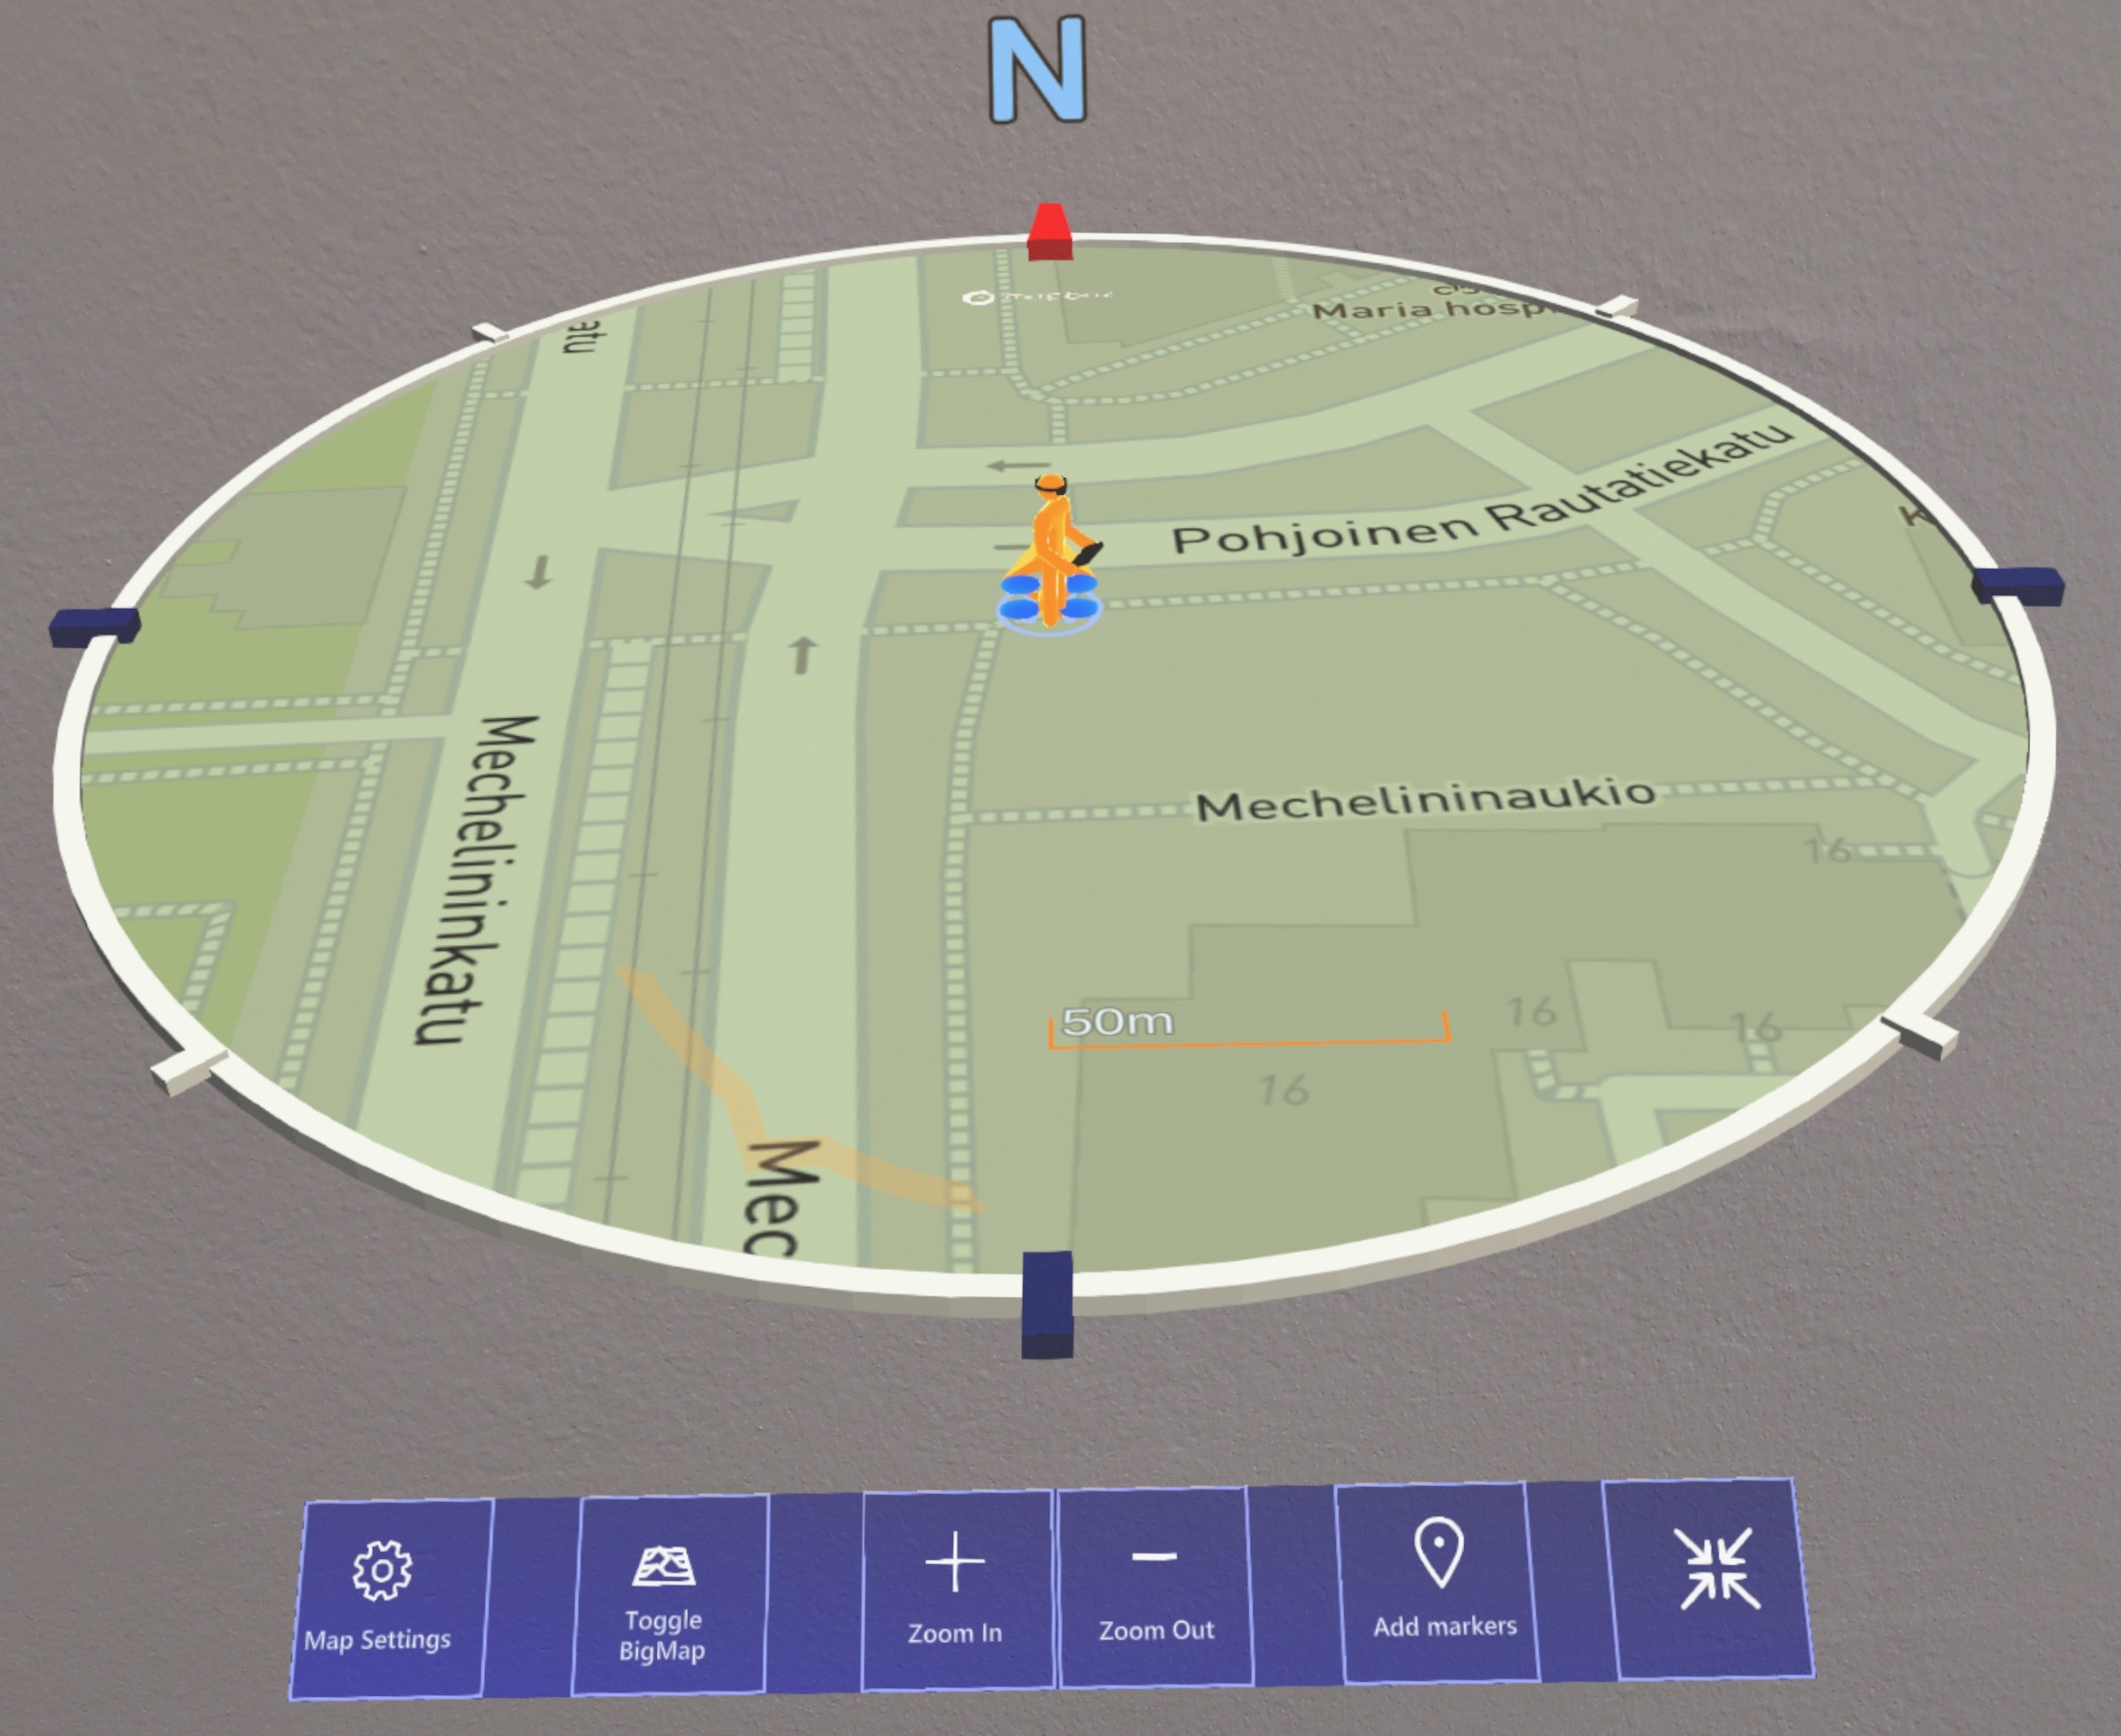
1. Circular Map (World Map): The circular map is situated in the middle of the Belt UI. With this map, you can see where the drone, the pilot and the home position are on the map.
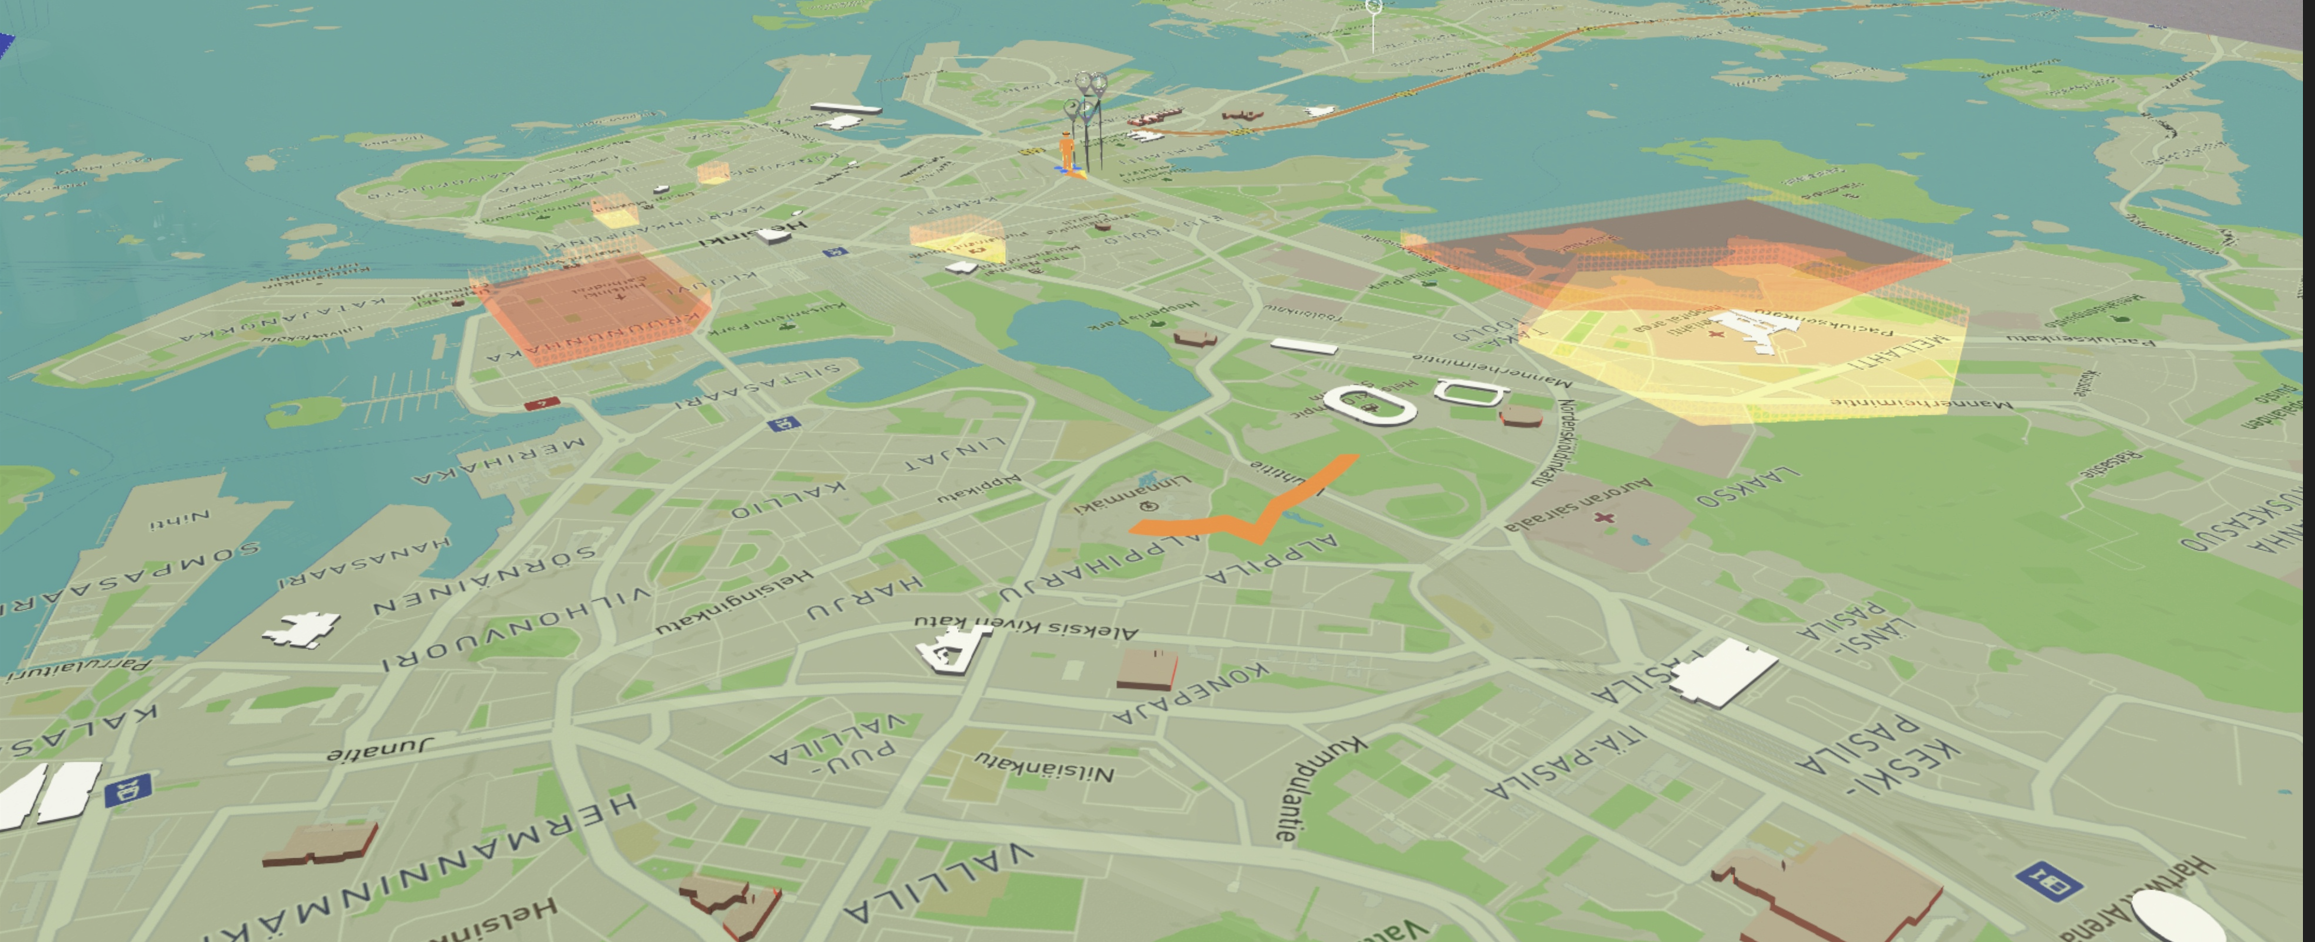
- Big Map: The big map helps you to get a better view of the area you are flying into. At the same time, you can see the surrounding buildings and their heights, as 3D elements on the big map. Another important feature of the big map is that you can walk on it. Once the extended map is active, it will stay fixed, and you can walk around to explore the map in greater detail.
NOTE: On the big map, buildings with known heights appear in white, while unknown buildings appear in red. The information about building heights is directly obtained from MapBox. Therefore, although the heights of the buildings on the map are assumed to be known, there may be some discrepancies during the actual flight. Therefore, please take into consideration that even though the buildings in the area you will be flying over are white buildings, their heights are not fully known, and proceed with your flight accordingly.
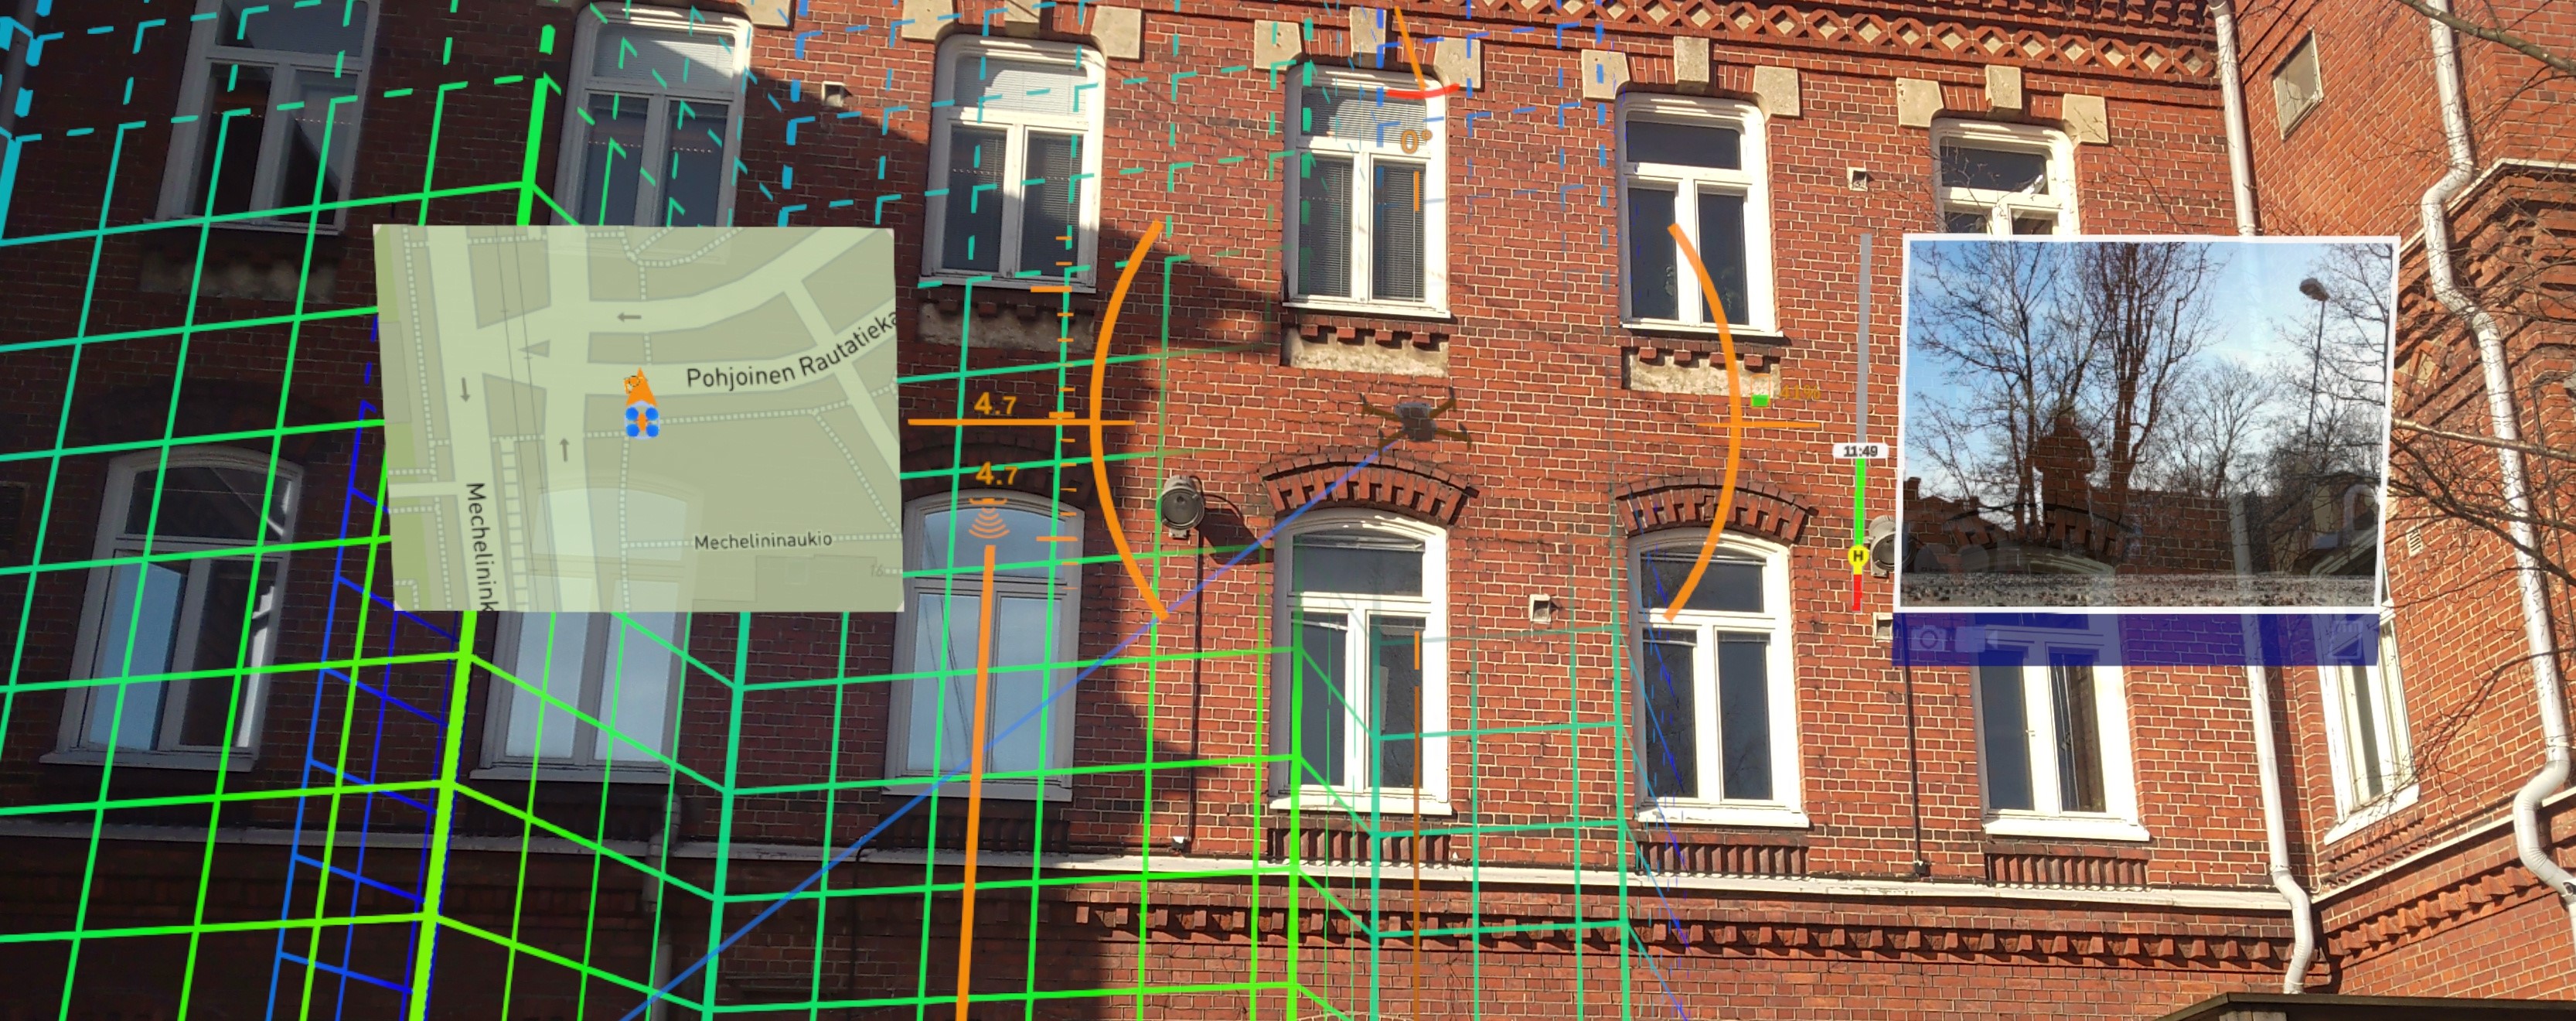
Drone Indicators
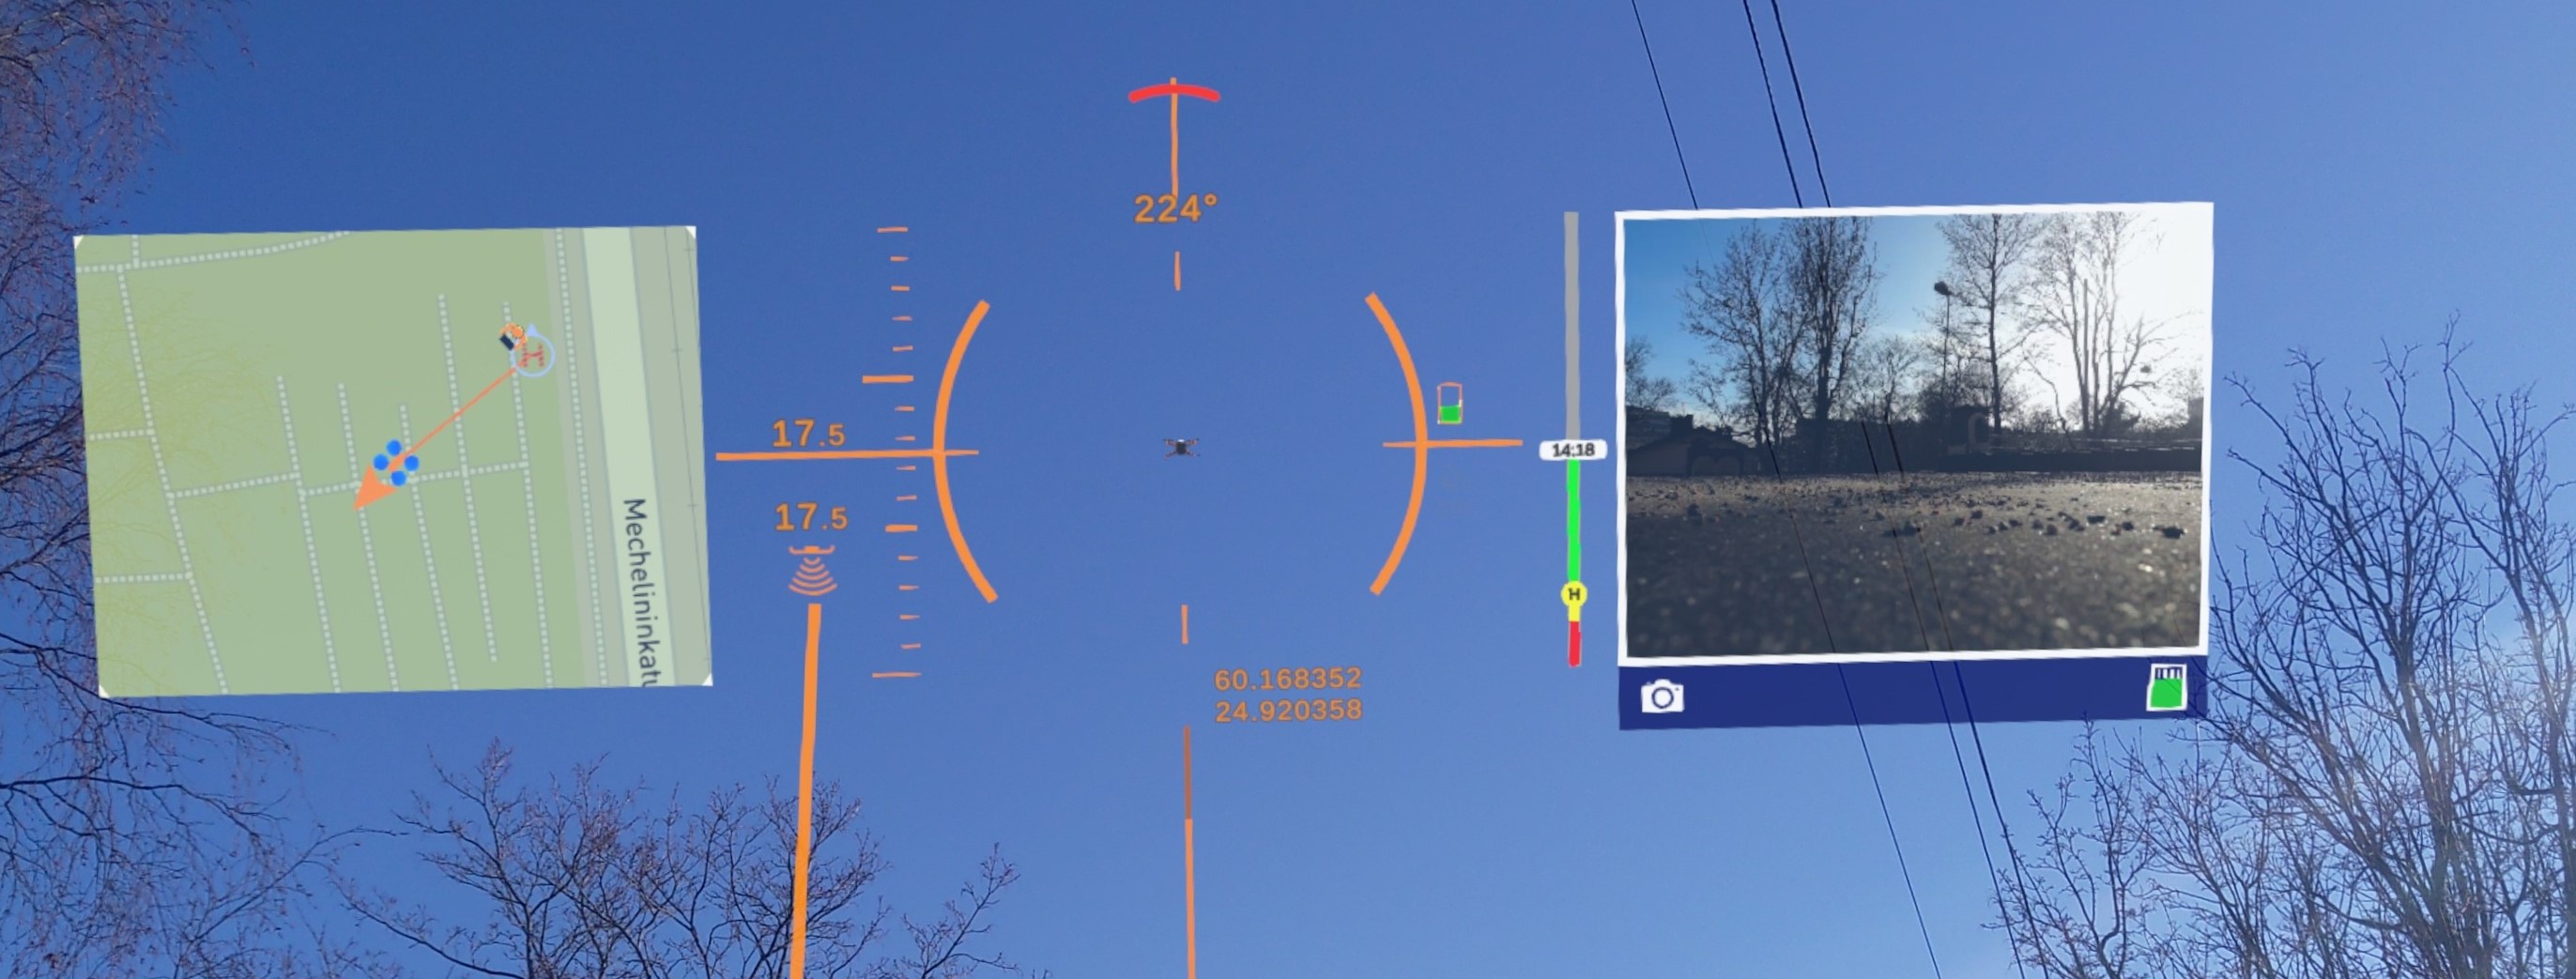
The drone indicators allow you to see information during the flight, where the drone is. With these indicators, you will be able to see important data about the flight in the AirHUD™ app. The drone indicators include the following elements:
Latitude/Longitude: This shows latitude and longitude of the drone. (Not visible by default but can be toggled on from the Settings panel. See Settings Panel section.)
Sky Map: The sky map is positioned above (left side of the drone indicators), so that you can see the map in the sky while flying. The sky map dynamically adapts to the selected map settings, whether you are in circular map mode or big map mode. If any function is triggered on a map, it will also be visible on the sky map: added markers, visibility of airspace zones, zoom in/out, etc.
Altitude indicator: Indicates the height of the drone.
Drone indicator brackets: Show where the drone is.
Battery level indicator: This shows the battery information of the drone as a simple bar and green / orange / red colours. When looking at the indicator for a short while, the detailed percentage number is shown.
Satellite reception strength: This shows how many GNSS satellites the drone is currently using as simple icon with green (over 13 satellites available) / orange (12-10) / red (9 or less satellites available) colours. When looking at the indicator for a short while, the number of satellites is also shown.
Remaining airtime (as shown also in DJI Flight app): This indicator shows the predicted remaining flight time of the drone according to the battery level and power usage.
Video: The live video feed from the drone camera(s). The configuration of this view is controlled by the controller AirHUD™ app camera settings.
Distance: Provides distance from the home position to current drone location on the ground level.
Heading indicator: This shows the drone's compass heading.
ADS-B
ADS-B is a technology used in aviation to transmit important aircraft information such as location, speed, and altitude to ground stations and other aircraft equipped with ADS-B receivers. This information is used by air traffic controllers to monitor and manage air traffic, improving safety and efficiency. ADS-B is becoming increasingly popular and is mandatory in certain airspace in many countries.
ADS-B information has been integrated into AirHUD™ to increase flight safety. Within a 50 km radius around the drone (affected by the surrounding environmental conditions), AirHUD™ displays approaching aircrafts and their direction on a circular map, while the Diagnostic Panel provides information on the aircrafts within a 3 km radius. (Note that the ADS-B icon on the map only indicates the direction of the aircraft, and not its exact location. Therefore, it is important to pay attention to this information during the flight.)
ADS-B icons on a circular map also include a panel that provides information about the approaching aircraft. To activate the ADS-B information panel, simply focus on the aircraft icon for a prolonged period, assuming eye tracking is permitted and enabled. Deactivating the panel follows the same procedure.
Since the data is drone-centrinc, ADS-B alerts are not visible on the map in the following cases:
Centering option other than drone-centered (such as pilot or mission center) or panning the map manually
In Big map mode
When the drone in use does not have ADS-B capability (for example, the DJI Mini 2 does not support ADS-B).
Panels
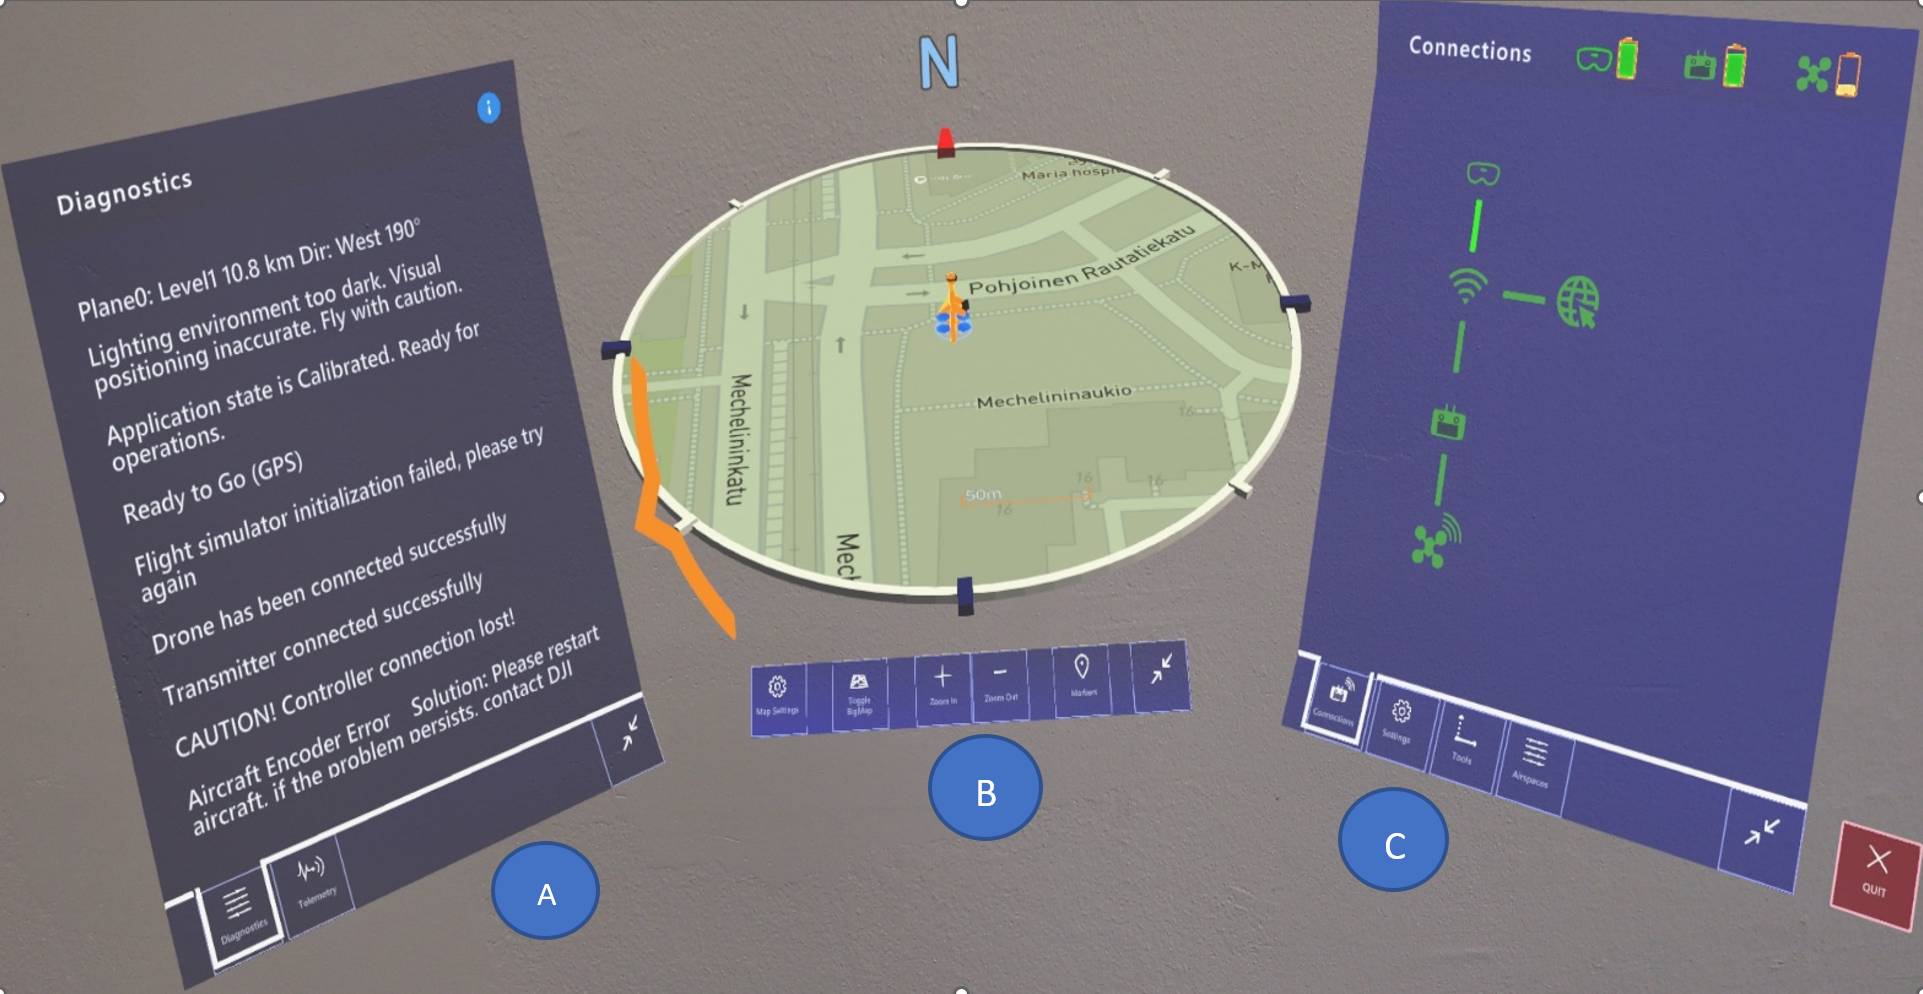
The “Belt UI” consisting of panels and the circular map appears as shown above. On the left panel there are Telemetry and Diagnostic panels (A). Switching between the panels can be done by pressing the buttons located in the lower part of the panel. In the middle there is a Map panel (B). Map and related settings are displayed on this panel. On the right (C) there are the Connections, Settings, Tools and Airspaces panels (C). Again, switching between panels can be made through the buttons located below.
1. Diagnostics Panel
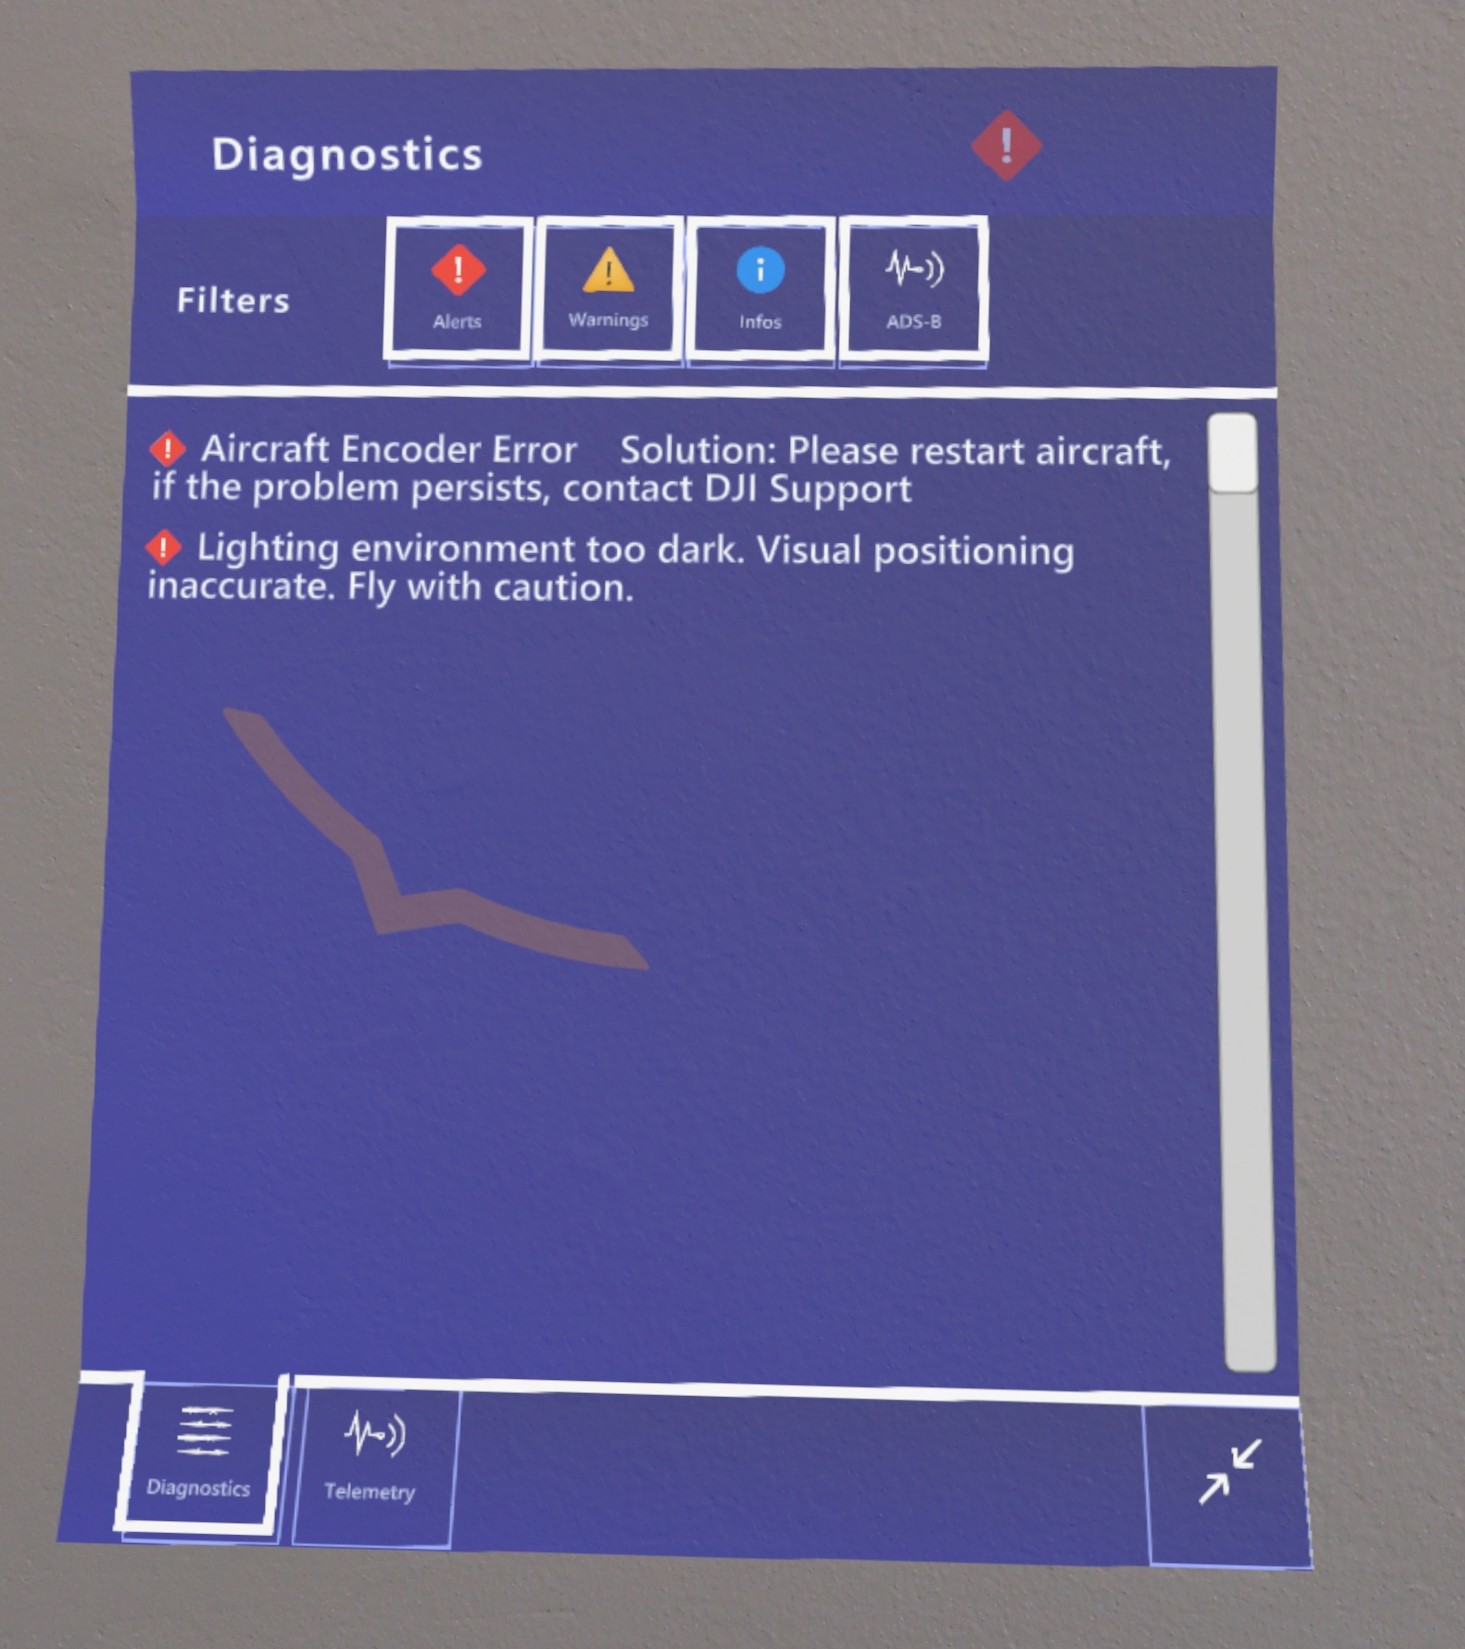
The Diagnostic feed panel provides you with a flow of information from the drone and / or controller. In case of a problem, or when you need to be informed, warnings are shown to you as notifications in this panel.
There are four types of warning messages in the Diagnostic Panel:
Alerts: Provides information about events with the highest priority. (Those with the red icon)
Warnings: Provides information about events with medium priority. (Those with the yellow icon)
Info: Provides messages containing information with low priority (e.g., calibration done). (Those with the blue icon)
ADS-B: Displays messages related to ADS-B. Two icons will be seen in ADS-B messages: one is the ADS-B icon and the other is the Alerts/ Warnings/Info icon depending on the priority level of the ADS-B message.
Messages are continuously sorted by priority level. Alert messages with the highest priority are displayed first, followed by warning messages, and finally Info messages. Messages are greyed out 30 seconds after becoming active and disappear completely 30 seconds after being greyed out.
All filters are initially activated in the application, and therefore, all warning messages are displayed. However, you can filter messages using the filters on the panel. ADS-B messages are also prioritized according to their importance. Therefore, ADS-B messages have both an ADS-B icon and a one of the priority level icons (Alert, Warning, Info); they are then sorted according to priority. Therefore, these messages can be filtered with either with level or separetly from the rest of the messages.
2. Telemetry Panel
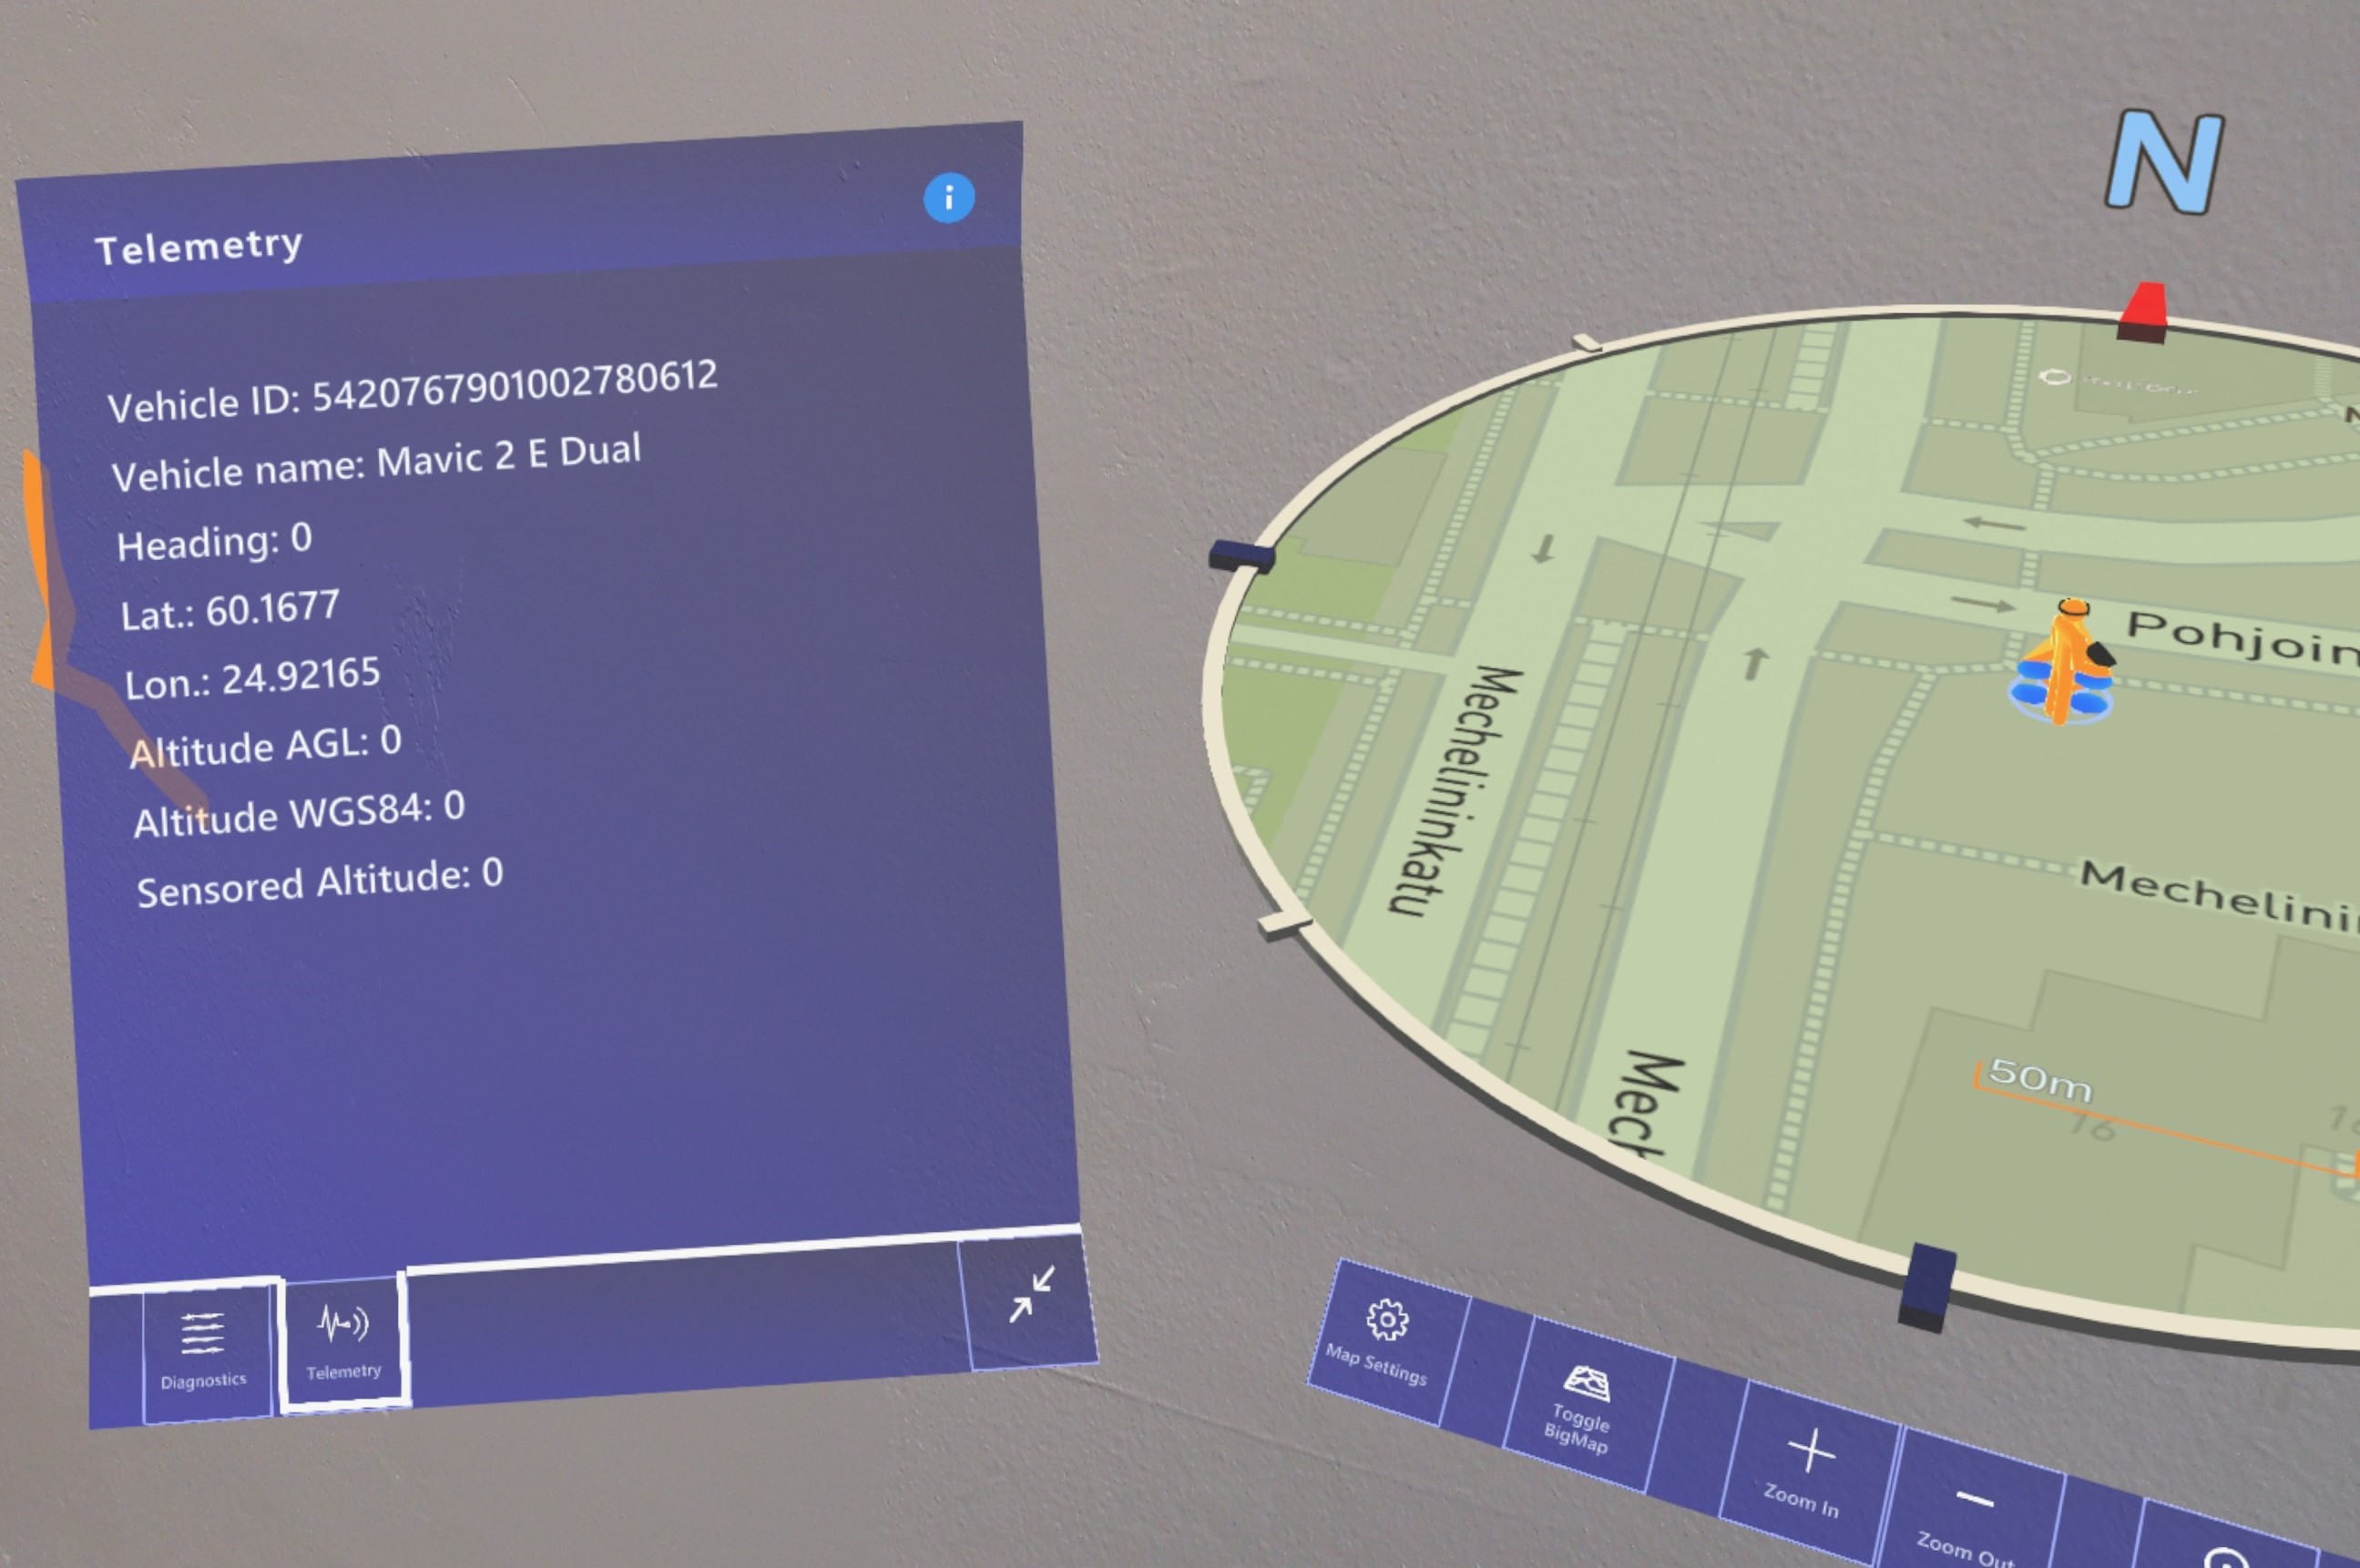
This panel provides you with detailed information about telemetry that flows from the connected drone, including the following data points:
Vehicle ID: The ID number of the drone.
Vehicle Name: Name of the drone, as given through the controller.
Heading: Compass heading of the drone in degrees.
Latitude: Latitude coordinate of the drone location.
Longitude: Longitude coordinate of the drone location.
Altitude AGL: Current height of the drone above ground level.
Altitude WGS84: Current height of the drone relative to the WGS84 coordinate system.
Sensored Altitude: The height as perceived by the drone near height detection sensors, if any are available, and if they detect the anything near enough below the drone.
NOTE: Whenever suspecting connection problems between the drone and the AirHUD™ interface, it is easy to check with the Telemetry panel if information is actually flowing from the drone into AirHUD™ panels, as for example the latitude, longitude and height values should fluctuate a bit almost constantly.
3. Map Panel
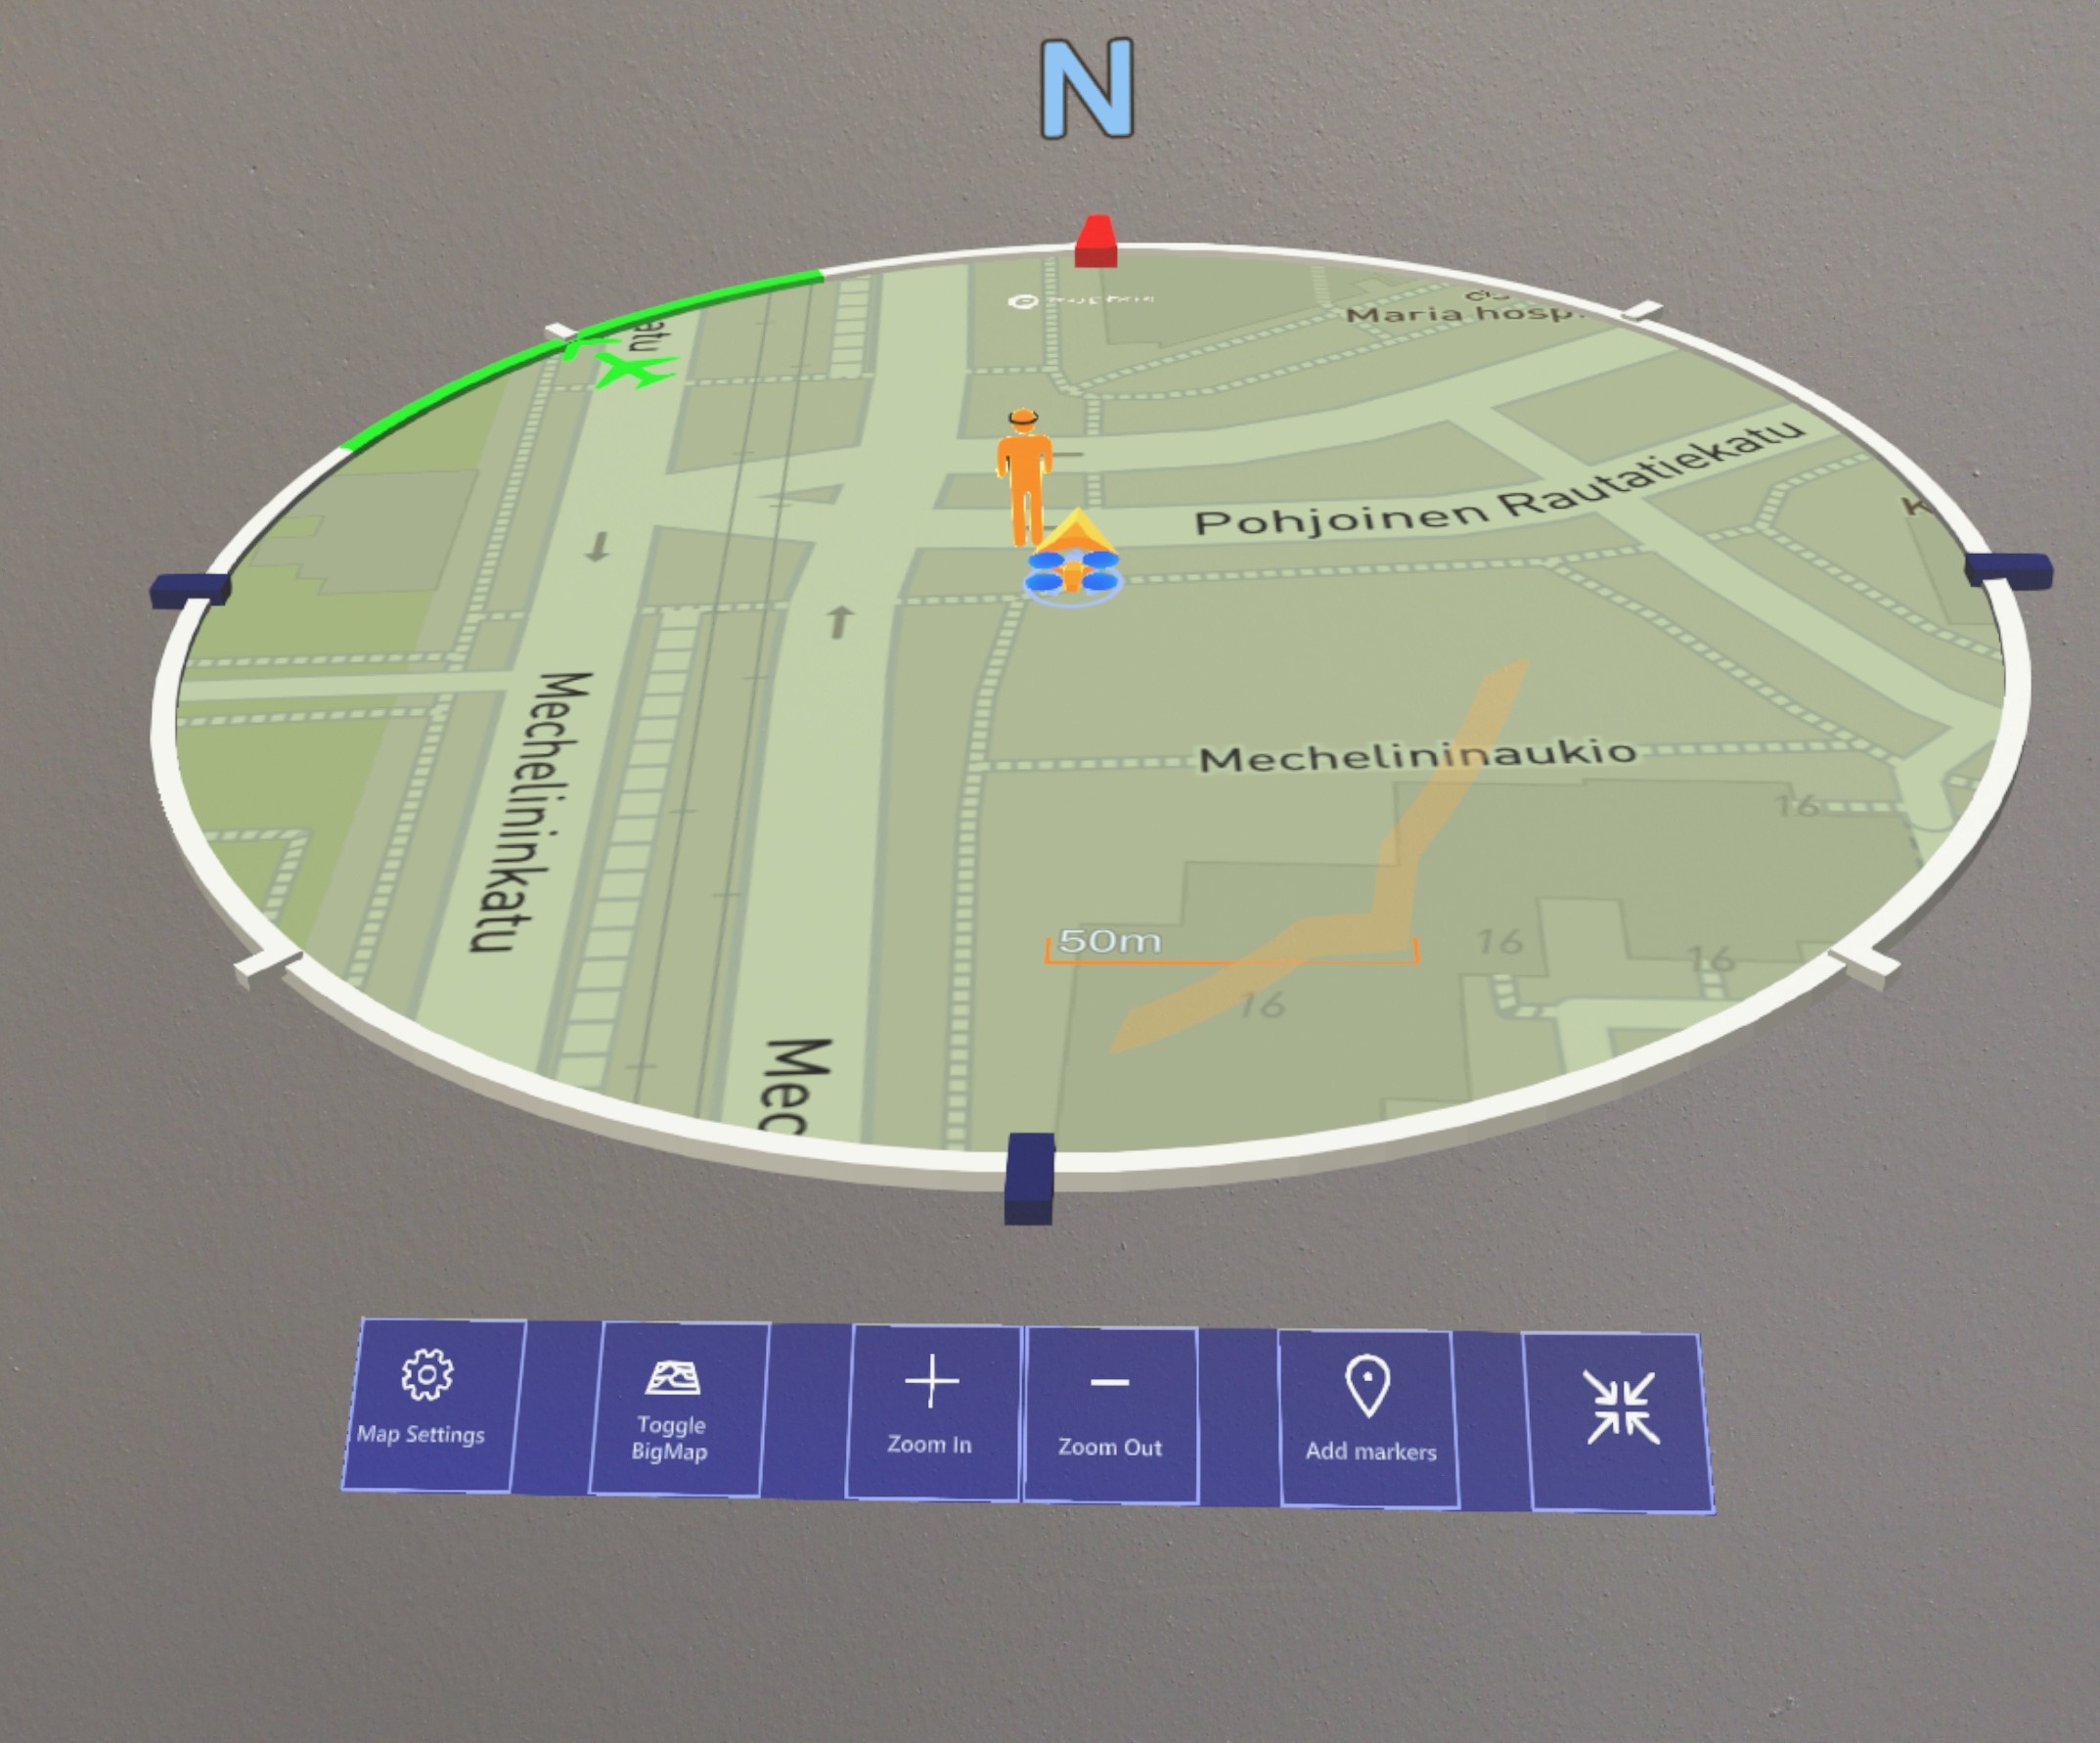
In the Map Panel, you can use the map functions and change the settings of the map. The features in the Map Panel are as follows:
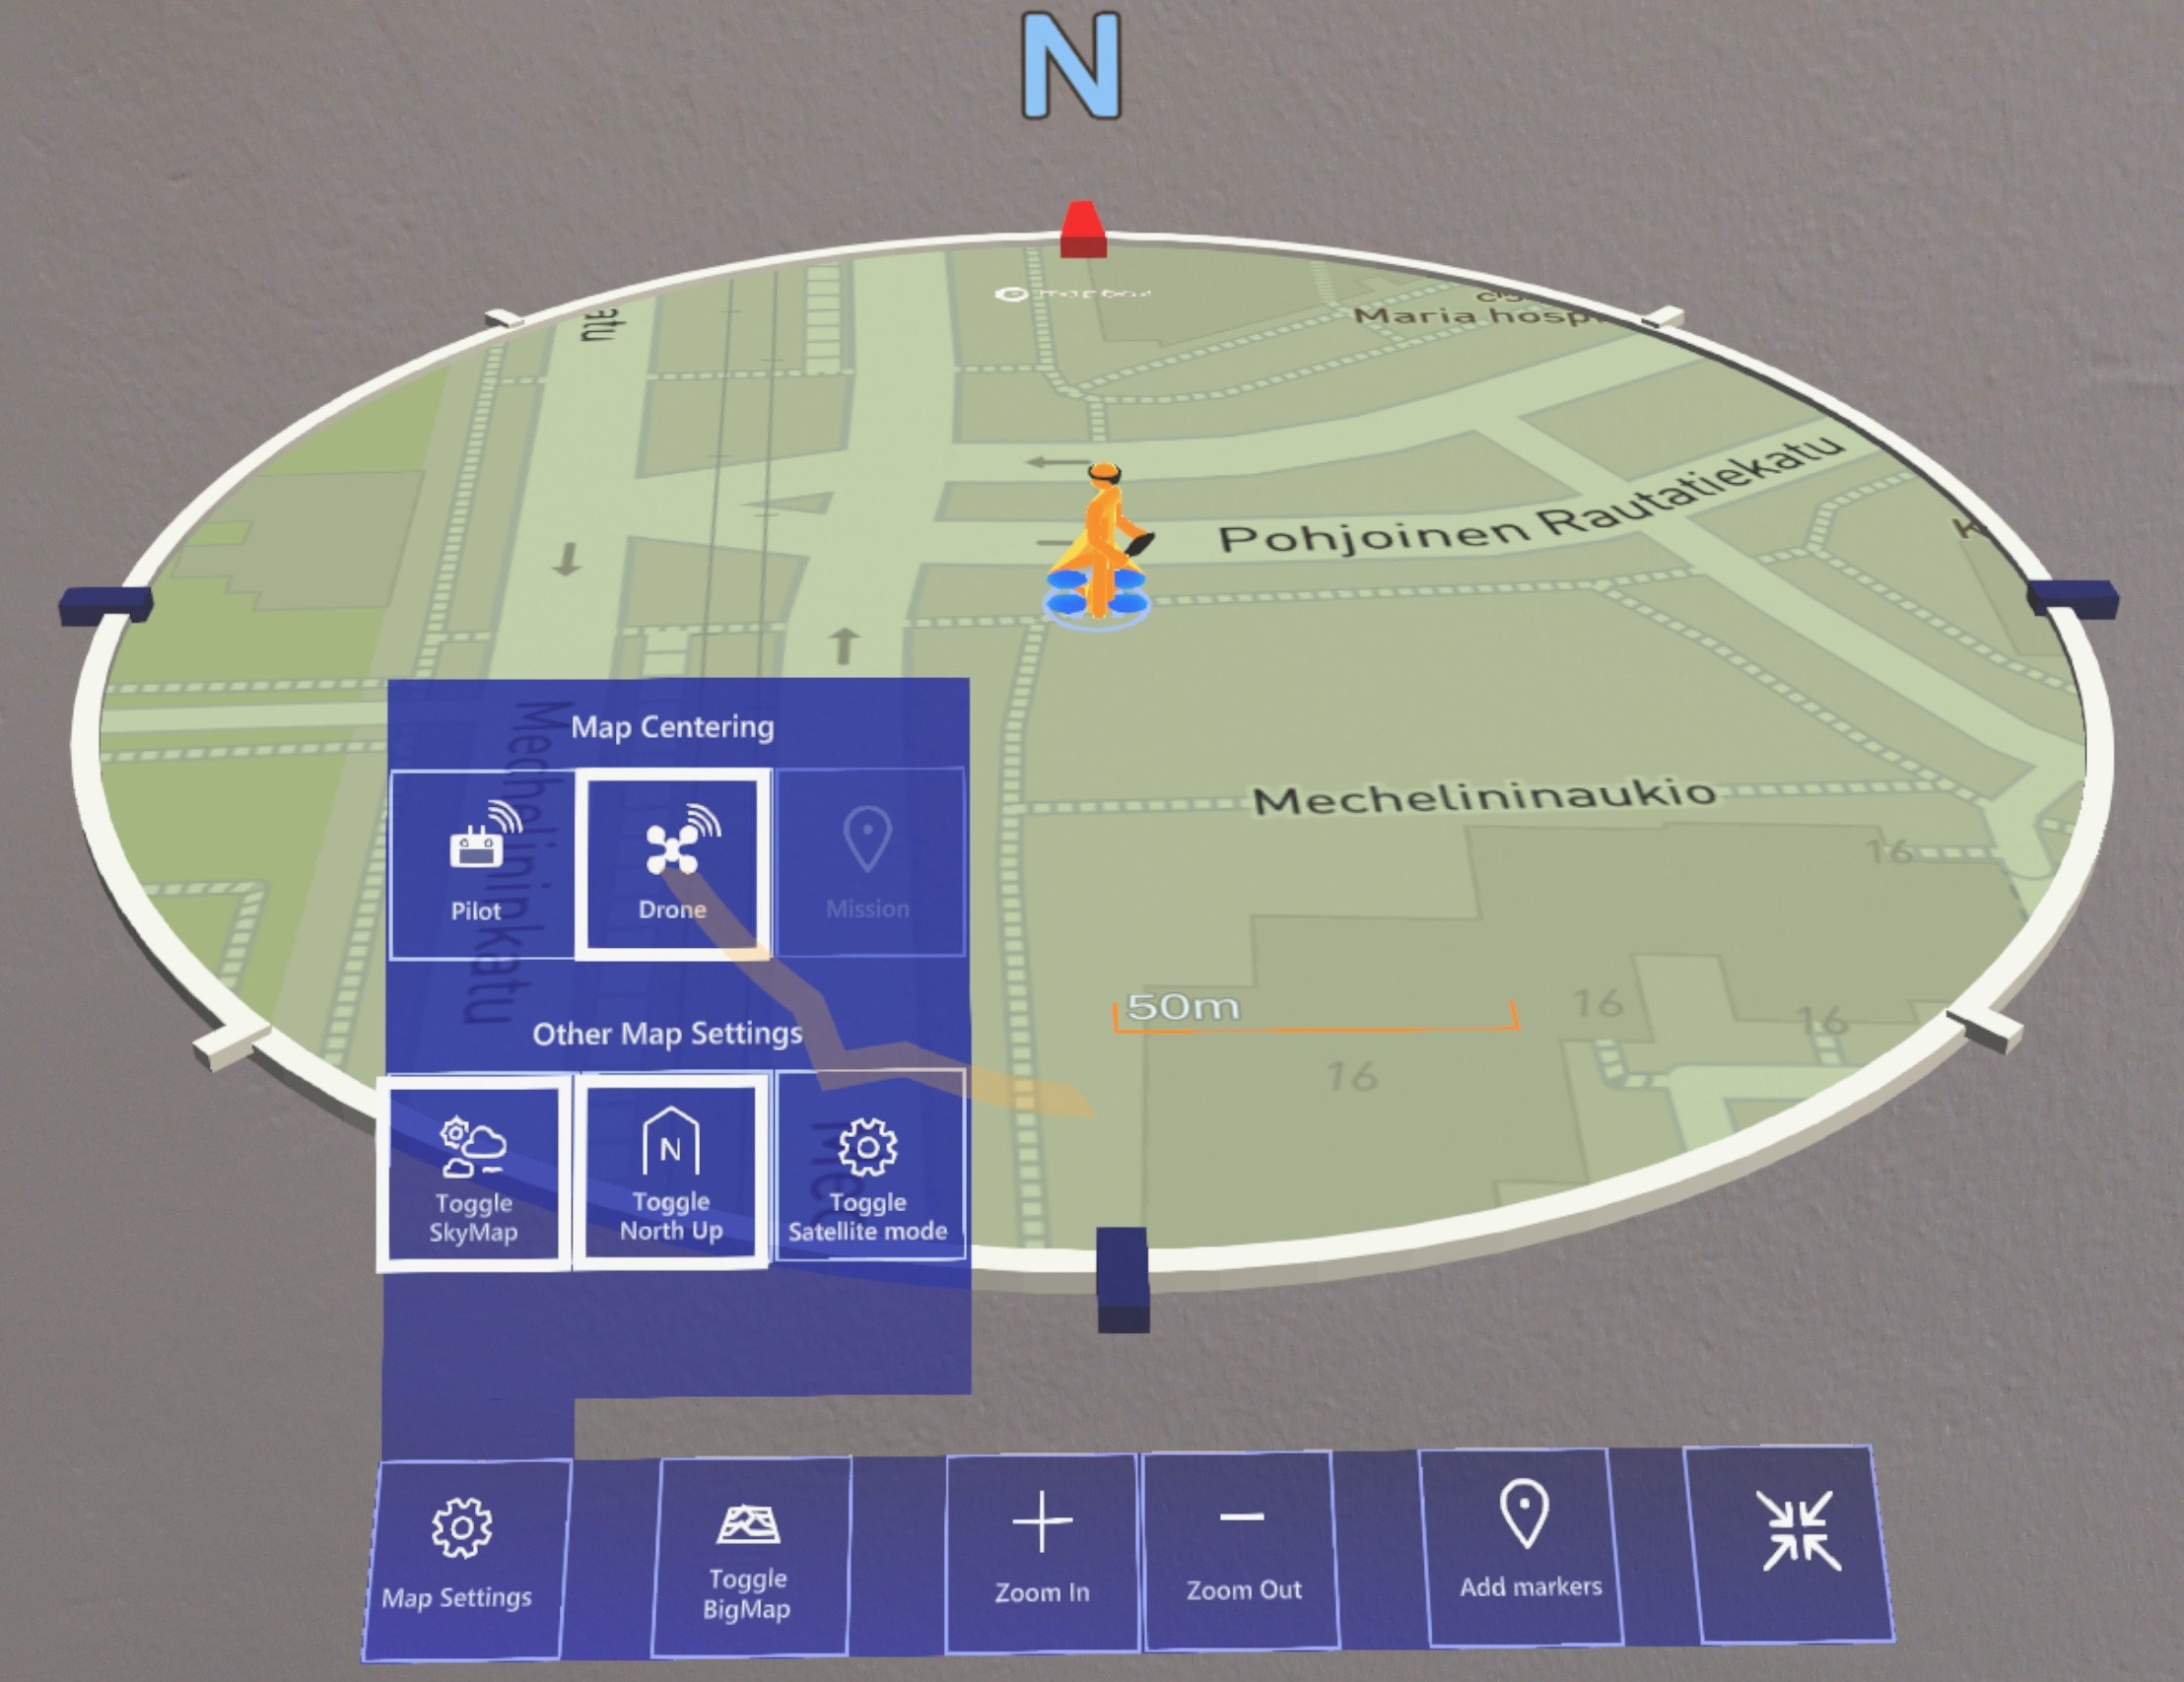
Map settings: This is where you will find all the settings for the map currently used. When you click on the map settings button, the Settings Panel will open. In the Settings Panel, you will find the following:
Centering: With these buttons, you can select the centering target of the map to either be the drone, the pilot (i.e., yourself) or the center of mission waypoint markers.
Toggle North up: This button is used to pin the north of the circular map to point always up in the map.
Sky map: Toggles the visibility of the sky map.
Satellite view: You can change the map to satellite view using this button.
Toggle Big map: You can toggle the “Big map” from this button.
Zoom in/Zoom out: During the flight, it is very important to have information about the flight area. For example, if the flight target is far away, you need a wider view on the map to better see the distance between target, you and the drone while flying. The Zoom in/out functions provide you with this possibility.
Markers: When you want to mark a specific point on the map, you can use “Makers”. In addition, the marker is visible in the correct world location as a real-world scale marker.

Clicking “'Add Marker” will make a marker appear on the marker button.
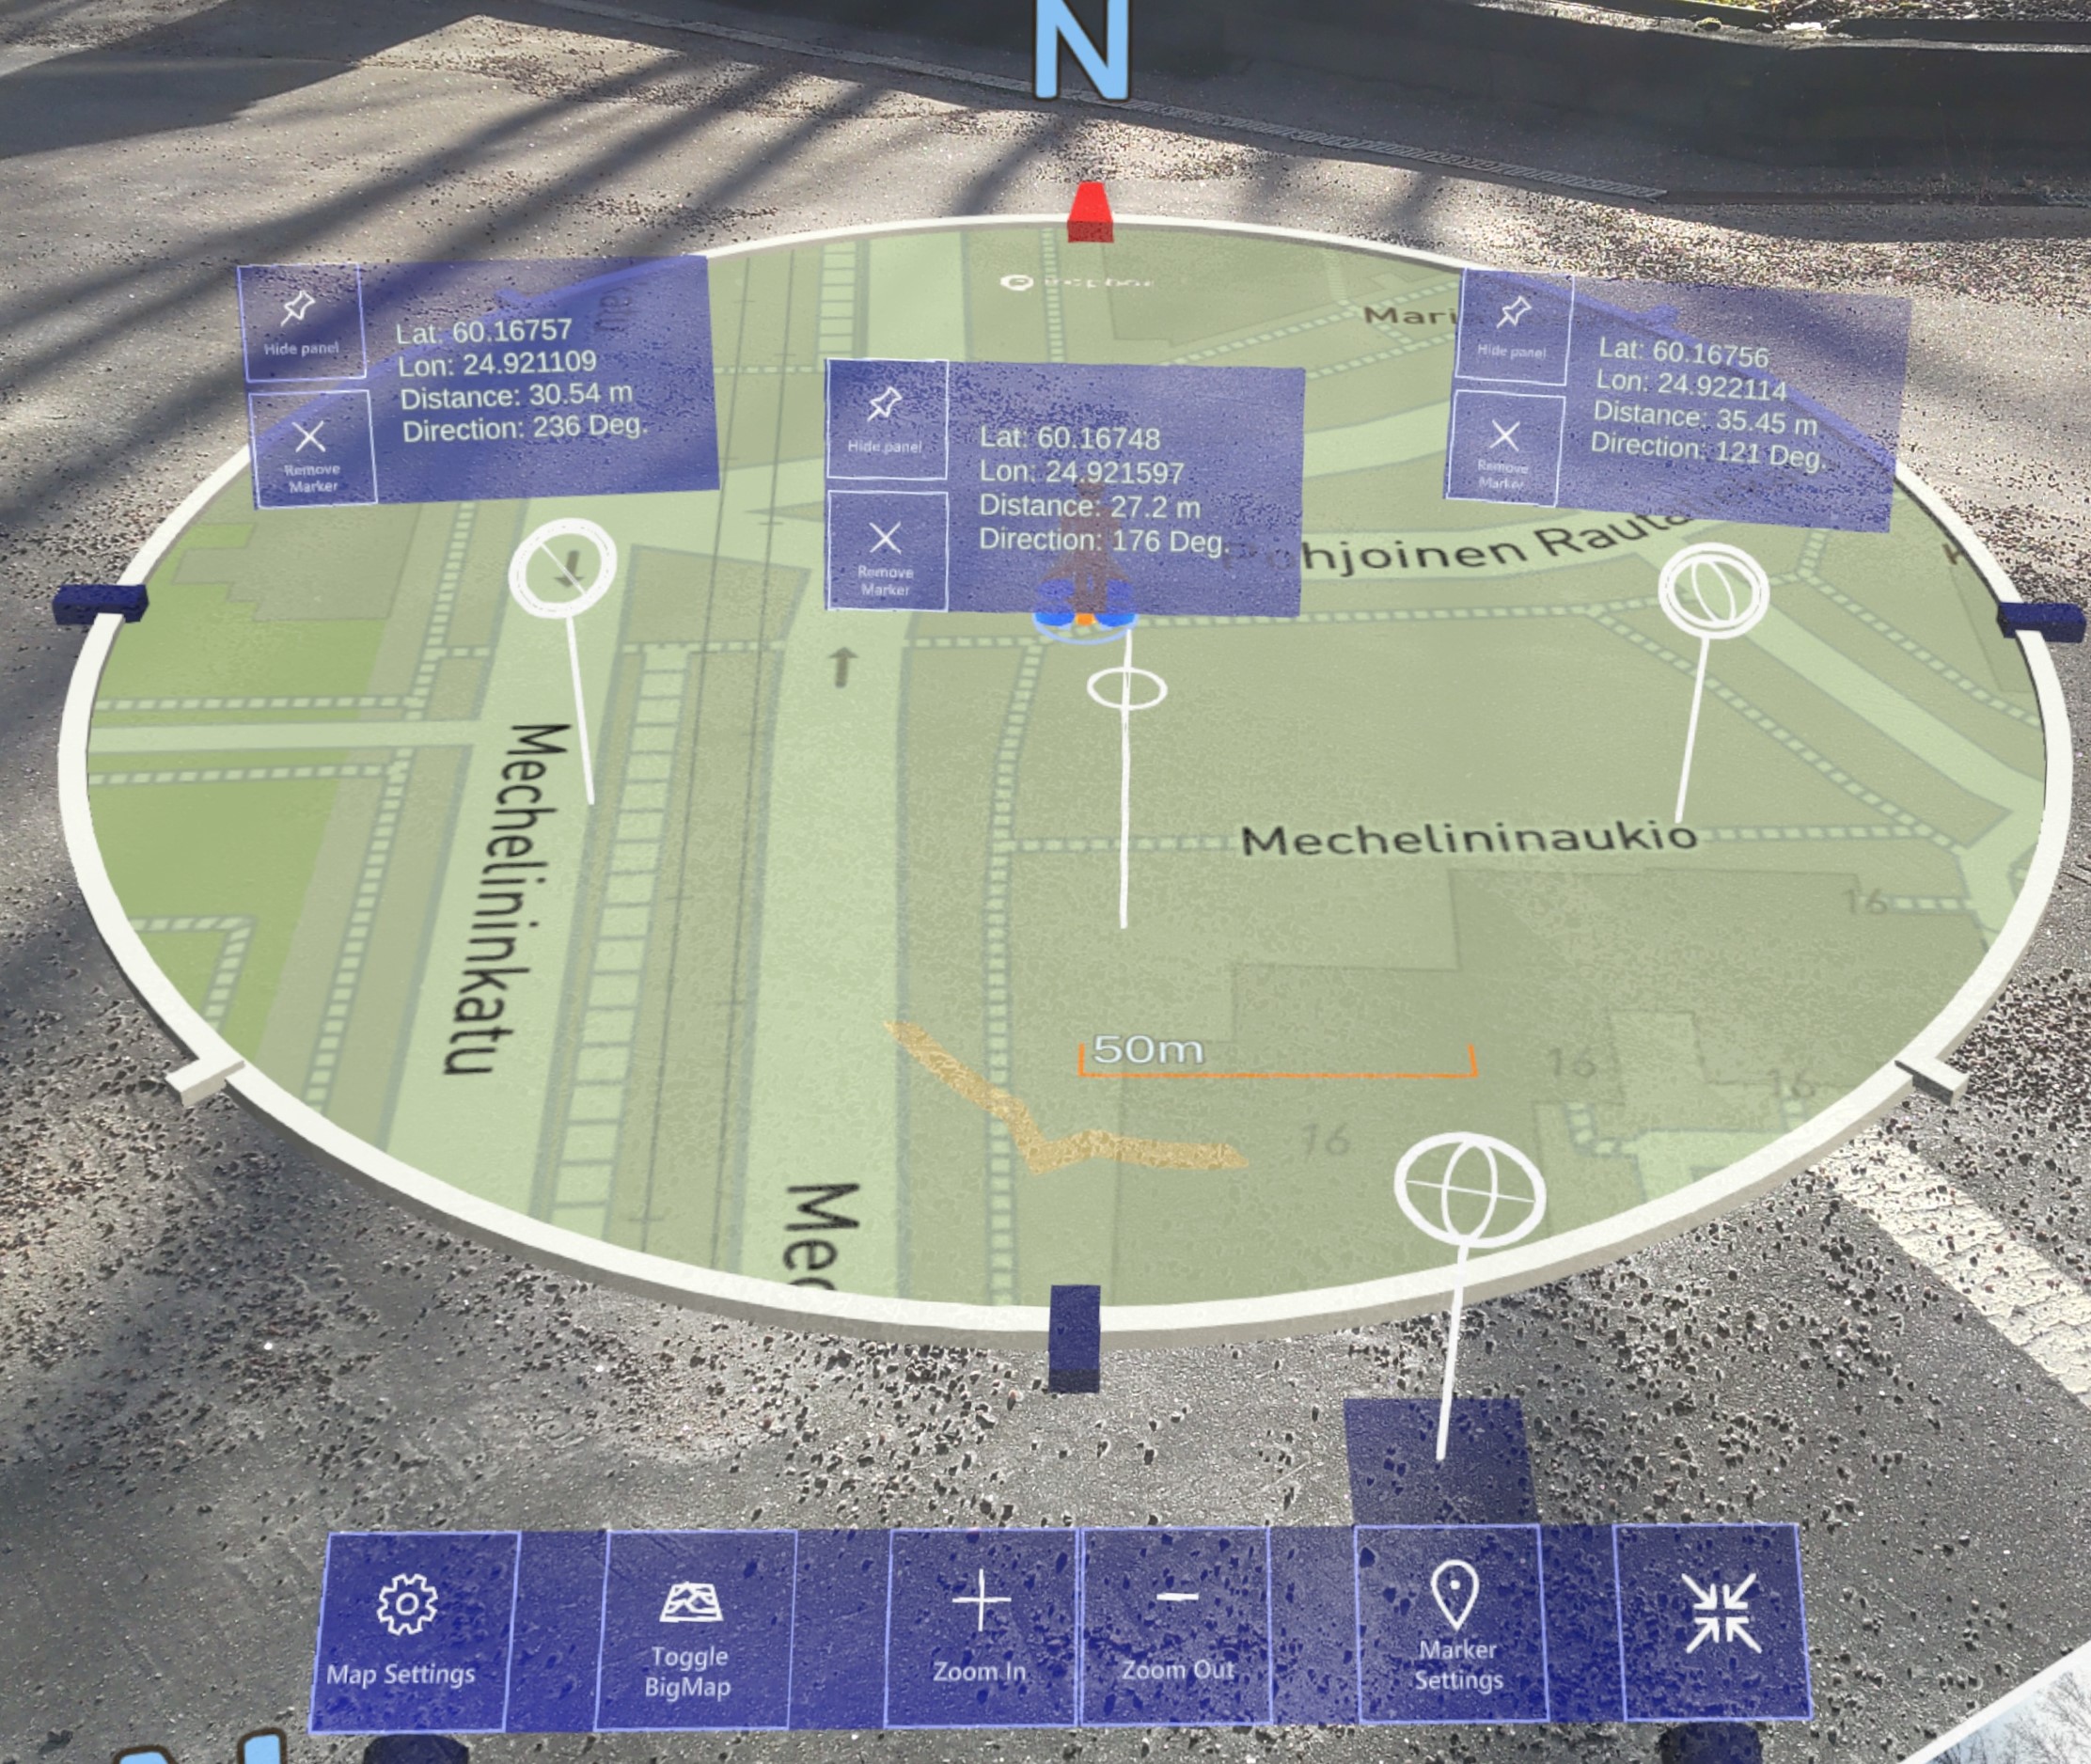
Now you can place the marker via drag and drop on the map wherever you want to have a marker.
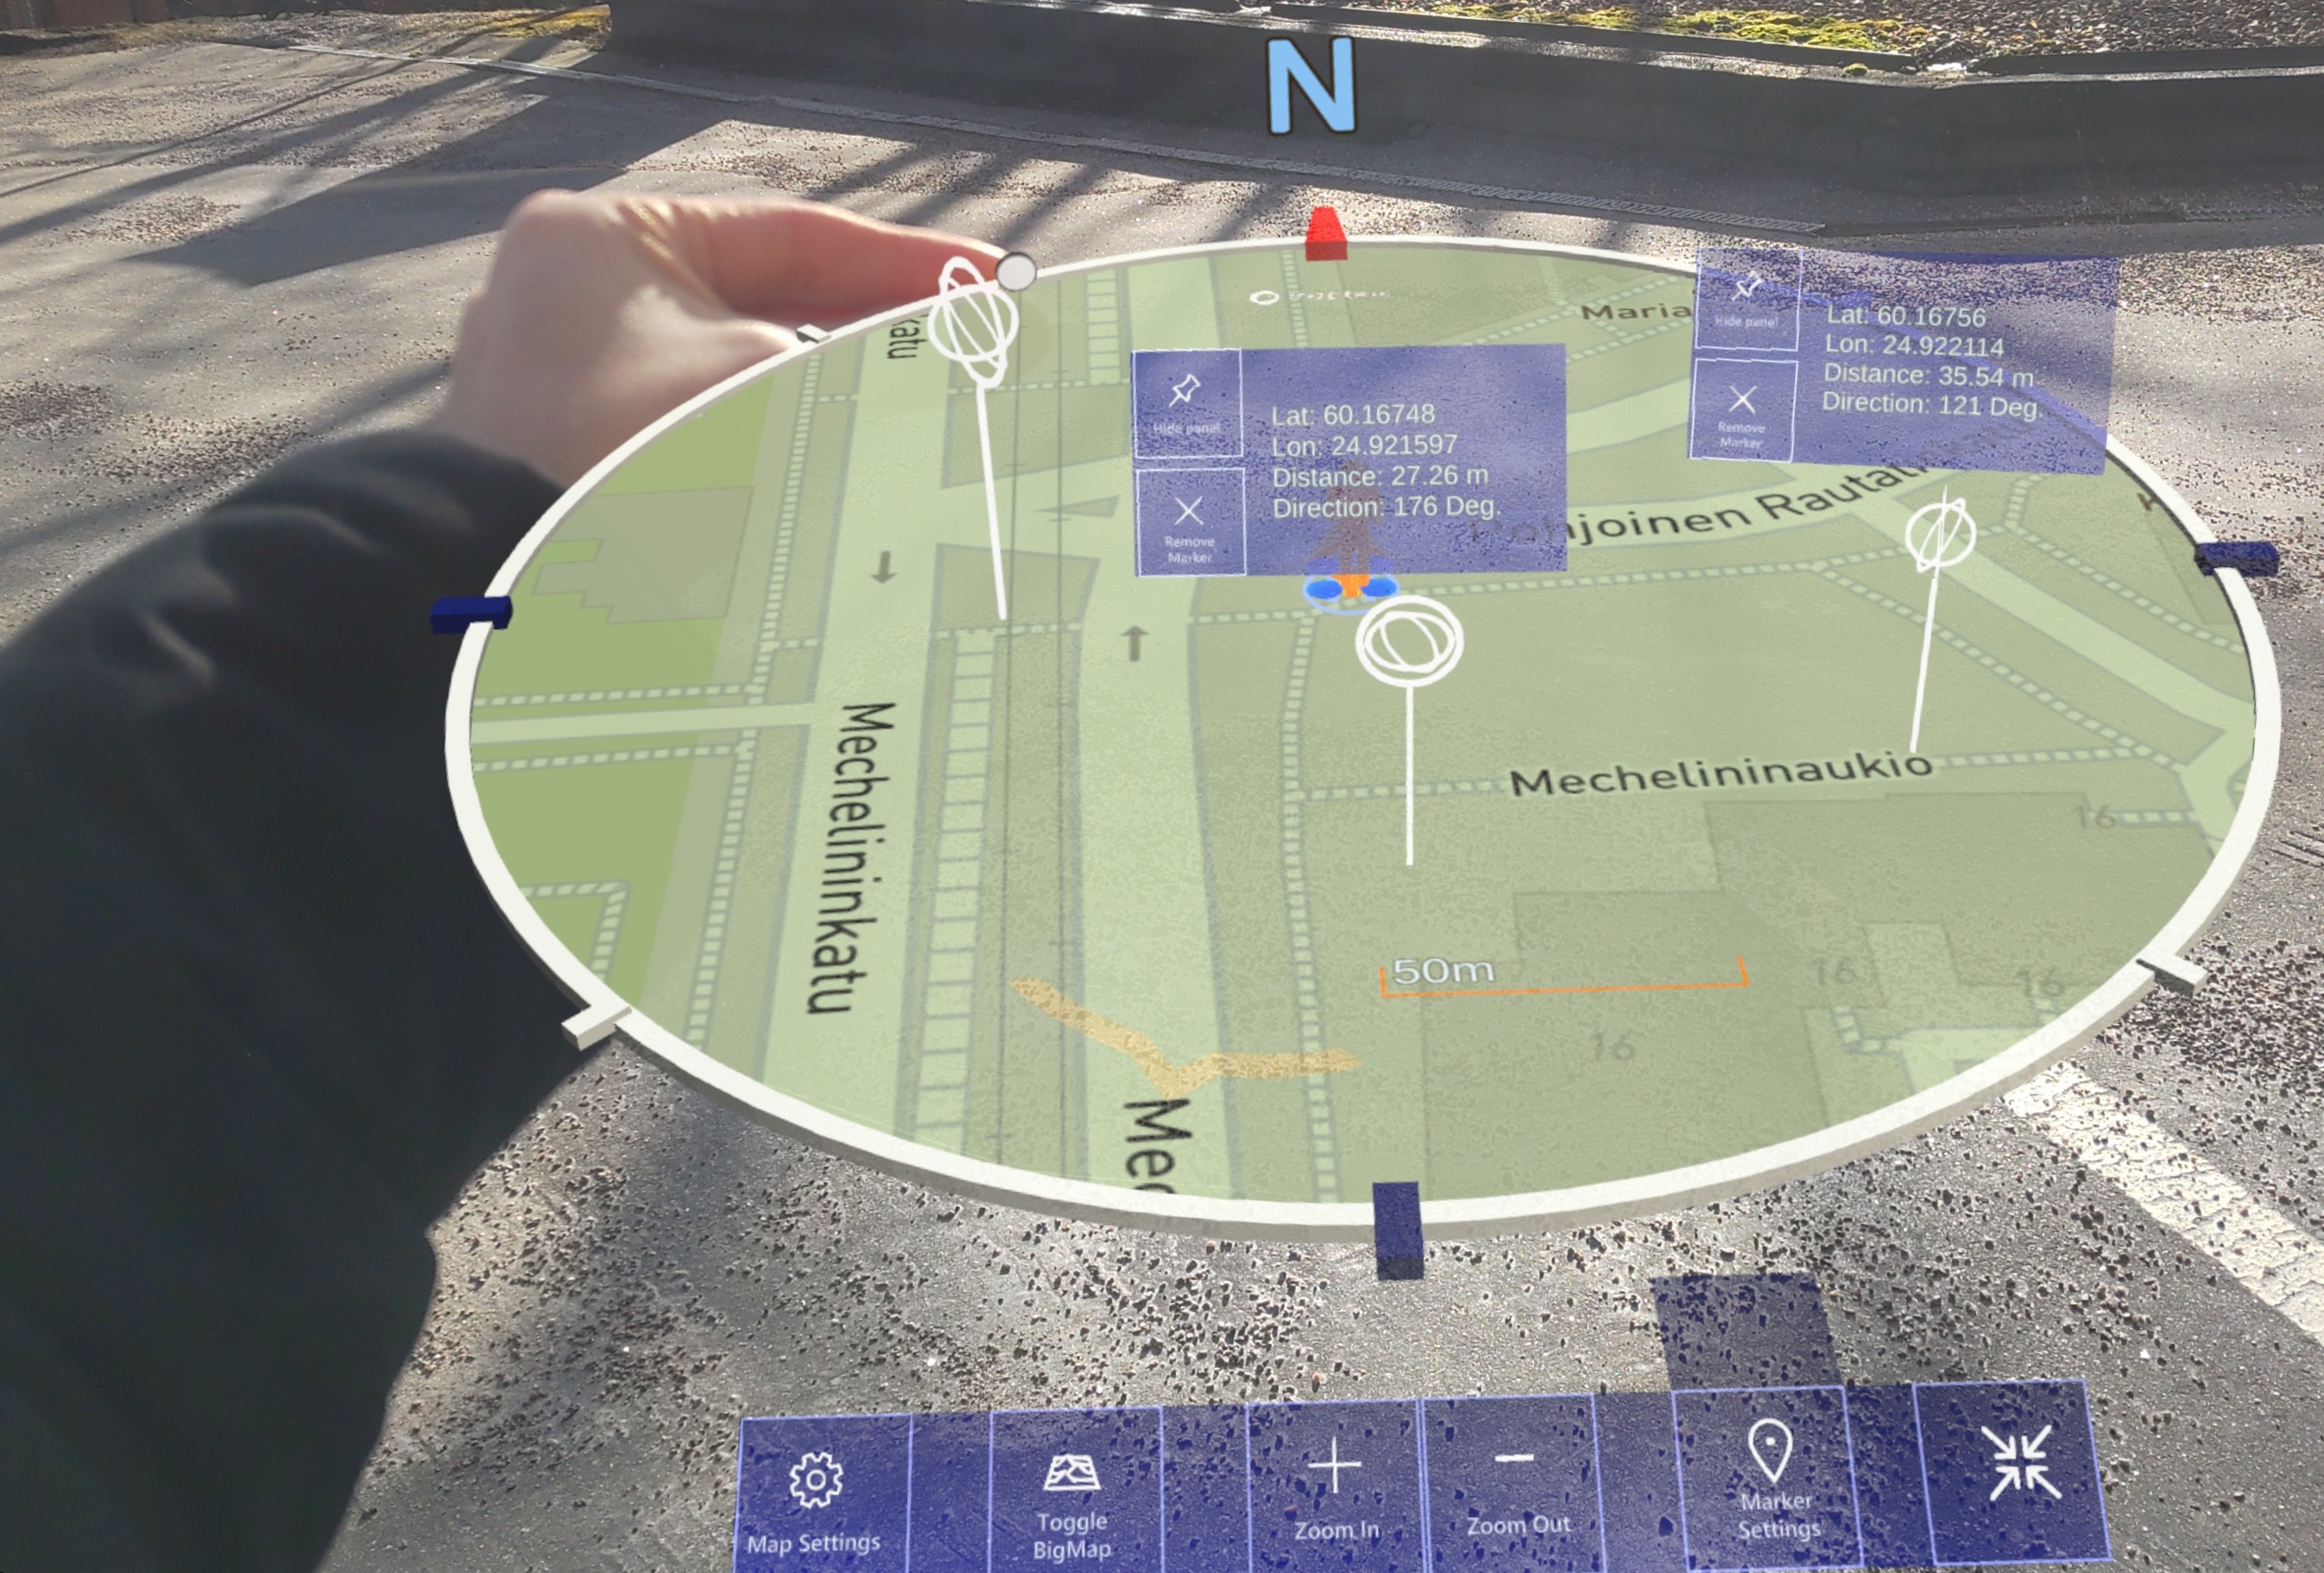
Once you have placed the marker, you can change its position again by dragging and dropping it. If you decide not to add the marker or want to remove an existing one from the map, you can drag and drop it off the map to remove it.
After adding a marker, a panel containing information about the marker will be opened. In this panel are, latitude and longitude information of the marker, your distance to the marker, and other information related to the marker. You can activate the information panels by looking at the markers head for an extended period (provided that eye tracking is enabled and active) or by keeping your finger on it as if you were looking at it. (When you look at the marker or hover your finger over it, an animation appears to activate/deactivate the panel.)
You can hide the panel with the 'Hide Panel' button or remove the marker with the 'Remove Marker' button.
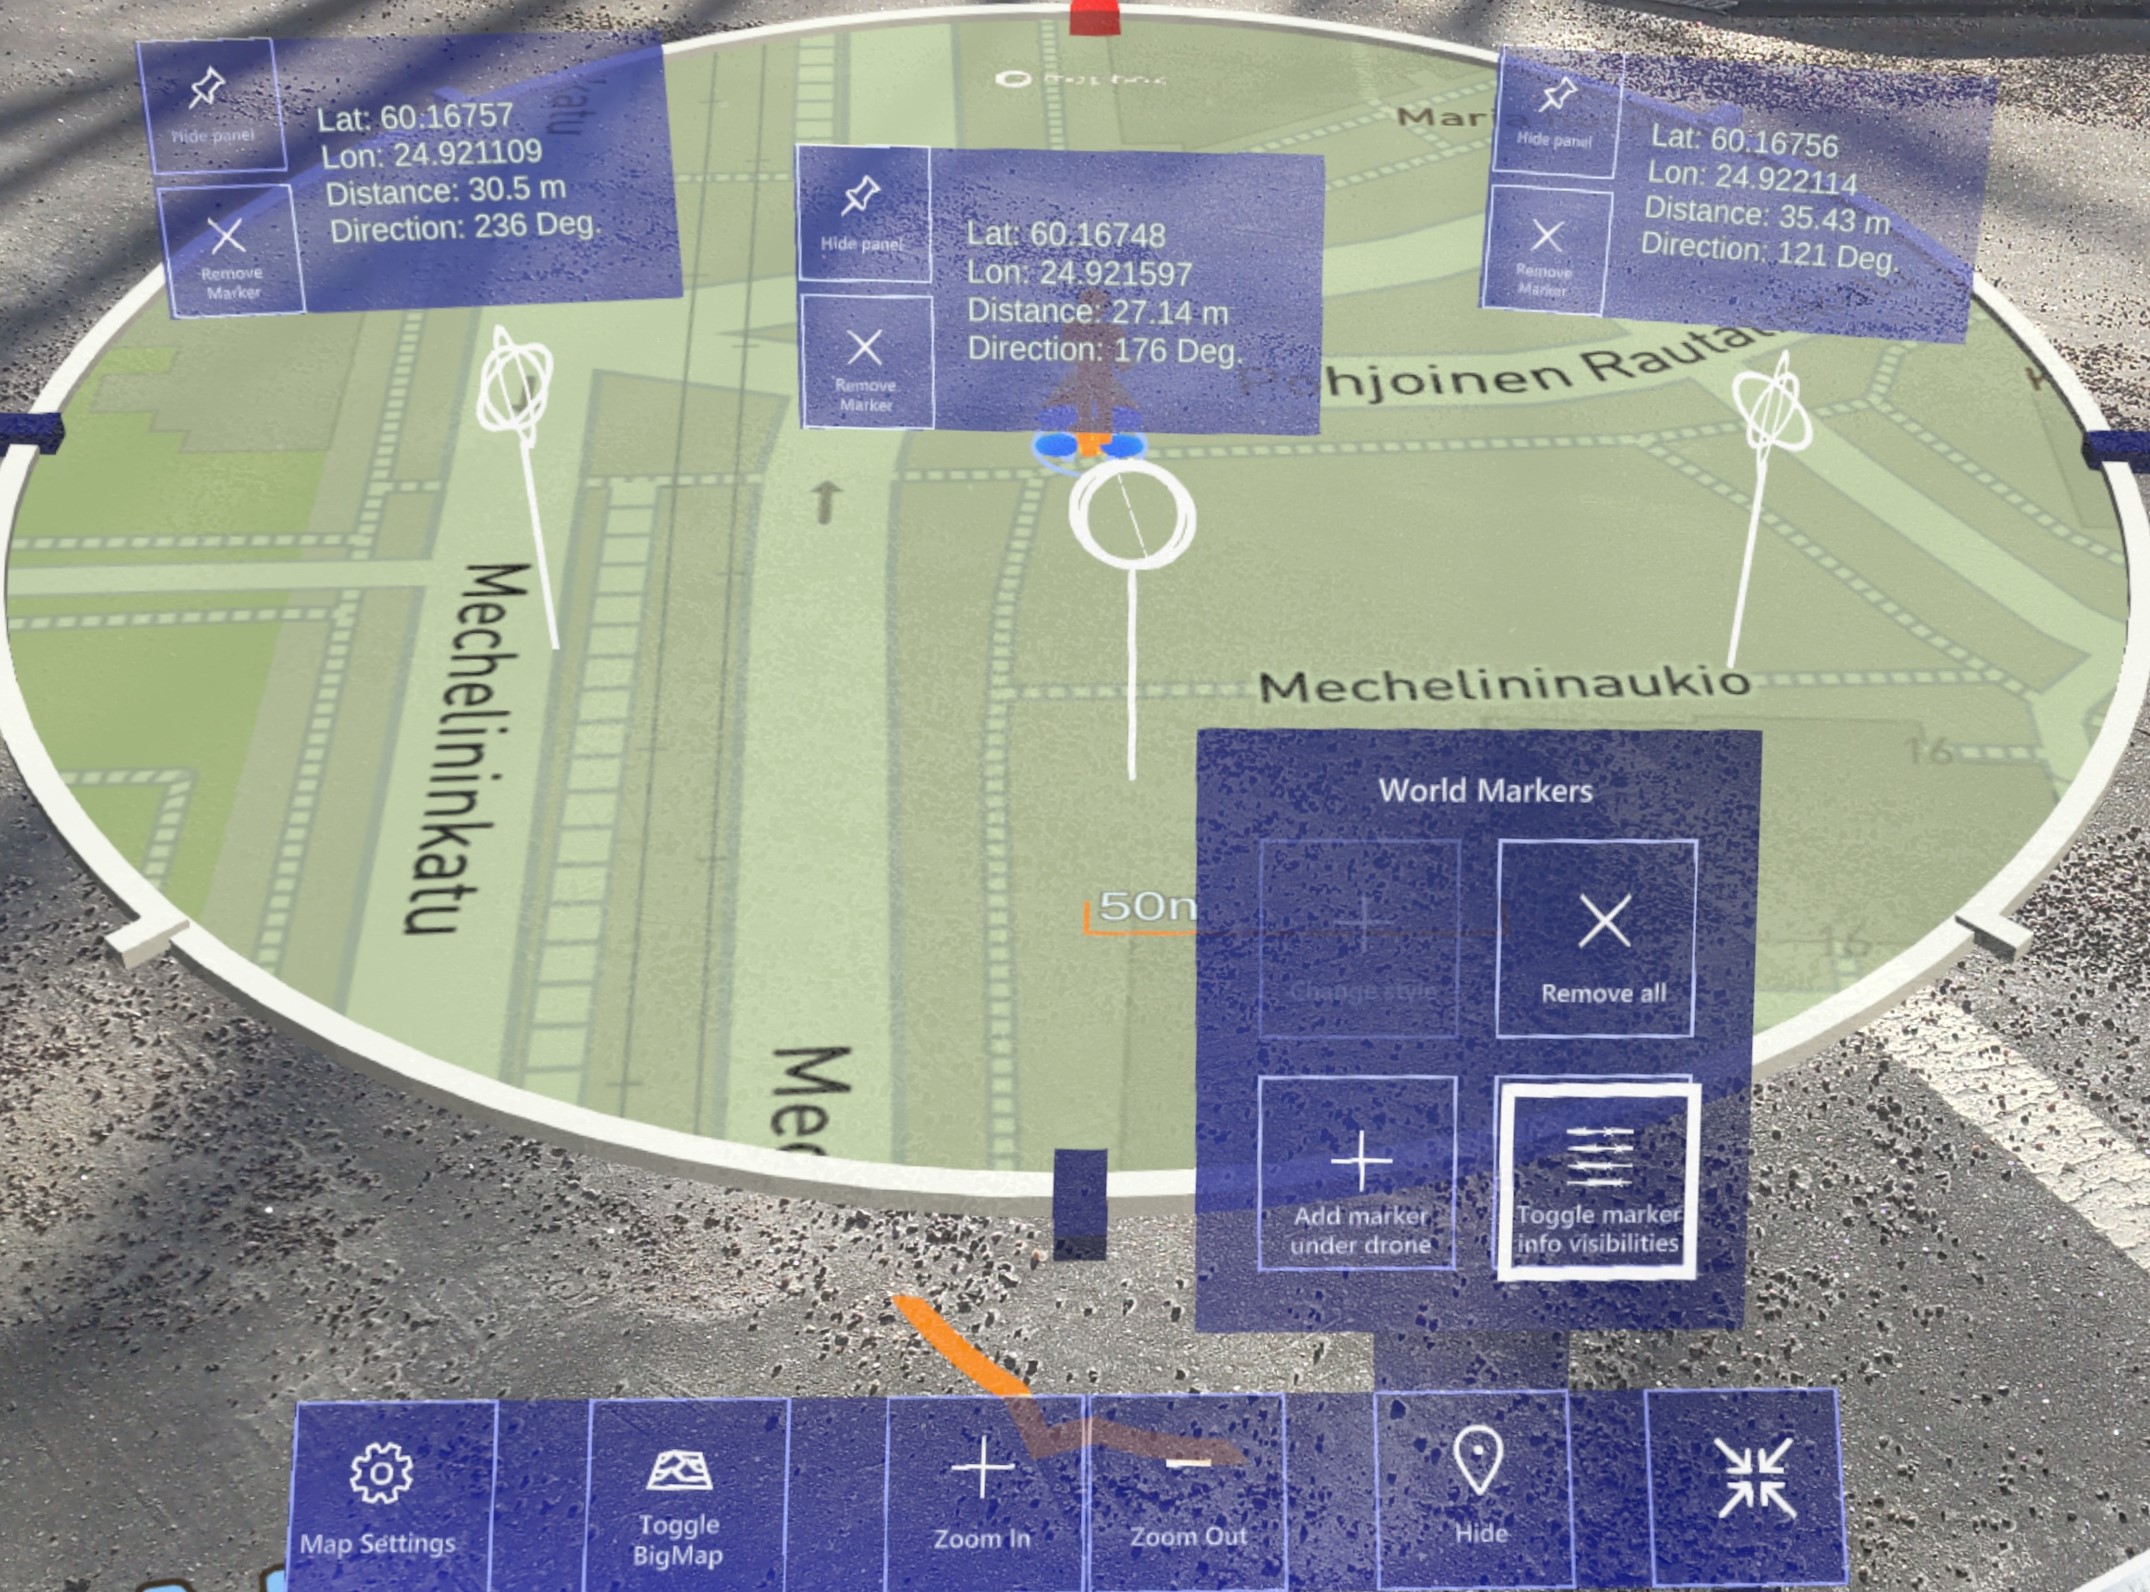
These settings include the 'Remove All' button to remove all markers, the 'Add under drone' button to add a marker directly to where the drone is located, the 'Change style' (upcoming feature) button to change the appearance of the markers, and the 'Toggle marker info visibilities' button to enable/disable information panels for all markers.
Lastly, you can hide the marker panel with the 'Hide' button.
Minimize/Maximize button: This button is used to minimize all panels in the Belt UI and activating Mini Panel.
- Mini Panel:
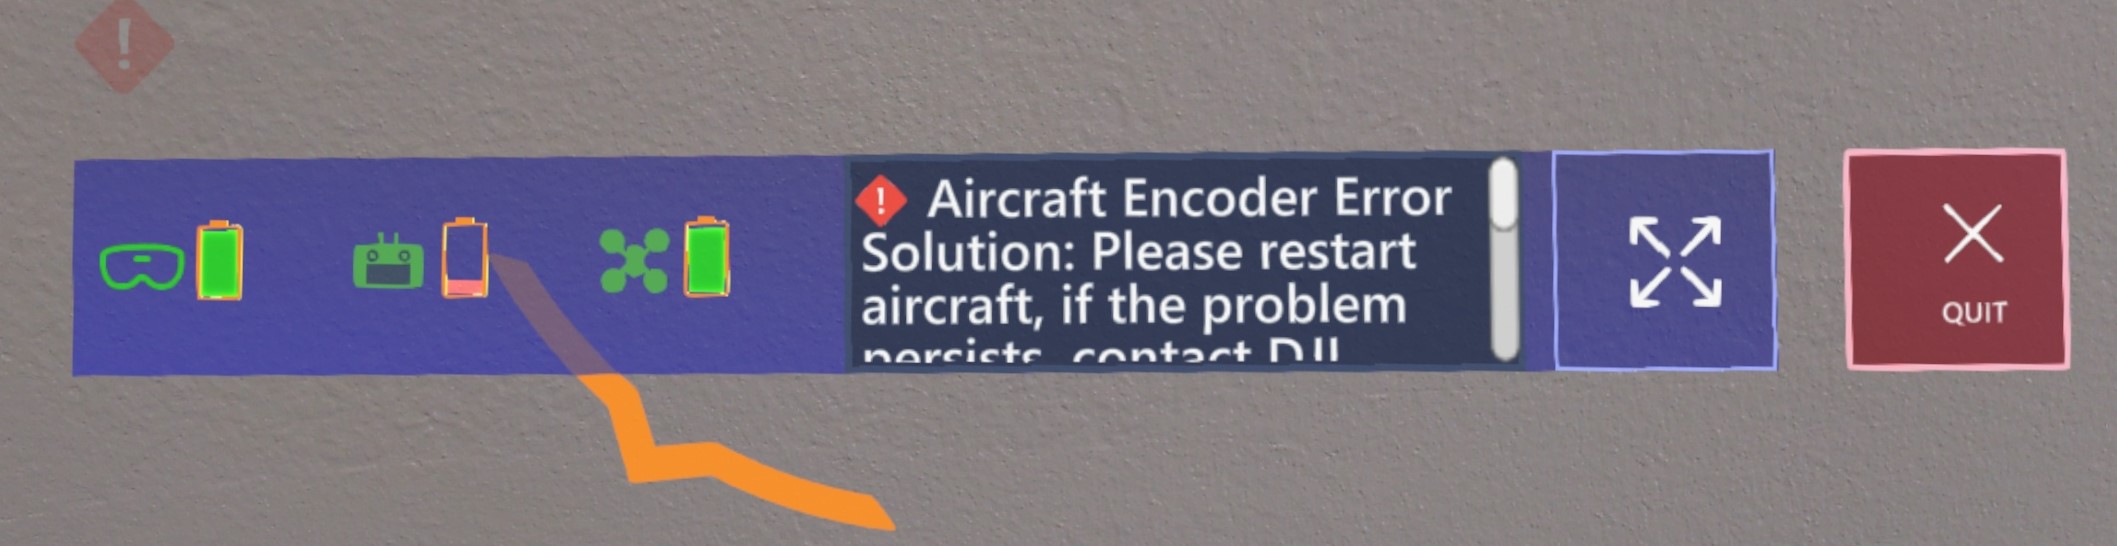
When you want to focus only on the flight, you can hide all the panels and the map via the map minimize button and Mini panel will appear in front of you. The mini panel contains the following items:
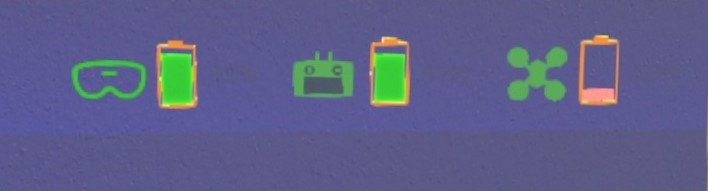
Status Bar: The connection manager shows whether the HoloLens, Drone, and Controller have established a successful connection with each other, and displays their battery levels. (Battery percentages is gaze activated)
Diagnostic Feed: A panel where you can see the necessary information and warnings.
Maximize Button: You can exit the mini panel by maximizing all panels and the map again with maximize button.
Quit button: You can exit from AirHUD™.
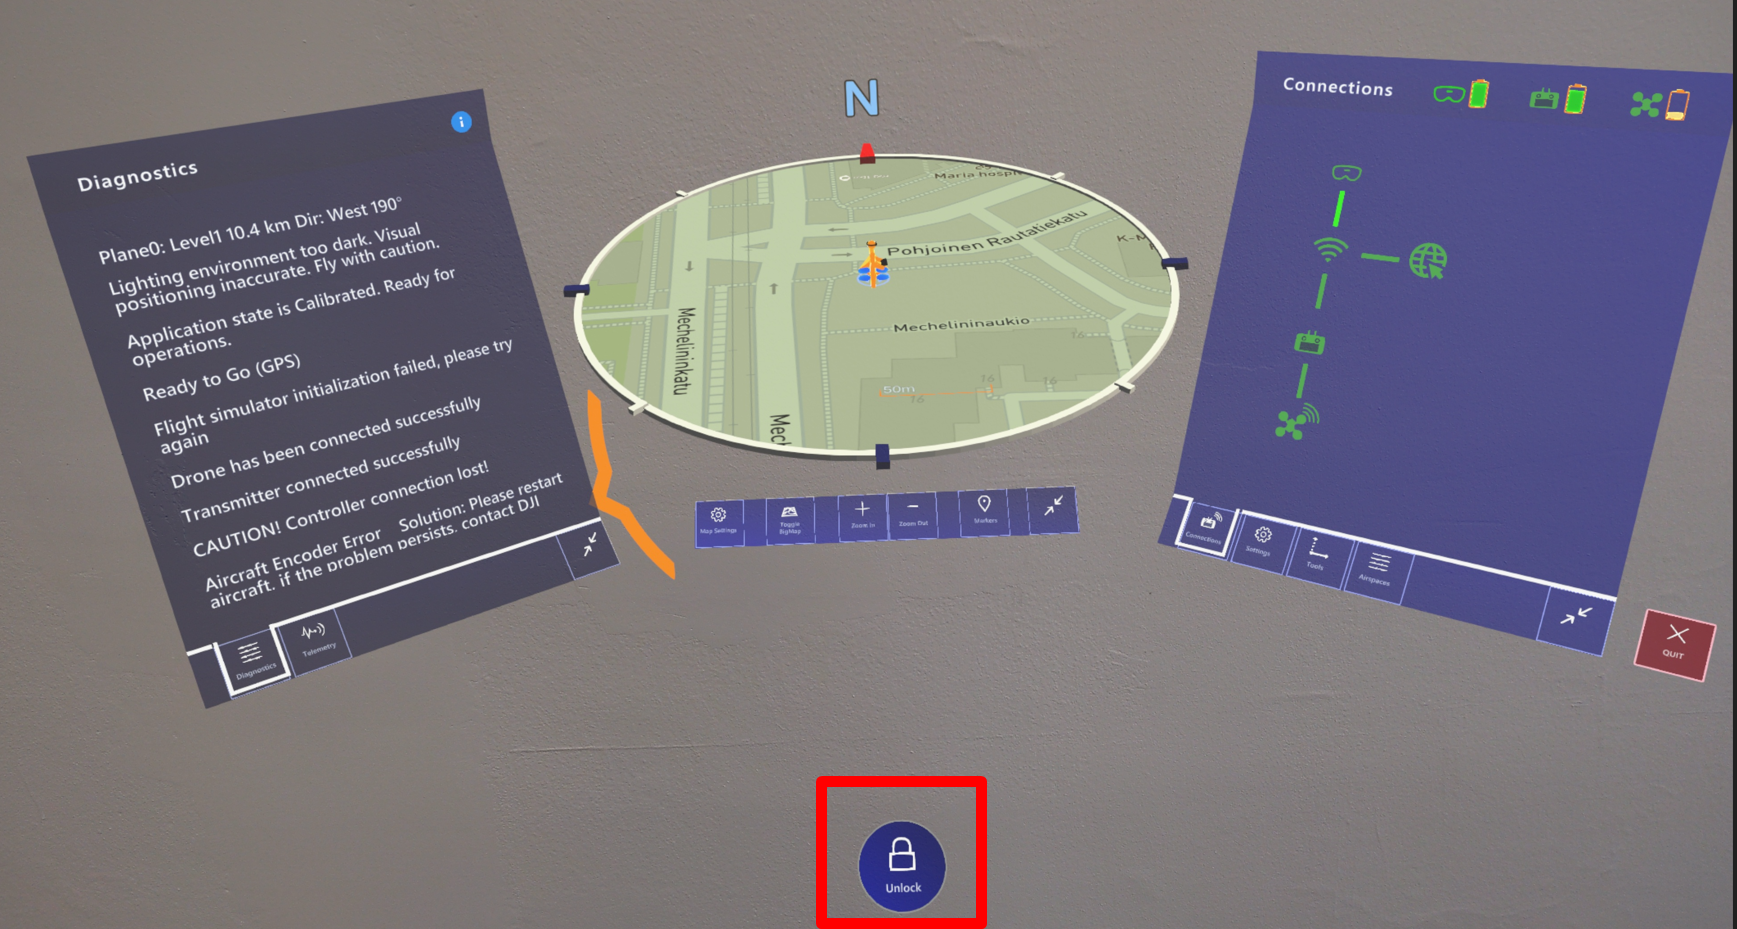
Lock / Unlock Belt UI
In some cases, you may want to prevent the Belt UI from constantly following your movement and stay in place instead. By using the lock button, the Belt UI will be fixed to a specific area even if you move, ensuring that it stays in place permanently.
Handlebar of the Belt UI
The comfort of use is very important when using AirHUD™. For this reason, the ‘Handlebar’ function has been introduced. By grabbing and moving the handlebar, you can position the Belt UI closer or further away from you, and adjust its height up or down.
4. Connections Panel
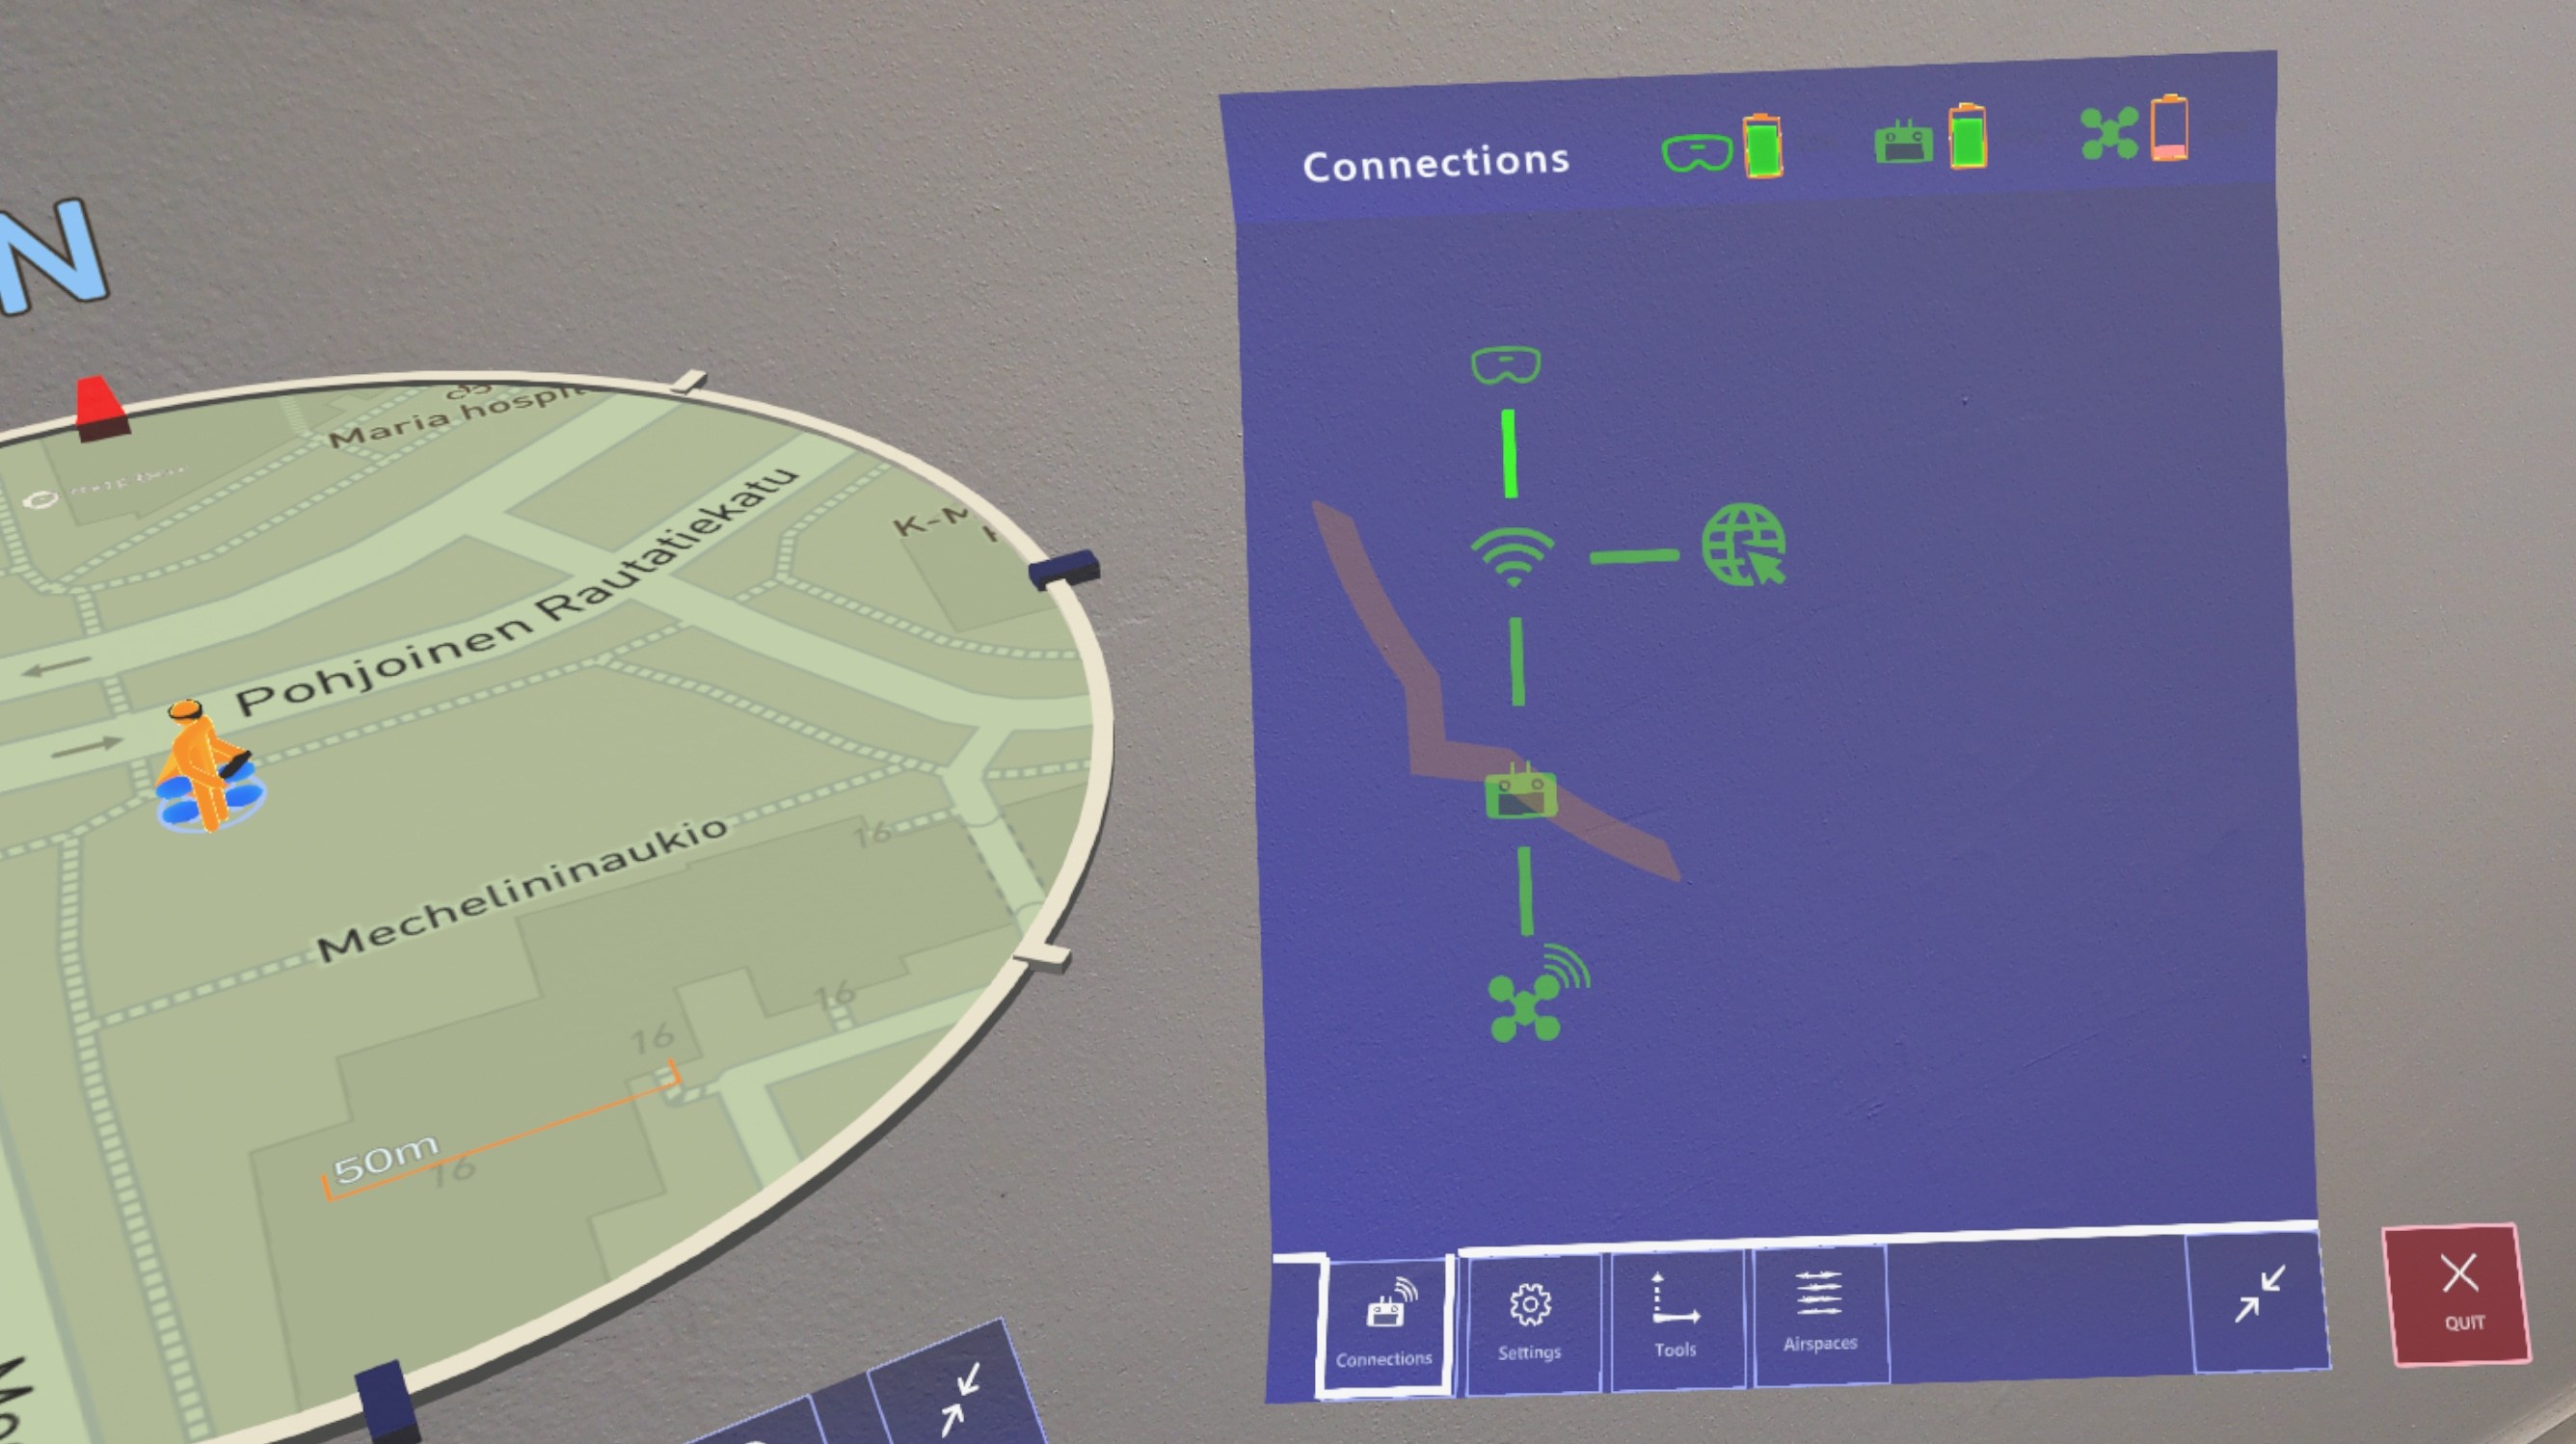
This panel shows the connection between the HoloLens, the controller, the network and the drone. If the connections are successfully established, all icons are be displayed in green, and if there are problems in connections, the icons appear orange.
5. Settings Panel
You can change some settings on AirHUD™ through this panel. The following settings are available:
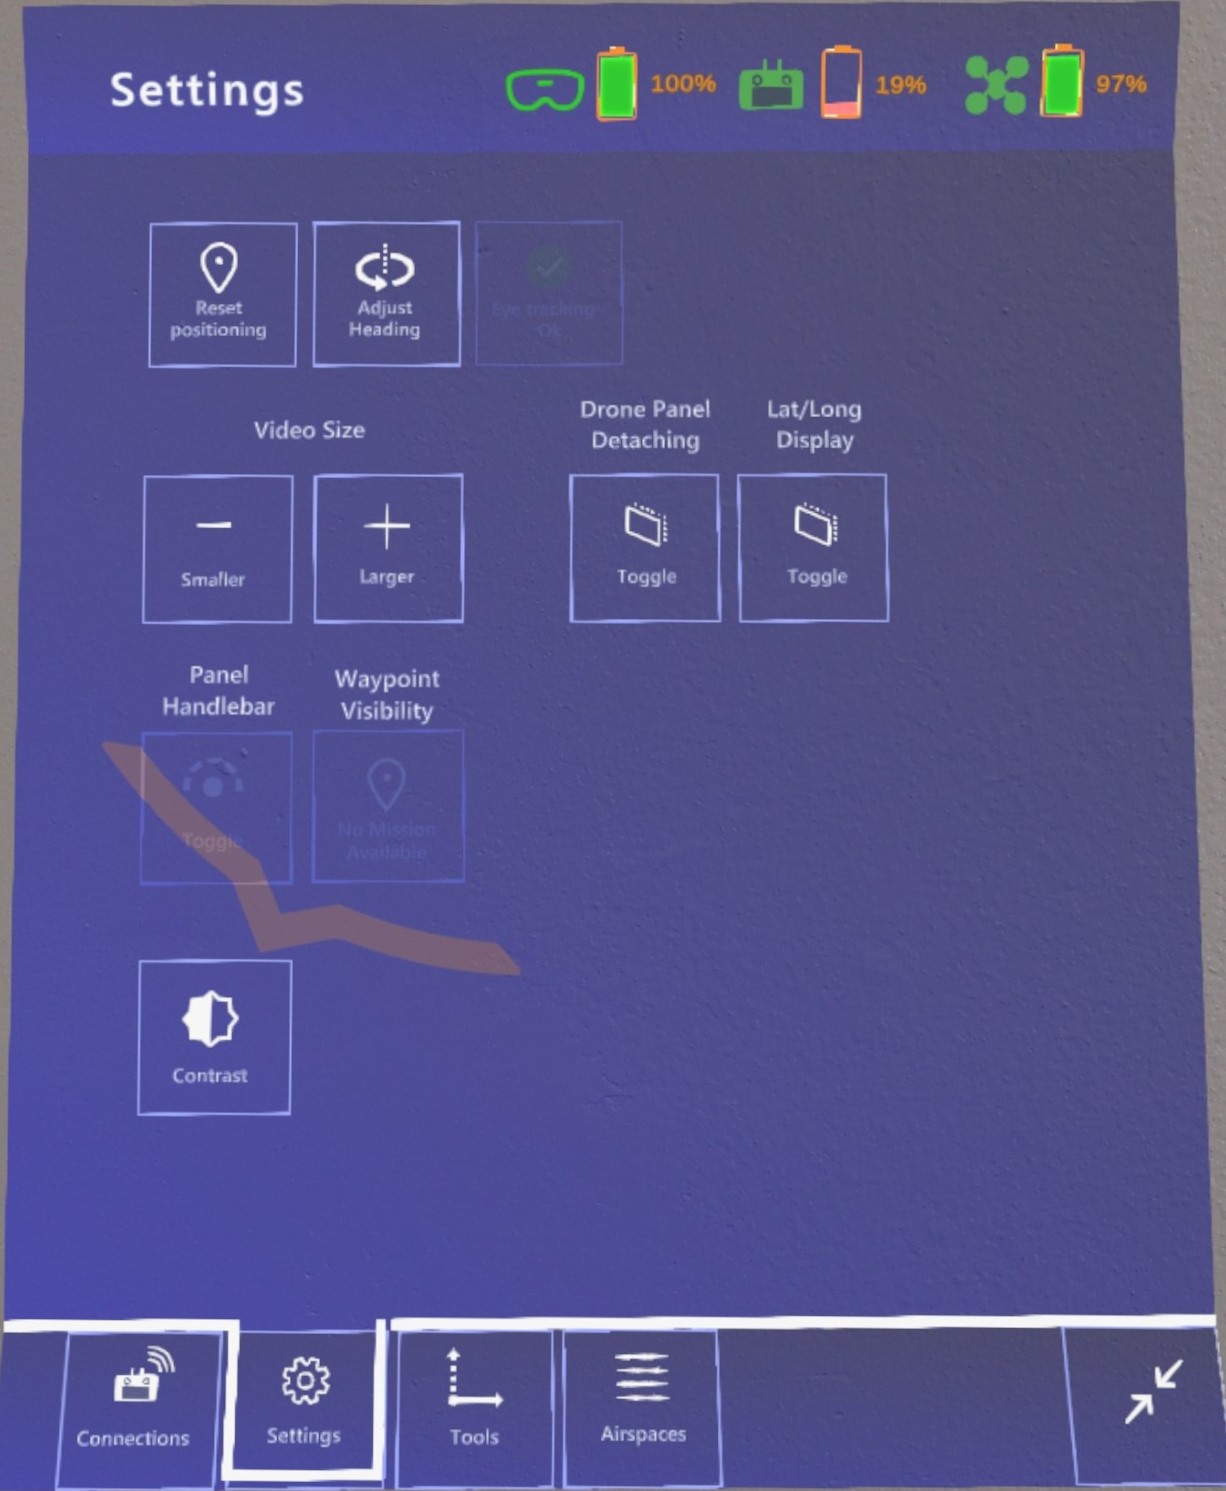
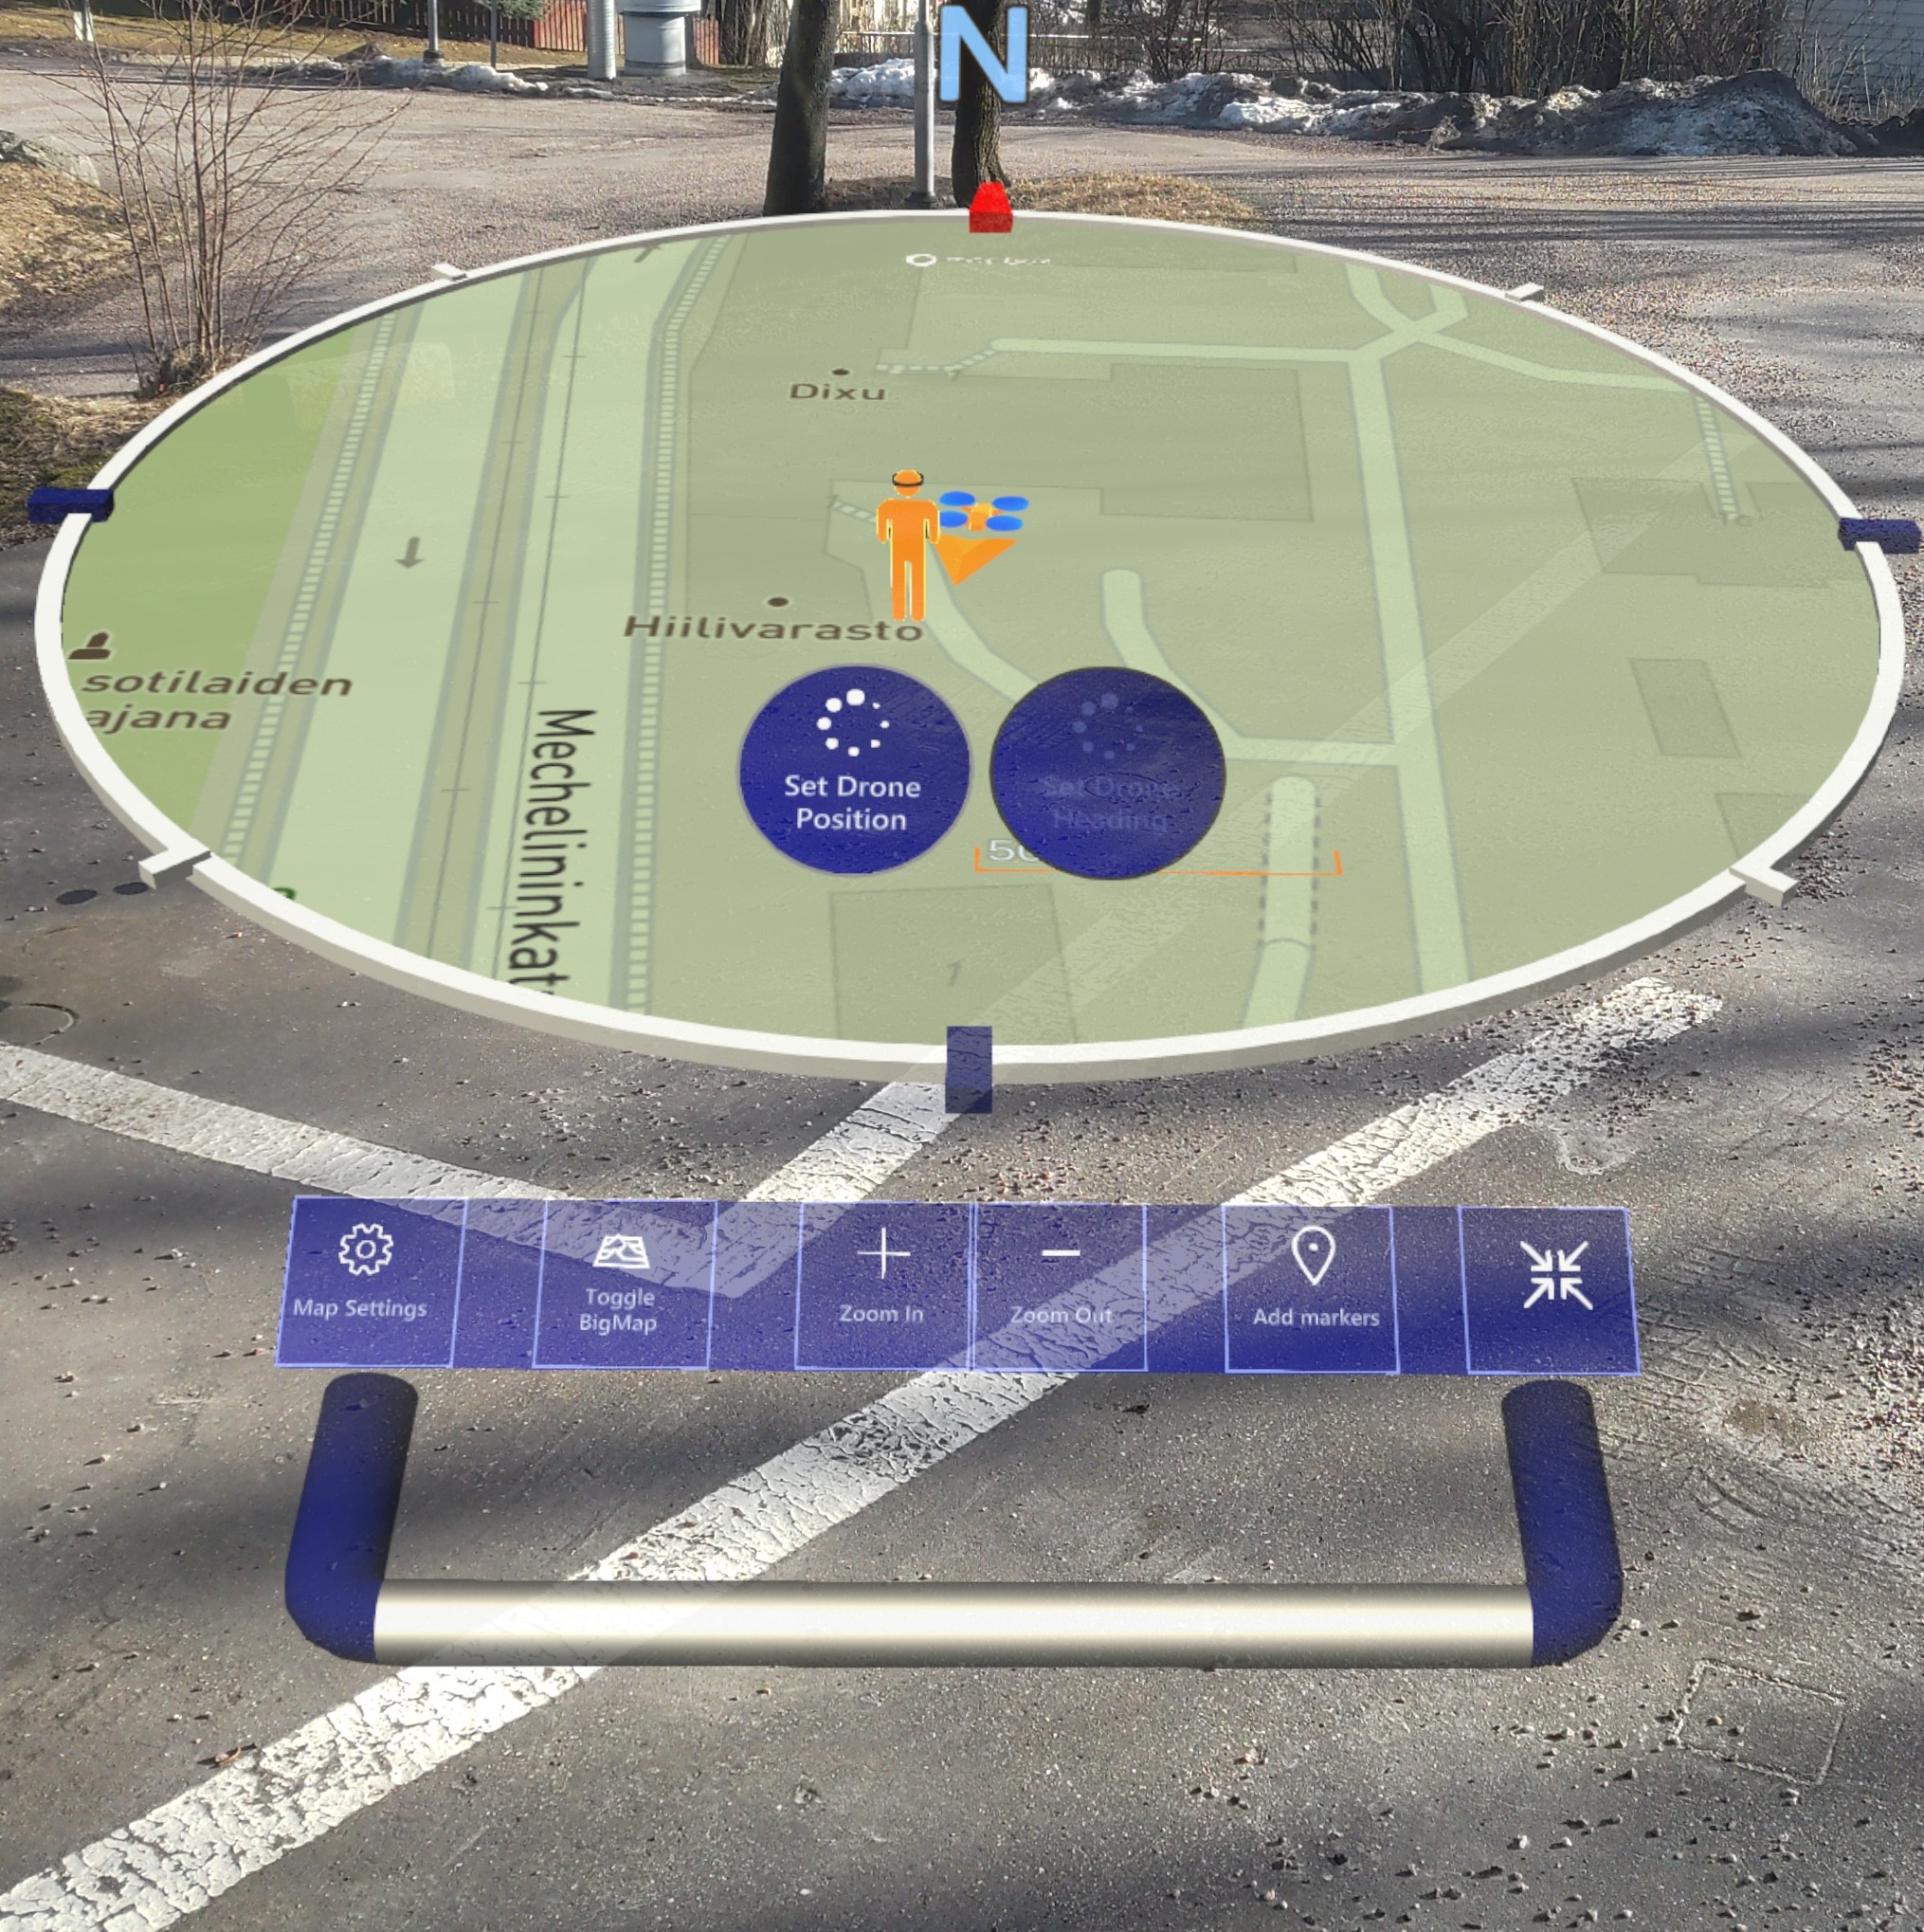
Reset Drone Position: This helps you to adjust the location and position of the drone.
Adjust Heading: Sometimes, it may be necessary to readjust the drone indicator during the flight. With this panel, you can adjust the drone indicator to better match the position of the drone by moving it left and/or right.
Eye Tracking: Indicates whether your eyes have been calibrated and/or the functionality is working properly.
Wi-Fi Settings: While using AirHUD™, you can directly view the WiFi settings. By clicking on the WiFi settings button, you can directly access the system WiFi settings and make changes to it.
However, the system settings for each headset work uniquely. Therefore, the principles of operation will be different when accessing this setting. The system settings affect AirHUD™ as follows, depending on the headset:
HoloLens: When using AirHUD™ on HoloLens and accessing the WiFi settings through the system WiFi button, you can still view and interact with AirHUD™. In other words, you can continue to use AirHUD™ while the WiFi settings panel is open.
Meta Quest Pro or Meta Quest 3: When using AirHUD™ on Quest Pro or Quest 3 and accessing the WiFi settings through the system WiFi button, you can still view AirHUD™, but you cannot interact with it. In other words, you can see and use the drone while the WiFi settings panel is open, but you cannot click on any AirHUD™ buttons or use any of its functions. After closing the WiFi settings panel, you can continue to use AirHUD™.
Magic Leap: When using AirHUD™ on Magic Leap and accessing the WiFi settings through the system WiFi button, the system will completely remove you from AirHUD™, and you will only see the WiFi settings panel. At this stage, you cannot see or interact with anything related to AirHUD™, but the application continues to run in the background. After you finish with the WiFi panel and close it using the 'X' button, you will automatically return to AirHUD™ and can continue using it.
Video Size: You can adjust the video size on the drone indicator using the + and - buttons.
Drone Panel Detaching: With this function, the drone panel detaches from the drone and always follows the direction of the HoloLens. When you turn your head, the panel will follow you, and when you look towards the drone, the drone indicator will return to follow the drone.

Latitude/Longitude Display: Normally, latitude and longitude information are provided in the Diagnostic Feeds Panel. However, if you need this information continuously during the flight, you can activate it via the latitude and longitude button. This way it can be seen under the drone indicator all the time.
Waypoint Visibility: If you have uploaded a waypoint mission into AirHUD™ from the controller, you can use this setting to toggle the waypoint visibility in all maps and real-world view.
Panel Handlebar: You can toggle on or off the handlebar with this button. (See Map Panel for more information.)
Contrast settings:
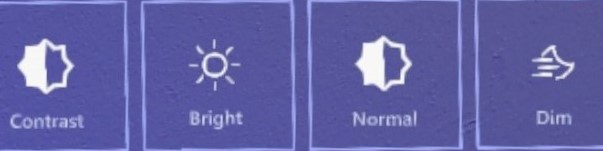
When using HoloLens in different weather conditions you may have a need to adjust the brightness of the Belt UI. The 'Contrast' function is also a function created for this purpose. It has 3 different uses:
Normal Mode: The brightness of Belt UI is presented at an average brightness.
Dim Mode: During night flights, you don't need much brightness, so when this mode is selected, the brightness is reduced, and a night vision is facilitated.
Bright Mode: It might be difficult to see the Belt UI in sunny days, for these conditions this mode increases the brightness for better visibility.
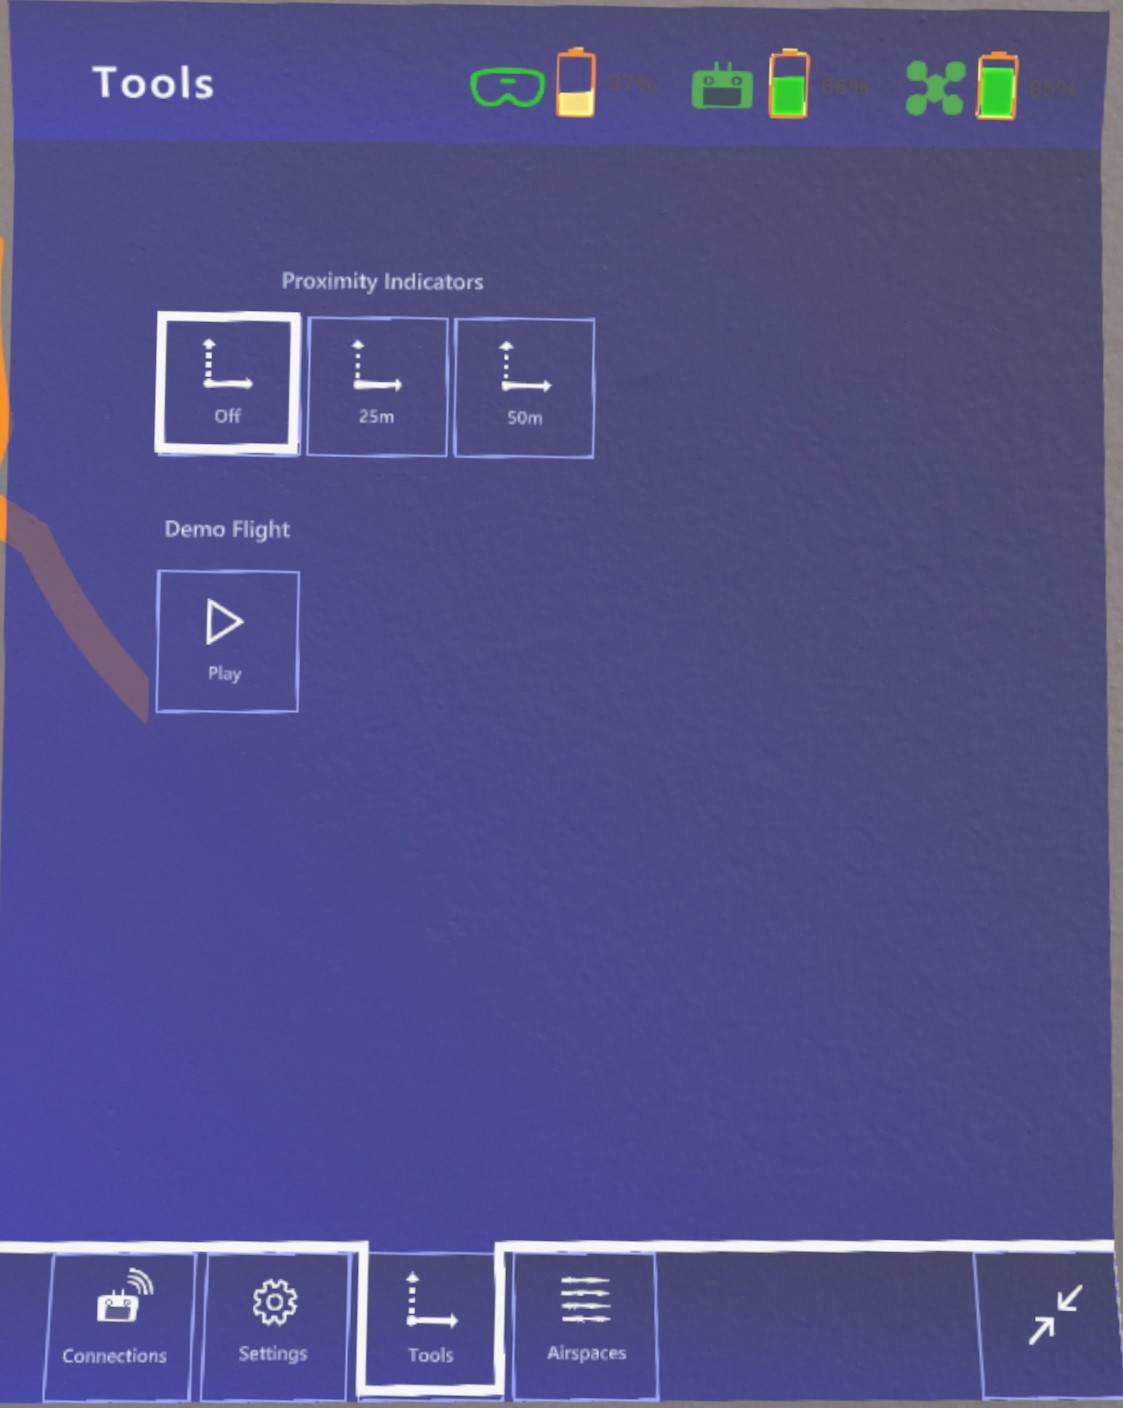
6. Tools Panel
Through this panel, you can activate tools in AirHUD™.
- Proximity Indicators
When the proximity indicator distance has been set to either 25 m or 50 m, and the drone approaches a building that AirHUD™ has 3D information about, a distance indicator is drawn from drone to the building. With the Proximity Indicators, you will be able to see the buildings as 3D but also their heights and distance from drone to them.
- Demo Flight: This button is only active when you go to Demo mode with the Demo mode button from the startup scene, it is not visible when connected to the drone or controller. Used to play the demo mode.
7. Airspaces Panel
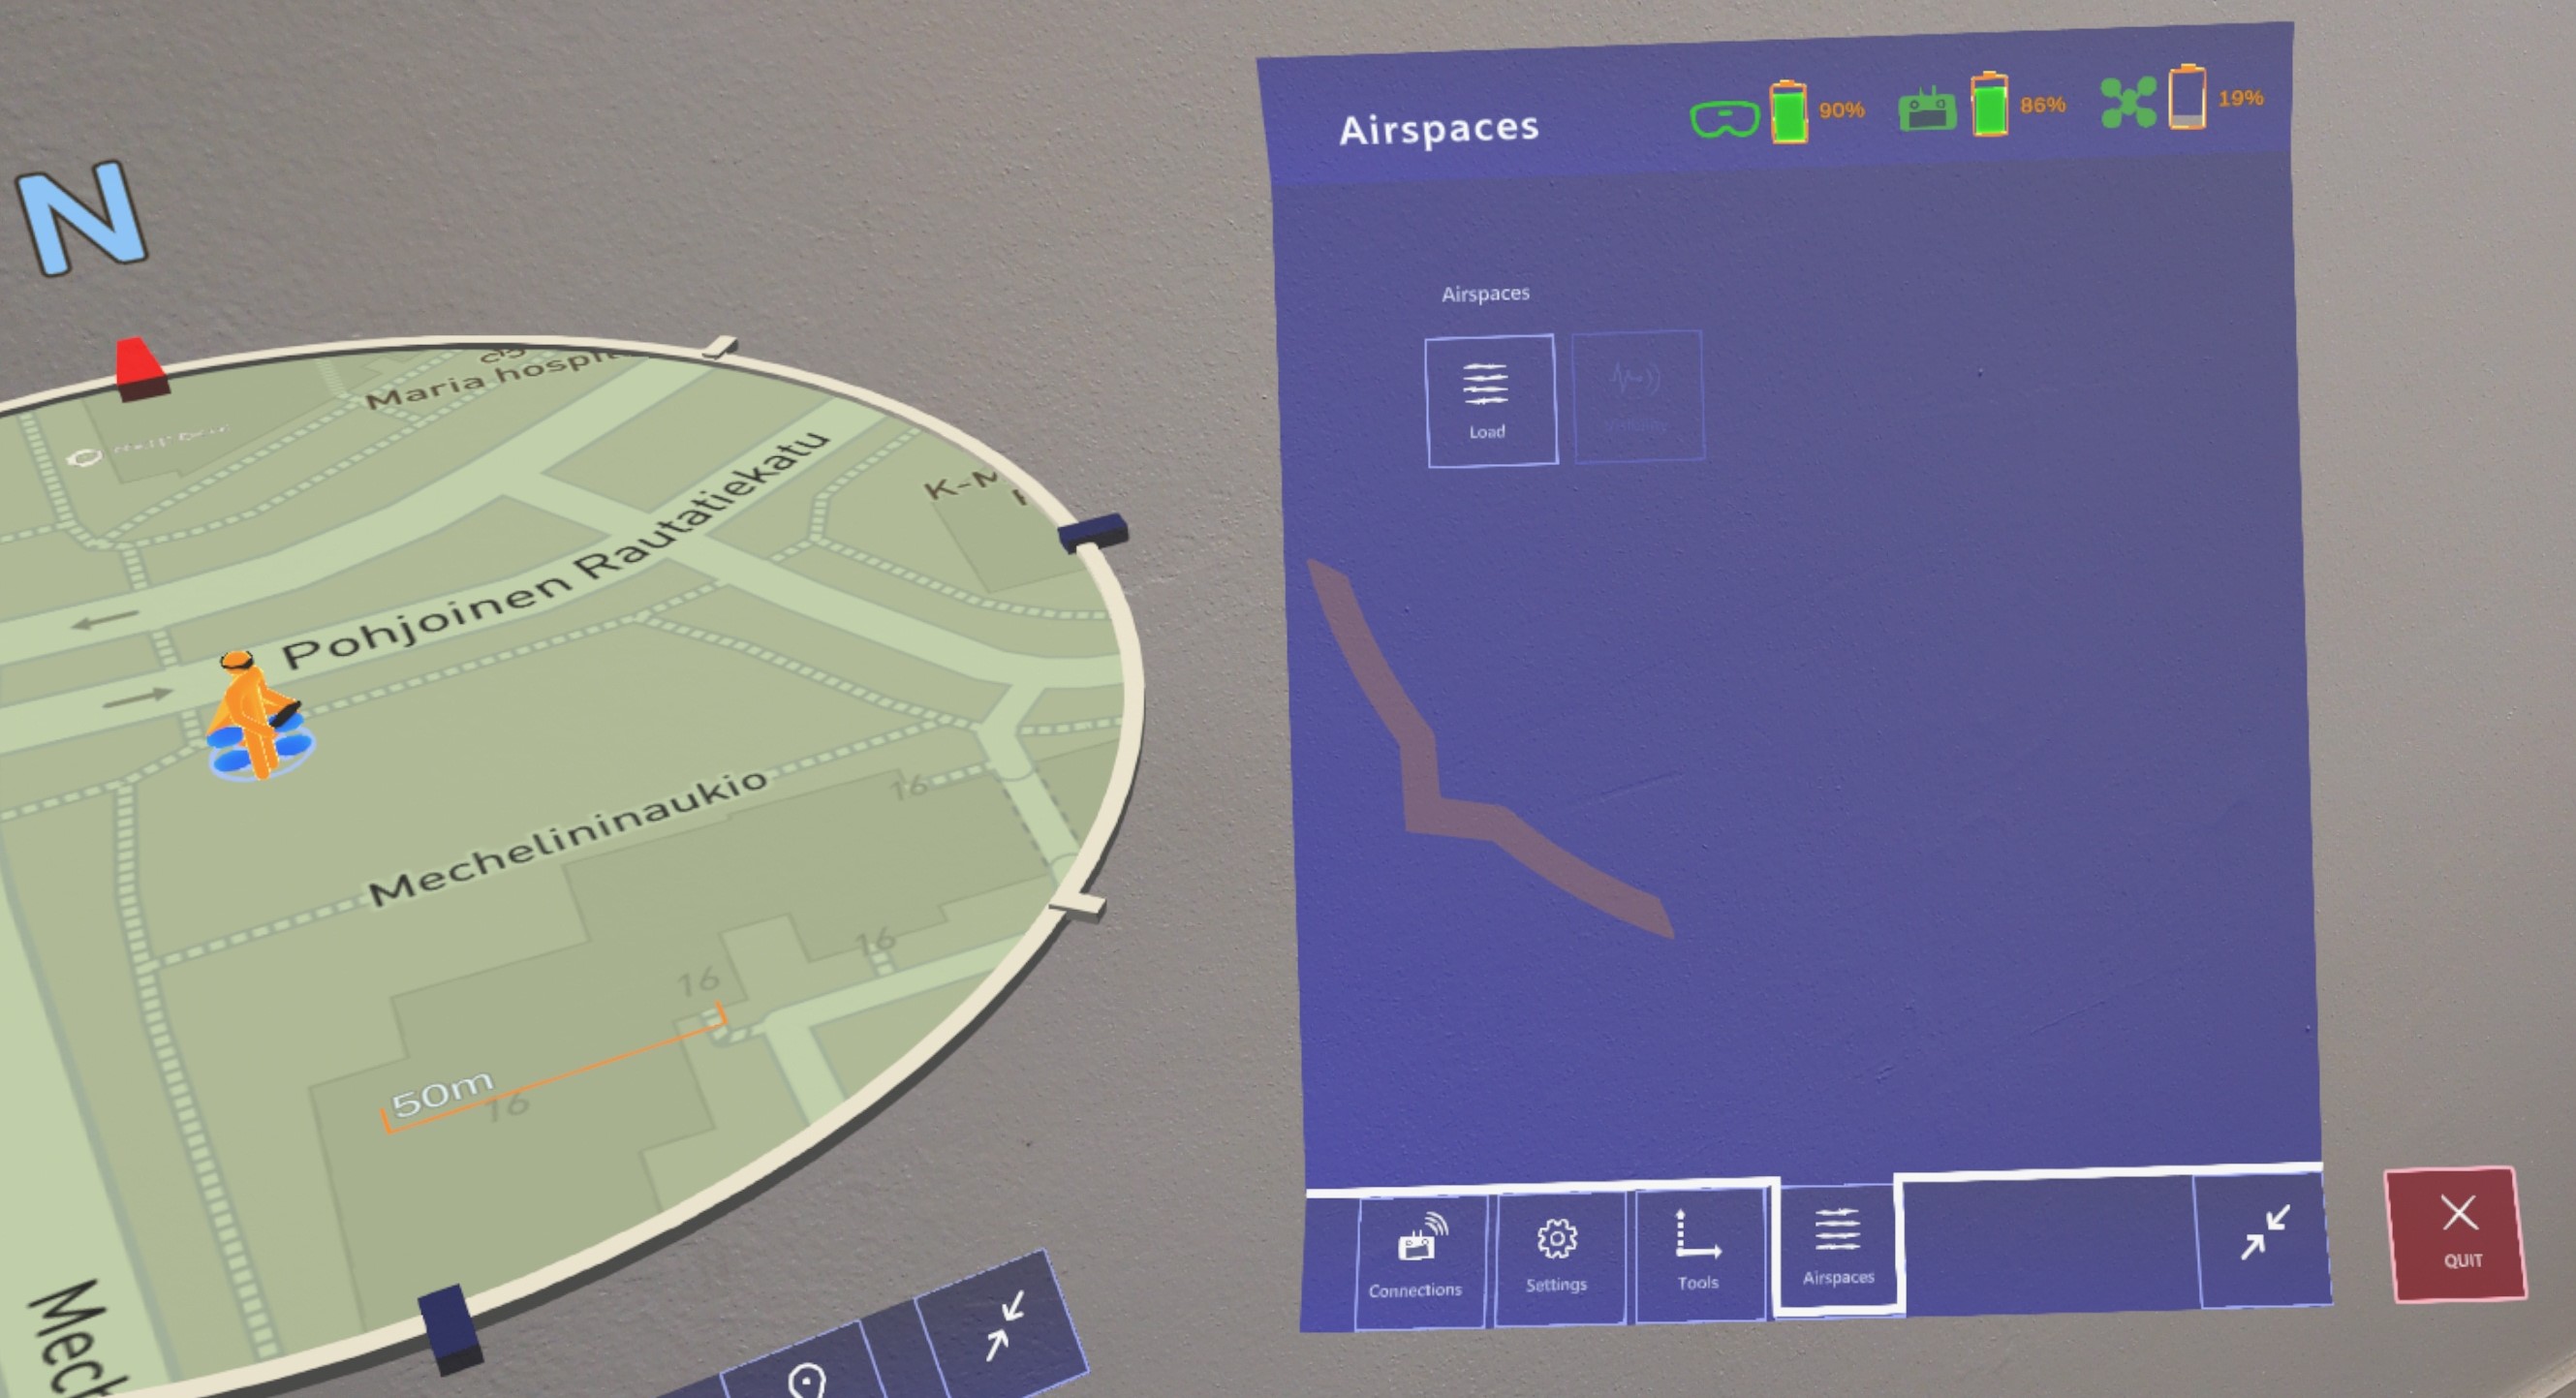
Airspace allows you to see suitable areas and flight restrictions with the data provided by Aviamaps. You can see, through the HoloLens, all the places on the map where the flight is restricted, alongside with the information about where those restrictions start. Also, all these pieces of information are seen as 3D in the air.
Status Bar
There is also a Status Bar at the top of the panel. (For more information see Map Panel > Mini Panel.)
Quit AirHUD™
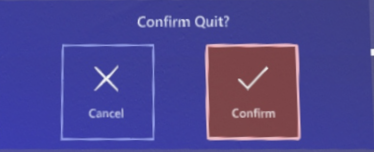
When you want to exit AirHUD™, press the “Exit” button. The application will require a confirmation to prevent accidental closing.
AirHUD™ Training
While in this mode, users can simulate flying a drone and experience flying by moving the AirHUD™ to a chosen location. The simulated drone is designed to closely resemble a real drone, providing users with a realistic flying experience. Additionally, by using a controller, users can familiarize themselves with the capabilities and movements of the drone, preparing them for an actual flight. The joystick movements can be easily learned and practiced on the simulated drone, thus increasing the safety of the flight for users who have little or no prior flying experience.
NOTE: When setting the position in flight simulation mode, the setting point is always perceived as north. Therefore, if you want to experience a real flight in specific location, you need to adjust the direction of the drone based on where north is. Otherwise, you may find that the map, airspace, or proximity indicators won’t match with the real world.
Requirements:
HoloLens 2
Drone and controller (See Requirements for supported devices.)
Accessing The Training Mode
- First, turn on your drone and the controller.
- Make sure that the drone and the controller are linked to each other.
- Open the AirHUD™ from the controller.
- At this stage, you should have access to the drone camera on the controller. If you cannot get the camera view, please check your connection with the drone.
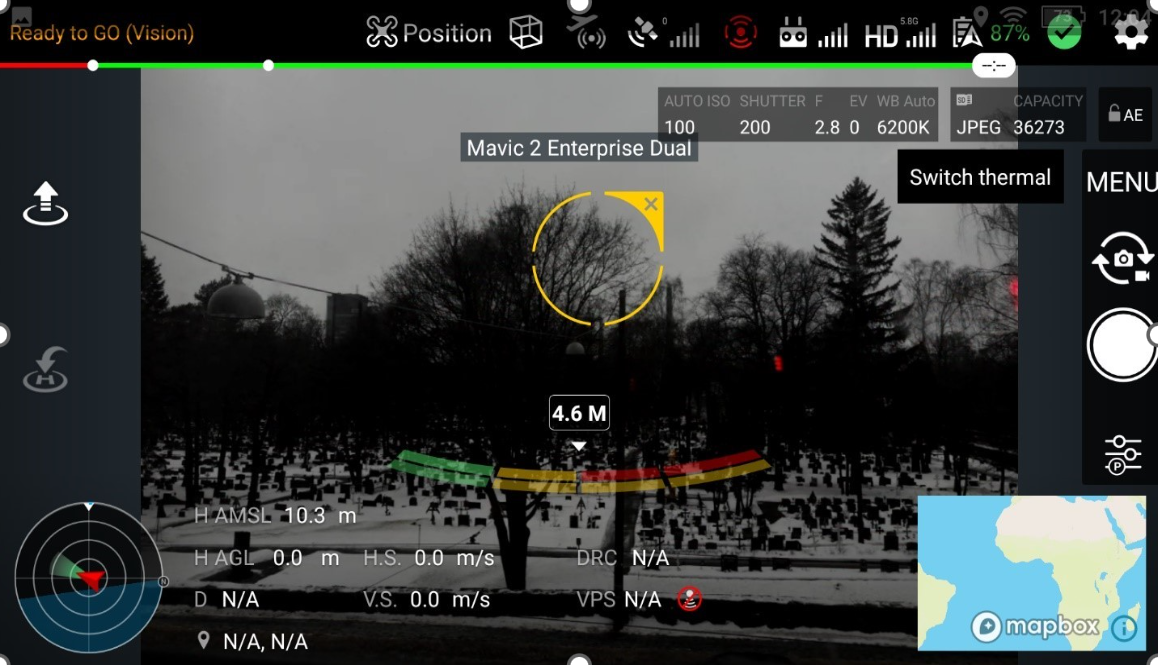
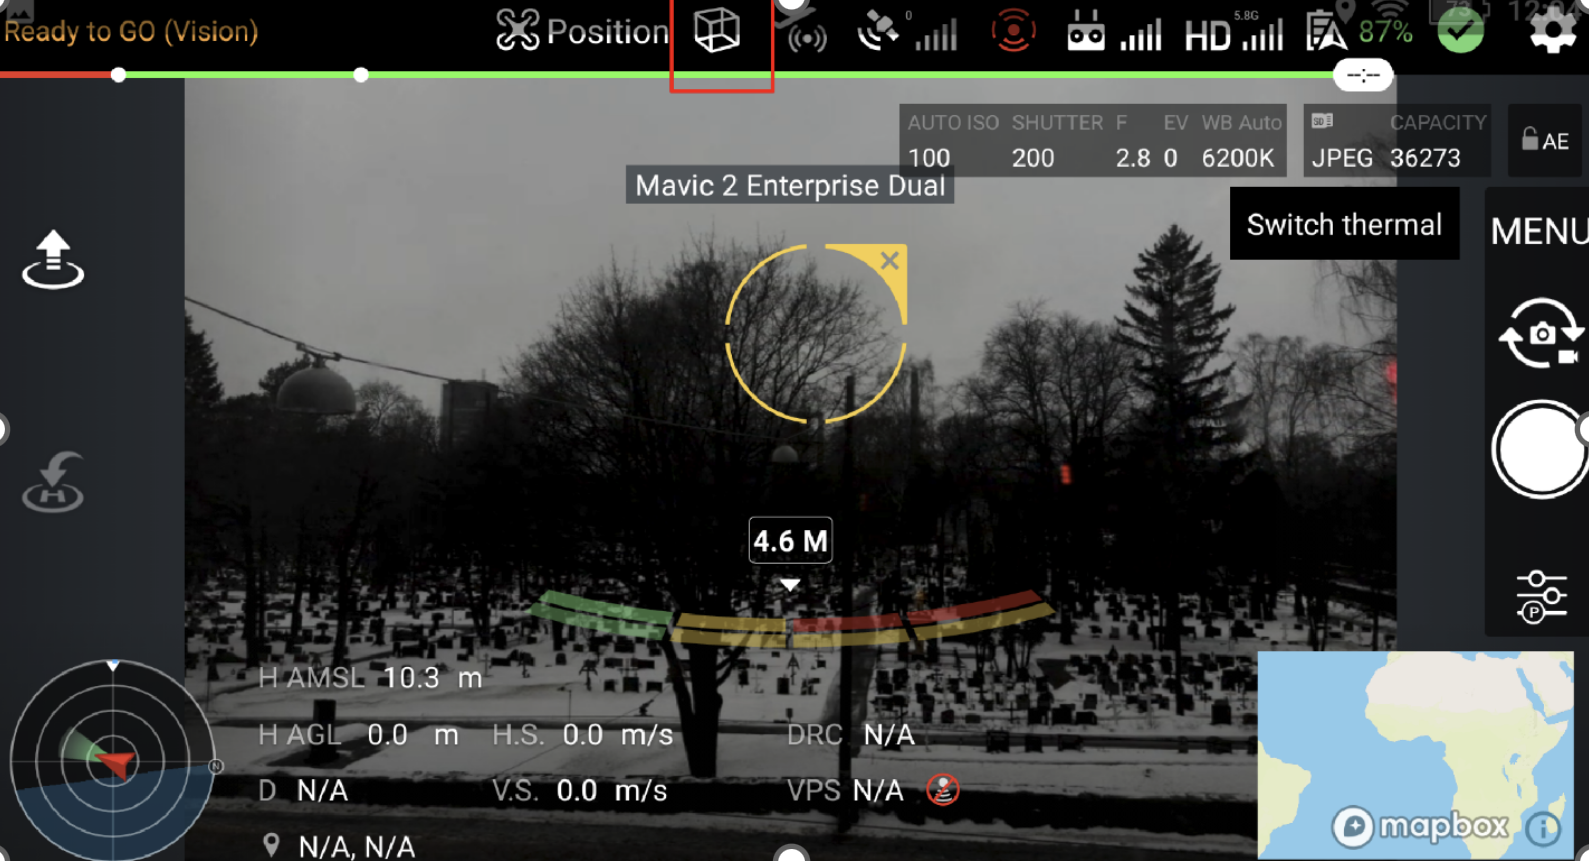
- Click on the training button.
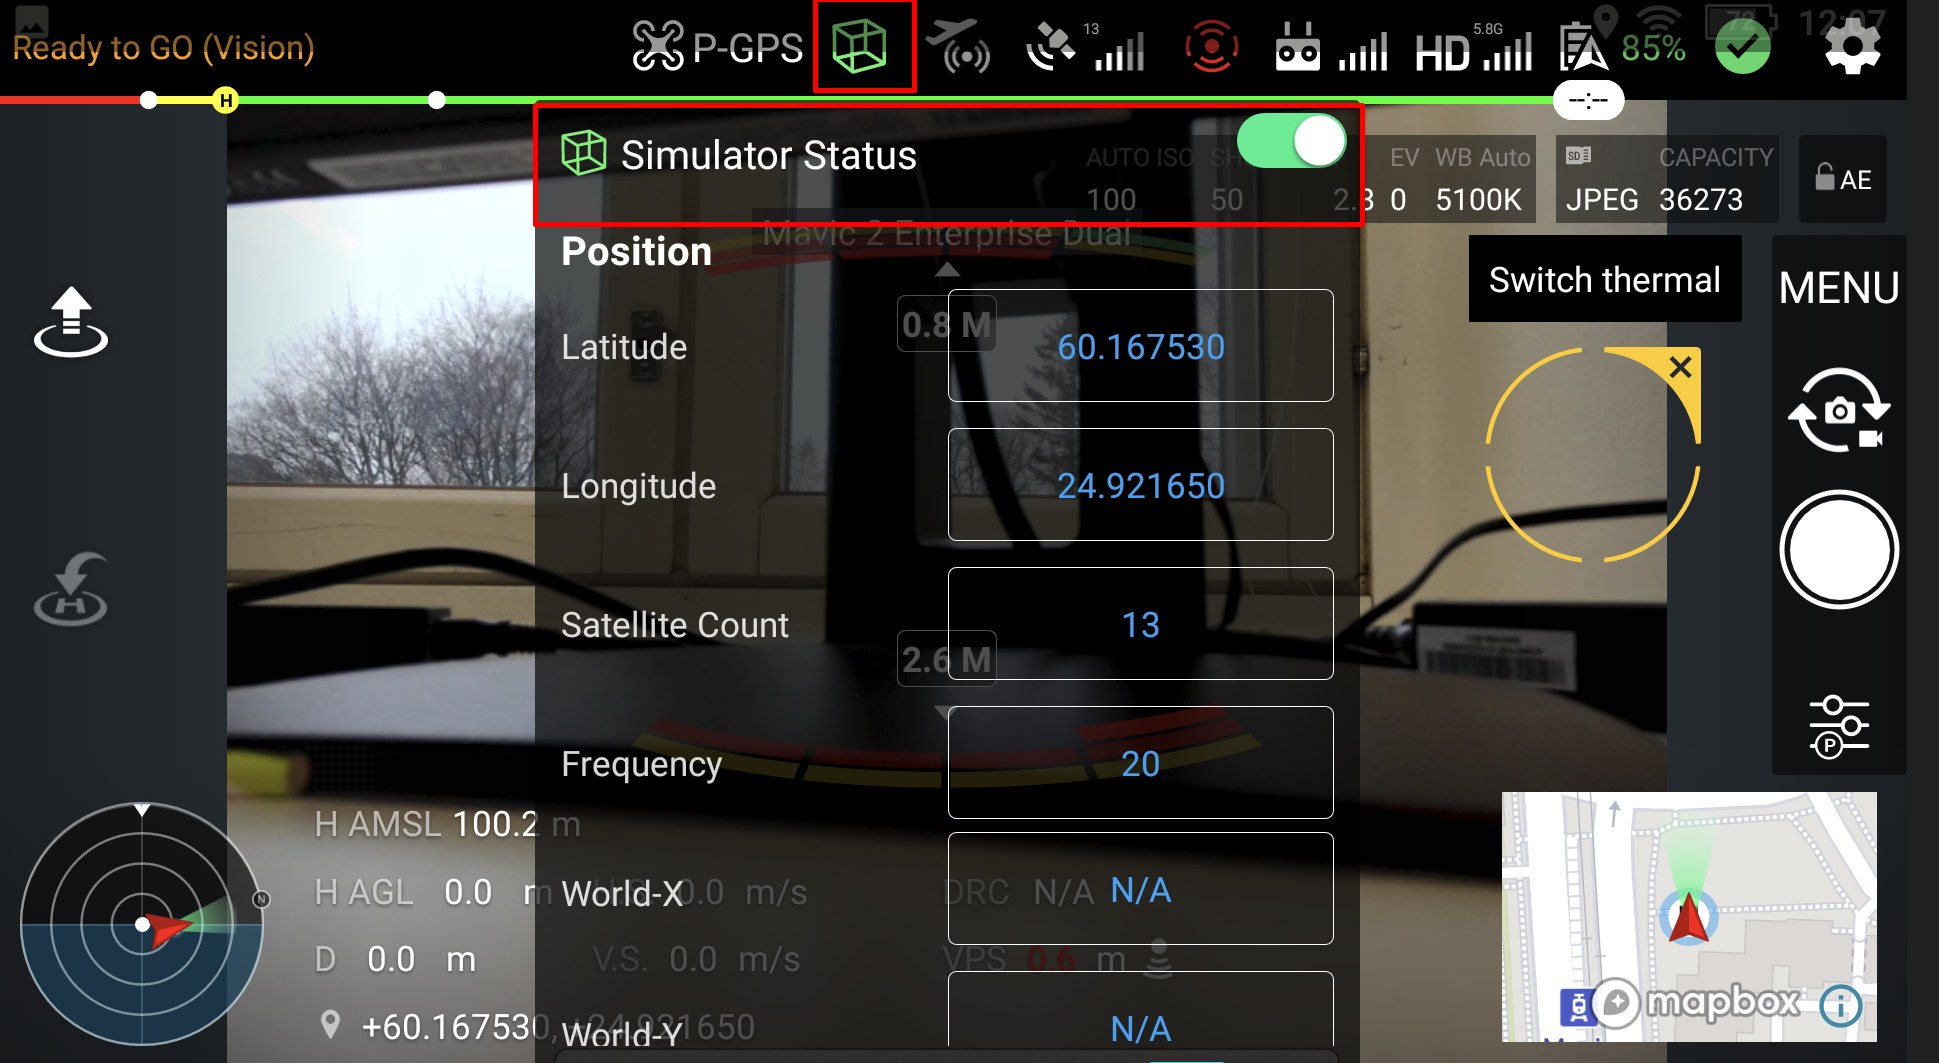
- The training button is located on the controller. Tap the cube-shaped button on the controller top toolbar. A window will open for you to enter the location where the simulation will be started from.
- Enter the location and satellite count.
- At this stage, enter the latitude and longitude information for the location where you will be training in the appropriate fields. In addition, set the satellite number to a minimum of 10 because, the simulation system must have enough GNSS. You don't need to fill in the fields other than altitude, longitude, and Satellite Count.
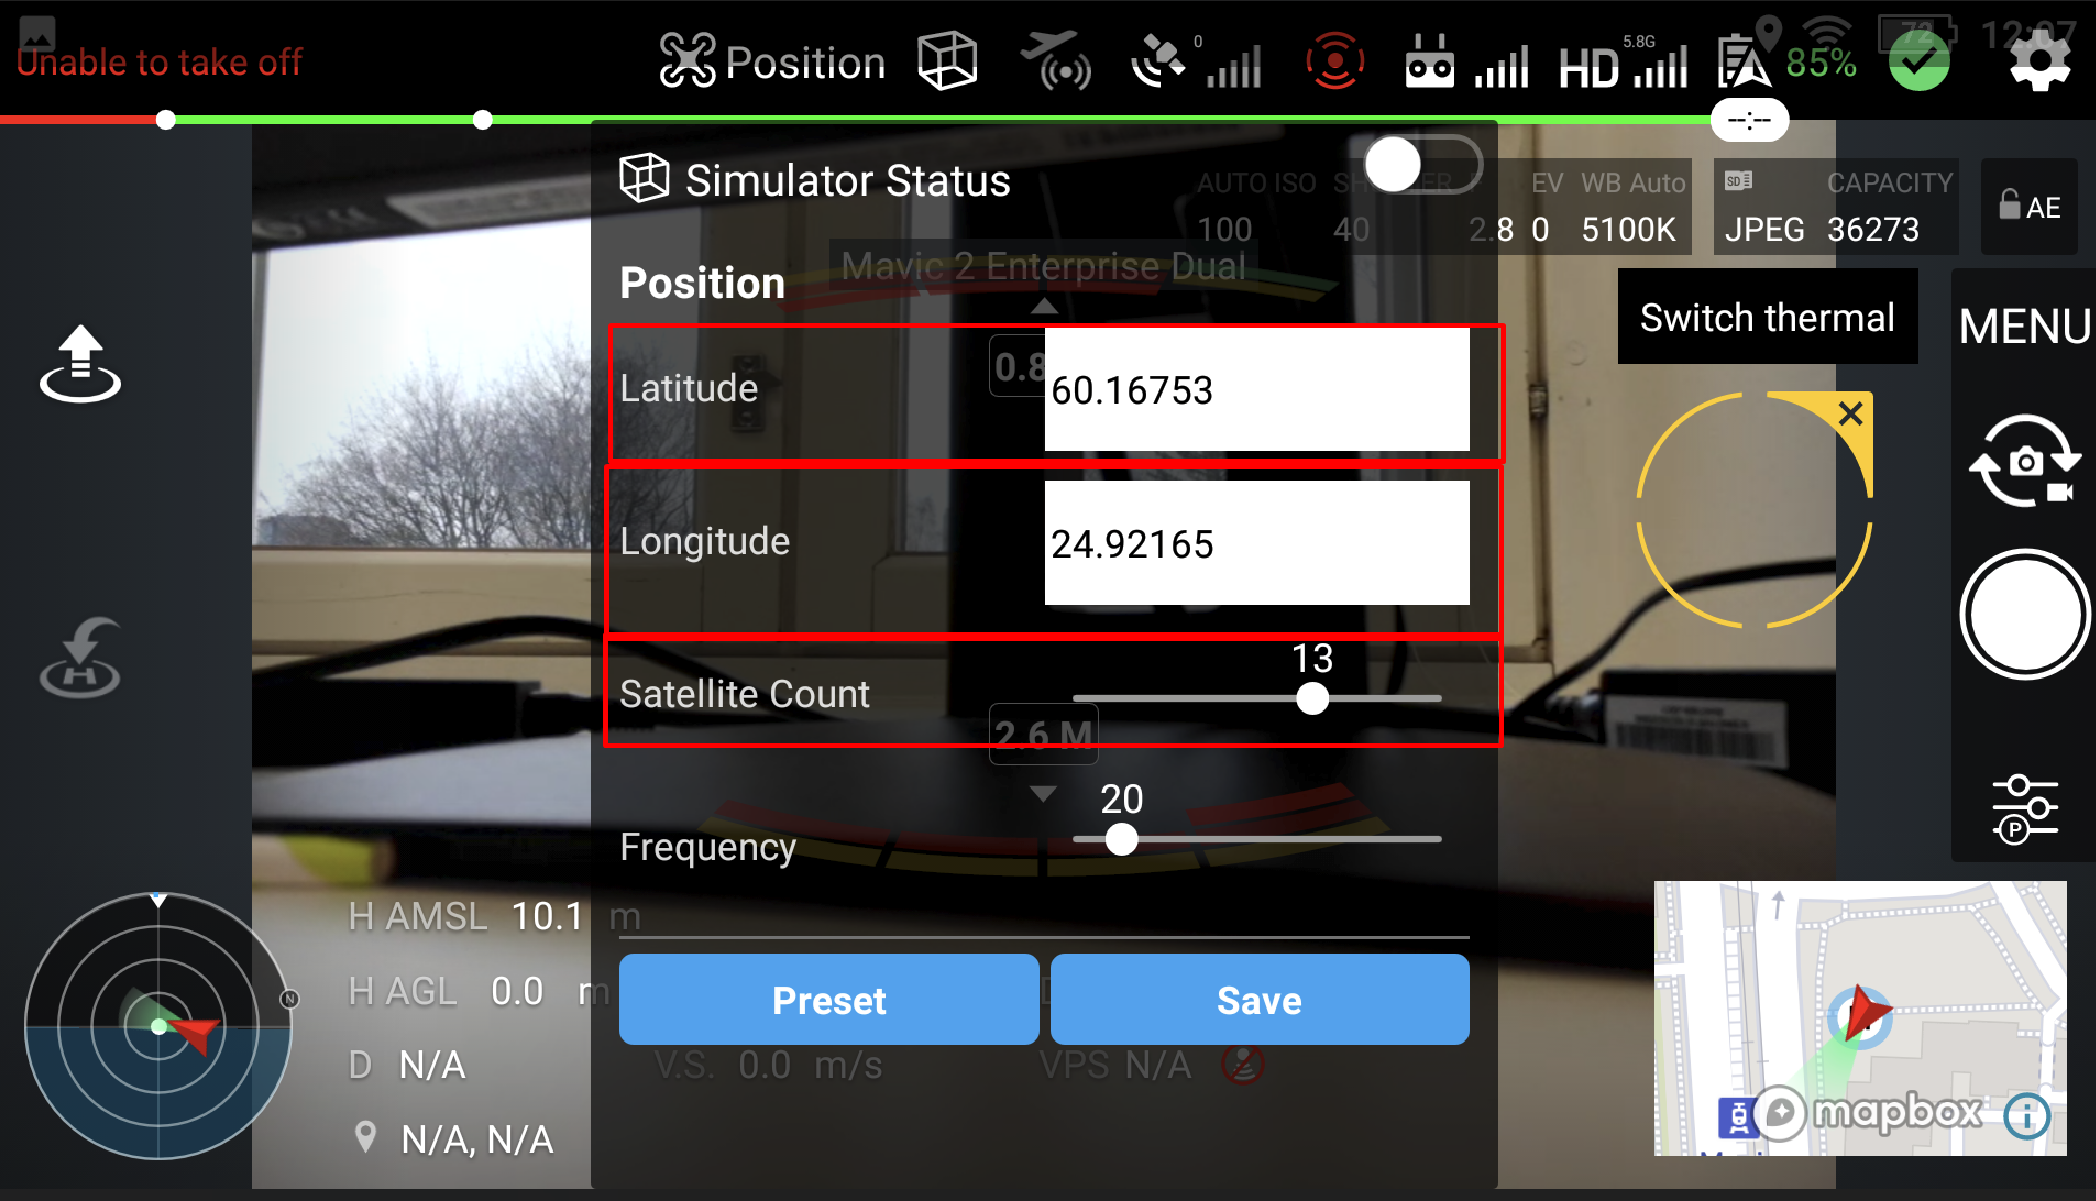
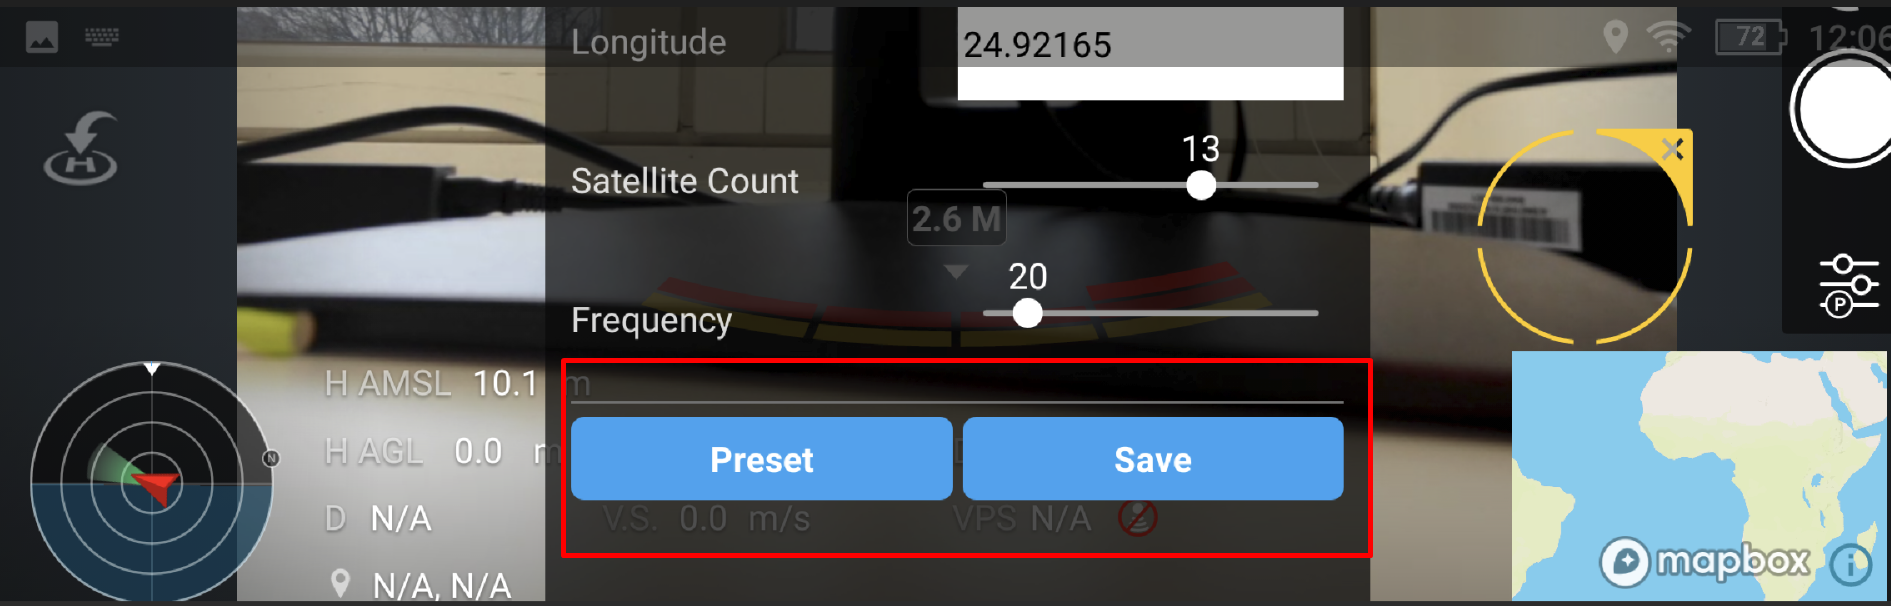
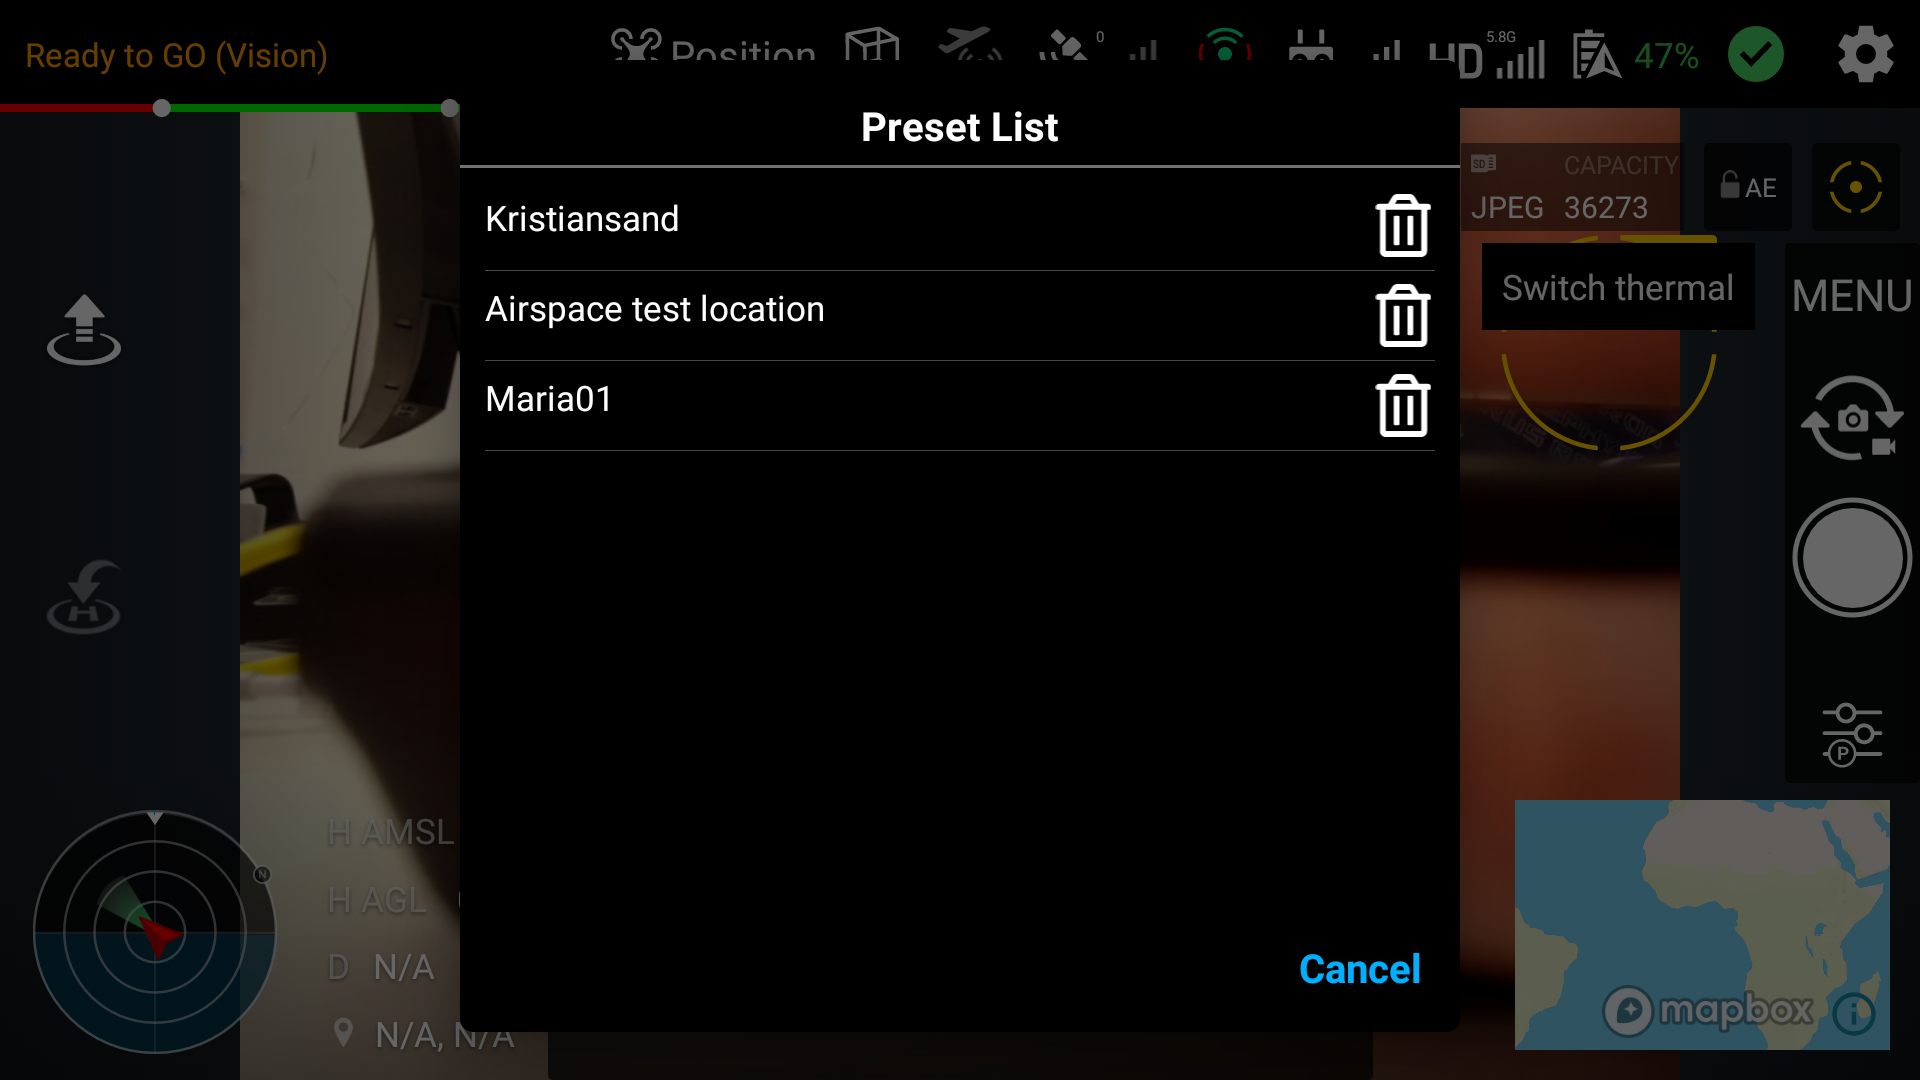
NOTE: If you want to continuously train on a specific location, after filling in the latitude, longitude, and satellite number (min. 10) fields, you can save it by clicking on the 'Save' button and giving the location a name. Then, you can access the locations you have saved before from the 'Preset' button and the information will be filled in.
- Turn on the training mode with the slider on the top right of the Simulator settings view.
- After activating the slider, it should turn green. Additionally, the training button should also turn green.
Click on the training button again to close the view.
Open the AirHUD™ from the headset.
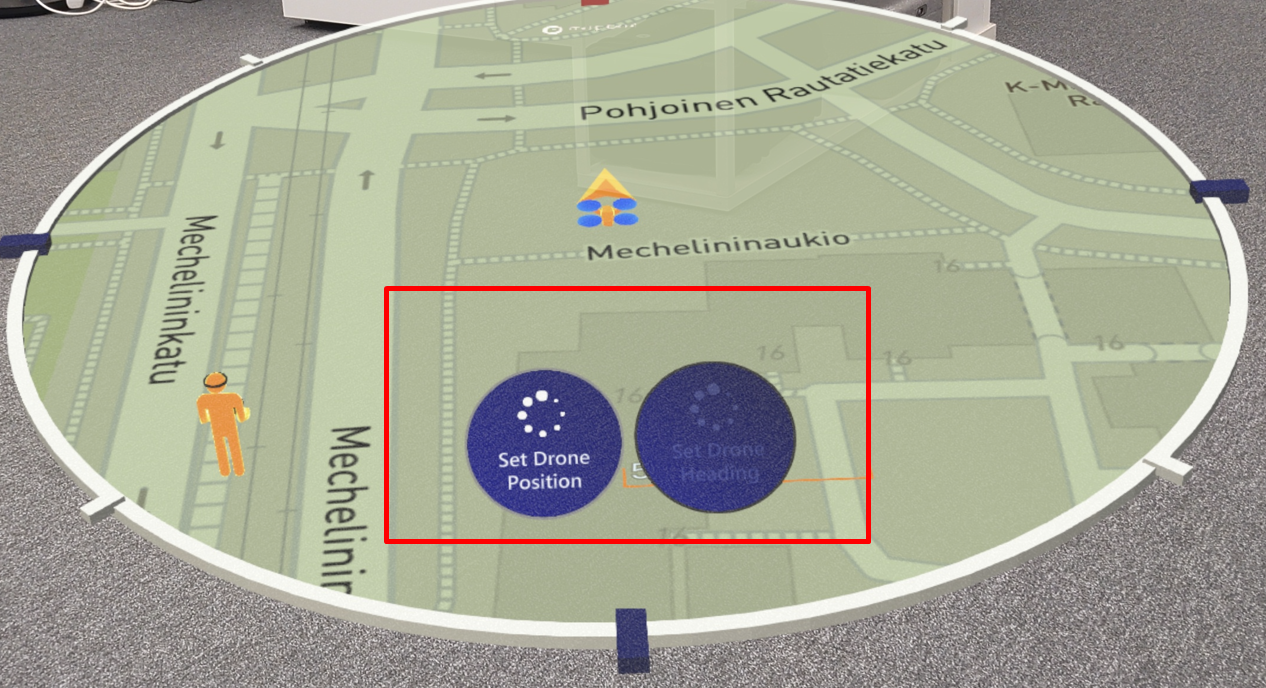
Set the drone's position by clicking on the set position button on the map.
NOTE: Additional information about how to adjust the position can be found in the Headset Guide.
- After setting the drone position, the simulated drone will appear on the home position.
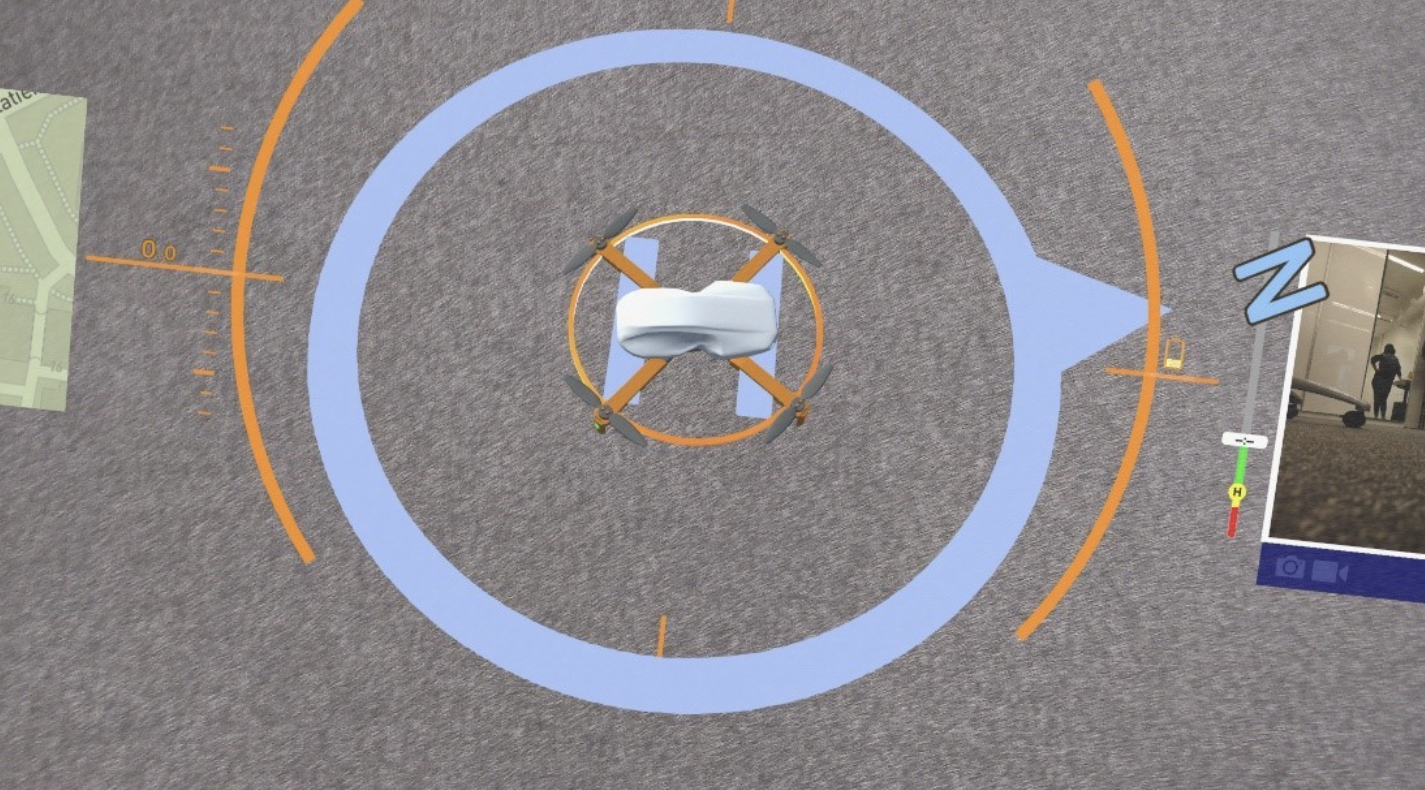
Start the drone's motors by moving the sticks on the controller to inner corners. Alternatively, you can also take off directly by using the take-off command from the controller.
Now you are ready to fly with the AirHUD™ Training!
Problems Related With Drones
- When problems occur with your drone, you can see information about the problem in the Diagnostics Panel. In addition, a summary of the necessary steps to resolve the problem is also visible on the panel. If the drone cannot take off for any reason and there is no RTK signal, go to the controller settings and disable RTK. If you encounter any problem other than the Diagnostic Panel or RTK, please check the drone user manual to resolve the issue. For DJI drones, you can access the user manual for all drones on DJI Website.
Known Issues
Changes in the Wi-Fi network of your devices can impact the functionality of AirHUD and potentially lead to issues. Therefore, it is essential to ensure that both your headset and controller are connected to the same Wi-Fi network before using the application. If you have made any changes to your Wi-Fi network, please restart all the devices involved to ensure proper connectivity.
Sometimes, due to temporary fluctuations in internet connectivity, the camera feed may not reach the HoloLens device, even though it appears on the controller. In such cases, we recommend restarting all devices and attempting the connection again. This step can help resolve any potential communication issues caused by network instability.
In Training Mode, the drone consistently displays the north as its heading. Thus, when you intend to train in a particular area, please ensure that the drone's heading is properly set to the north. (See AirHUD™ Training)
ADS-B messages provide information on the direction of the aircraft but do not include its altitude. The aircraft can be located anywhere within a 3 km radius. Hence, it is important to consider this limitation during the flight.
If you want to switch from real flight mode to training mode or from training mode to real flight mode, please be aware that the application retains previous flight data, which can cause some issues. Therefore, in such a situation, please restart all devices.
If the Camera Shoulder buttons are not functioning correctly, please ensure that you have disabled the "Camera Lock" option in the DJI Lab settings. To do this, navigate to Settings > DJI Lab > Camera Lock and make sure it is turned off.
Occasionally, the text on the information panels of the ADS-B icon may not be shown or may be displayed inaccurately.
We have found that Microsoft HoloLens 2 may state that it is connected to your iPhone mobile hotspot when starting a new session, when in fact it has dropped the connection. This can be remedied by reactivating the hotspot on iPhone and making sure the HoloLens gets the connection back. AirHUD™ app on the HoloLens will have to be restarted after reconnecting, if it was running.
If there are too many networks around, HoloLens may have difficulty managing them all. For example: When you go to Settings > Wifi Settings, under normal circumstances, all wifi networks around should be listed. However, if there is too much WiFi around, HoloLens cannot manage this situation and cannot display the WiFi list successfully. The list sometimes appears empty or when you try to select another WiFi, the system slows down and WiFi replacement may not be possible. Therefore, be careful when using HoloLens if there is a lot of network traffic around.
Please use the devices with a single WiFi connection at all times. If more than one network has been defined before and there is a problem with the connection you use, you may experience problems with the internet connection as the headset wants to automatically connect to a better connection, which will affect the use of AirHUD™.
Some network problems may occur in AirHUD™ when using some DJI drones and controllers. Therefore, when this problem occurs, please use your internet by selecting the 5 GHz band. If the controller is having difficulty finding a network, please connect by selecting the 2.4 GHz band first, then switch back to 5 GHz and use it.
When using Meta headsets, please ensure that there are not multiple boundaries around you. Having multiple boundaries can cause the application to move between boundaries, creating problems while using the application. If you have created multiple boundaries in the same area, please clean them before using AirHUD™.
- You can follow these steps to clear the boundaries:
Settings > Physical Space > Clear boundary and space scan history
DJI M3 Version Issues
Before using the M3 version, you must first close the DJI Pilot app to avoid conflicts with AirHUD™. If the DJI Pilot app is not completely closed, the drone connection may be constantly disconnected or the camera image may not be displayed. To properly close the DJI Pilot app, follow these steps:
1. Press the Back/Function button and 5D button at the same time to view the applications running in the background.
2. Close any other applications besides the AirHUD™ app.
After completely closing the DJI Pilot app, you are now prepared to use the M3 version of AirHUD™.
The ADS-B functionality in the DJI M3 drones operates differently compared to the M2 series. In the M3 series, ADS-B messages undergo a more robust filtering process to prioritize relevant information. However, due to this filtering, there is a possibility that ADS-B messages may not appear efficiently on the display of M3 version drones. Therefore, it is strongly recommended to exercise caution regarding nearby aircraft throughout the entire duration of the flight.
DJI has not yet provided some widgets in the M3 version, which is why certain functions are not available or may not work properly in AirHUD™. AirHUD™ is lacking two key functions as a result:
o Menu: The absence of this widget in DJI's development has also led to its absence in AirHUD™. Normally, this area contains some camera settings. Therefore, if you wish to change camera settings, please use the DJI Pilot App to make those adjustments.
o Exposure Settings: Although AirHUD™ provides a button for accessing the Exposure Settings feature, it is important to note that not all functionalities associated with it are currently available in the application. Usually, this area allows for various exposure adjustments. You can use the DJI Pilot App to change exposure settings.
If you close AirHUD™ or leave it running in the background for a period of time, you may experience a delay when the camera feed appears on the controller or headset upon returning to AirHUD™. To prevent any inconvenience, we recommend ensuring that all necessary adjustments are made prior to using AirHUD™.